Easy Homemade Poultry Broth Recipe
If you ask me, there’s nothing quite like biting into a slice of freshly baked banana bread. It’s the kind of comfort food that somehow warms your hands, your heart, and even your soul. I’ve made countless banana breads over the years, but the one that keeps us coming back is this moist zucchini banana bread topped with a luscious glaze. It’s just as good for a quick breakfast as it is for afternoon coffee with friends. The smell alone—rich bananas, tender zucchini, and warm cinnamon—fills my entire house and makes everyone gather in the kitchen. Plus, it’s so easy to toss together on busy nights, and honestly, my kids ask for this all the time. I love that I can sneak in some veggies without them suspecting a thing. Trust me, once you try this, it’ll become a staple. And because it’s made with ingredients most of us already have on hand, you’ll want to keep this recipe in your back pocket for the next time sweet cravings hit at 10 pm. It’s one of those keeps-me-sane kind of recipes, you know?
What is Moist Zucchini Banana Bread?
Think of this as a cozy twist on classic banana bread—extra moist, a little healthier, and topped with a sweet, shiny glaze. The magic lies in the zucchini—yes, that humble vegetable that we usually sneak into pasta sauces or fritters—it actually keeps the bread super tender and moist, even days after baking. The name might sound fancy, but it’s really just a simple loaf that comes together easily, making it perfect for busy mornings or lazy weekends. It’s essentially a mash-up of ripe bananas and shredded zucchini folded into a batter with warm spices, then baked to golden perfection. When you slice into it, you get this lovely marbled look from the swirling of batter and filling, plus that delightful smell that makes everyone stop what they’re doing and head straight to the kitchen. The glaze adds the perfect touch of sweetness and a glossy finish that makes this bread feel a little fancy, even if it’s totally homemade.
Why you’ll love this recipe?
Okay, I know I say this about a lot of my recipes, but this one’s really special. What I love most about this is how it combines taste, ease, and a little bit of nutrition without feeling like a health food rebel. First off, flavor: the bananas give it that signature sweet, caramelized hint, while the zucchini adds moisture and a subtle freshness that balances everything out. The cinnamon and vanilla sprinkle in a cozy warmth that makes my house smell incredible. It’s basically a hug in baked form.
Second, the simplicity. I’ve tested this recipe with just about every ingredient change and it never fails. Whisk everything in one bowl, fold in the filling, pop it in the oven, and you’re golden. No complicated steps or fancy equipment needed. Plus, it’s budget-friendly—most of the ingredients are pantry staples—and you can cut corners without ruining the texture or flavor.
And for versatility, I like to think of this bread as a blank canvas. Have extra chocolate chips? Toss them in. Want to make it dairy-free? Almond or oat milk work beautifully. Need it gluten-free? Just swap out the flour, and you’re good to go. My kids actually ask for this all the time, and I love that it’s a way to sneak a little extra veg into their diet without fuss. Plus, the glaze? It’s such a nice little finishing touch that elevates this from everyday to special. All in all, it’s a recipe I keep coming back to, and I know you will too once you see how easy and delicious it is!
How do I make Moist Zucchini Banana Bread?
Quick Overview
Make no mistake, this zucchini banana bread comes together so easily—almost like a little kitchen magic. You start by grating the zucchini and mashing the bananas, then mix everything in one large bowl. The batter is really forgiving—if you overmix slightly, it’s still moist and tender. The filling gets layered right into the batter before baking, creating this pretty marbled effect. Once baked and cooled just a bit, you pour on the sweet glaze, which makes the top shiny and irresistible. This method keeps things simple but results in a beautifully textured loaf that’s moist with every bite. It’s perfect for when you want something sweet but don’t want to spend hours in the kitchen.
Ingredients
For the Main Batter:
– 2 ripe bananas, mashed (the browner, the better!)—they add sweetness and moisture.
– 1 cup shredded zucchini (about 1 medium zucchini)—squeeze out excess moisture to prevent sogginess.
– 2 cups all-purpose flour (or gluten-free blend if you prefer)—don’t overmeasure; spoon and level to keep it light.
– 1 teaspoon baking soda—gives the bread a good lift.
– 1 teaspoon baking powder—paired with baking soda for fluffiness.
– 1 teaspoon ground cinnamon—adds warm, cozy flavor.
– ½ teaspoon salt—brings out the sweetness.
– ½ cup sugar—or adjust to taste if you like it less sweet.
– ½ cup vegetable oil or melted coconut oil—trust me, this makes it super moist.
– 2 large eggs—bind everything together.
– 1 teaspoon vanilla extract—for a hint of warmth and depth.
For the Filling:
– ½ cup chopped walnuts or chocolate chips—optional but adds a lovely crunch or extra sweetness.
– ¼ cup brown sugar (or coconut sugar)—for a caramel note when layered.
For the Glaze:
– 1 cup powdered sugar
– 2-3 tablespoons milk (dairy or plant-based)
– ½ teaspoon vanilla
– A splash of lemon juice for brightness (optional, but my secret weapon).
– Add more milk or sugar for desired consistency.
Step-by-Step Instructions
Step 1: Preheat & Prep Pan
First, I always start by preheating my oven to 350°F (175°C). Butter or line a standard 9×5-inch loaf pan with parchment paper—I find that parchment makes for the easiest cleanup and neat slices. If you want a crusty top, a little butter brushed on the top before baking works wonders. Trust me on this, don’t skip greasing or lining!
Step 2: Mix Dry Ingredients
In a big mixing bowl, whisk together the flour, baking soda, baking powder, cinnamon, and salt. This step is so important because it evenly distributes the leavening agents and spices. When you whisk, the batter rises beautifully, and you avoid clumps.
Step 3: Mix Wet Ingredients
In another bowl, mash those bananas until smooth—there’s something satisfying about doing it with a fork, and I always do this right over the sink in case of spills. Then, whisk in the eggs, oil, vanilla, and sugar. It should look silky and slightly frothy. I’ve tested this with almond milk instead of oil, and it actually made it even creamier—so feel free to experiment!
Step 4: Combine
Pour the wet mixture into the dry ingredients — but don’t overmix! A few lumps are okay. Fold in the shredded zucchini gently. Overmixing can make the bread dense, so be tender. If you see your batter is looking a little stiff, add a splash of milk to loosen it up just enough for easy folding.
Step 5: Prepare Filling
If you’re using chopped nuts or chocolate chips, toss them with a teaspoon of flour before folding them into the batter—this keeps them from sinking. Mix brown sugar and optional chopped nuts for the filling, then layer it into the batter later.
Step 6: Layer & Swirl
Pour half of the batter into the loaf pan, then sprinkle the filling evenly across the top. Cover with the remaining batter and gently swirl with a skewer or knife to create a marbled effect. The visual swirl adds a gorgeous look and a surprise of flavor in every bite.
Step 7: Bake
Bake at 350°F (175°C) for 50-60 minutes. Check doneness with a toothpick inserted in the center—if it comes out clean, you’re ready. If it’s still damp, pop it back in for ten-minute intervals. Every oven is different, so I always start checking around the 45-minute mark.
Step 8: Cool & Glaze
Let the bread cool in the pan for about 10 minutes, then transfer to a wire rack. Once it’s just warm or cooled, pour the glaze right over the top. The heat helps it spread out evenly and soak in a little—bonus points for aroma! I love glazing it while slightly warm because the glaze sets beautifully.
Step 9: Slice & Serve
Use a serrated knife for clean slices—don’t press down too hard or you’ll squish the soft insides. This is fantastic warm with a pat of butter or topped with cream cheese for extra indulgence. Serve it with fresh fruit or coffee and enjoy the magic you just created!
What to Serve It With
This zucchini banana bread is so versatile, I often serve it differently depending on the occasion. For breakfast, I like pairing it with a strong cup of coffee or a mug of herbal tea and maybe some fresh berries on the side. It’s perfect toasted the next day with a schmear of butter or honey—my kids love it that way. On weekends, I cut thick slices and serve with yogurt and a drizzle of honey for brunch. When it’s dessert time, I sometimes add a dollop of whipped cream or a scoop of vanilla ice cream, especially if I’ve been generous with the chocolate chips. And for those cozy nights, a simple cup of hot cocoa alongside a warm slice feels like a big hug in every bite. Honestly, I’ve made this for picnics, potlucks, and even as a last-minute gift—everyone always asks for the recipe. It’s just one of those things that makes people smile, and I love that it’s as easy as it is delicious.
Top Tips for Perfecting Your Moist Zucchini Banana Bread
I’ve learned a few tricks over the years that make this bread come out just right every time. First, prep your zucchini thoroughly: I always squeeze out as much moisture as I can after shredding—it prevents sogginess and ensures the bread holds its structure. My secret is to leave the shredded zucchini in a clean towel for a few minutes, pressing out excess water. When mixing, avoid overworking the batter. I see so many recipes turn dense because of overmixing. Mix until just combined—remember, some lumps are good! To make the swirl look even better, I like to gently drag a skewer through the batter in zigzag motions, creating lovely marbled patterns. If I want to switch it up, I’ve tested adding chocolate chunks instead of walnuts or using maple syrup instead of sugar, which gives a lovely caramel flavor. Adjust baking time as needed—my oven tends to bake a little fast, so I keep a close eye and check with a toothpick. The glaze is also forgiving; if you want it thicker, add more powdered sugar, or loosen it up with a splash of milk. Trust me, once you master these small tips, every loaf will turn out perfect and beautifully moist. It’s all about patience, gentle handling, and a little love in the kitchen.
Storing and Reheating Tips
This bread stays moist and delicious for days—if it lasts that long! Keep leftovers at room temperature, wrapped tightly in plastic wrap or stored in an airtight container. I usually keep it on the counter for up to two days; after that, I pop it in the fridge—just make sure it’s well-wrapped so it doesn’t dry out. Reheating slices in the microwave for about 15-20 seconds makes it taste just baked. If you want to keep it longer, the freezer is your friend. Wrap slices individually in plastic wrap, then store in a freezer bag for up to three months. To thaw, leave it out at room temperature or warm it up briefly in the microwave. As for the glaze, I usually add that just before serving if I’m making it ahead; otherwise, it gets a little soft after a day or two. I find that the bread is best enjoyed fresh, but with proper storage, it still tastes incredible days later. Just remember—warm slices with a drizzle of glaze are the way to go for that just-baked feeling!
Frequently Asked Questions
Final Thoughts
This moist zucchini banana bread is one of those recipes I find myself making over and over. It’s simple, forgiving, and packed with flavor—plus, the sneaky addition of zucchini keeps it wonderfully moist and tender. Every time I bake this, I feel like I’m passing along a little piece of comfort, and honestly, it never lasts more than a couple of days around my house. It’s perfect for lazy mornings, cozy afternoons, or even as a last-minute gift for a friend. If you’re hesitant about adding zucchini, don’t be—trust me, it’ll be your secret ingredient that everyone loves. Plus, it’s a great way to get the kids to eat a vegetable without a fuss. So next time you’re craving something sweet, give this a try. I’d love to hear how yours turns out—leave a comment or share your tweaks! Happy baking, and enjoy every moist, flavorful bite.
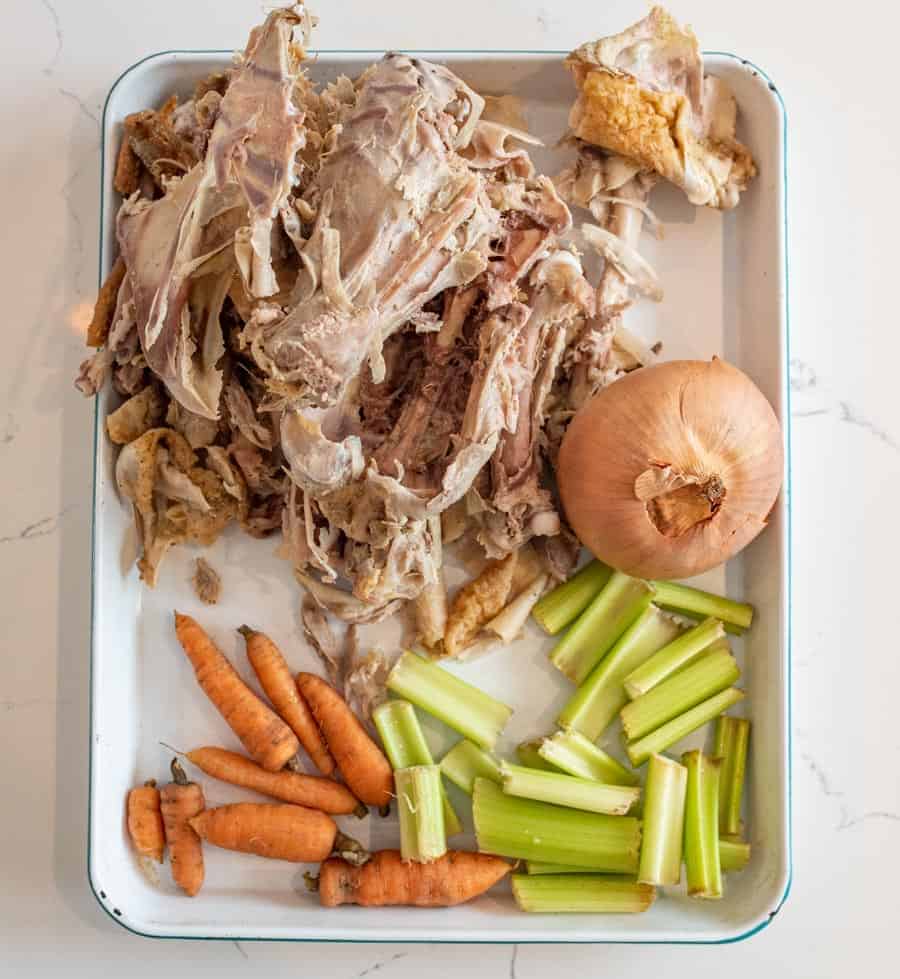
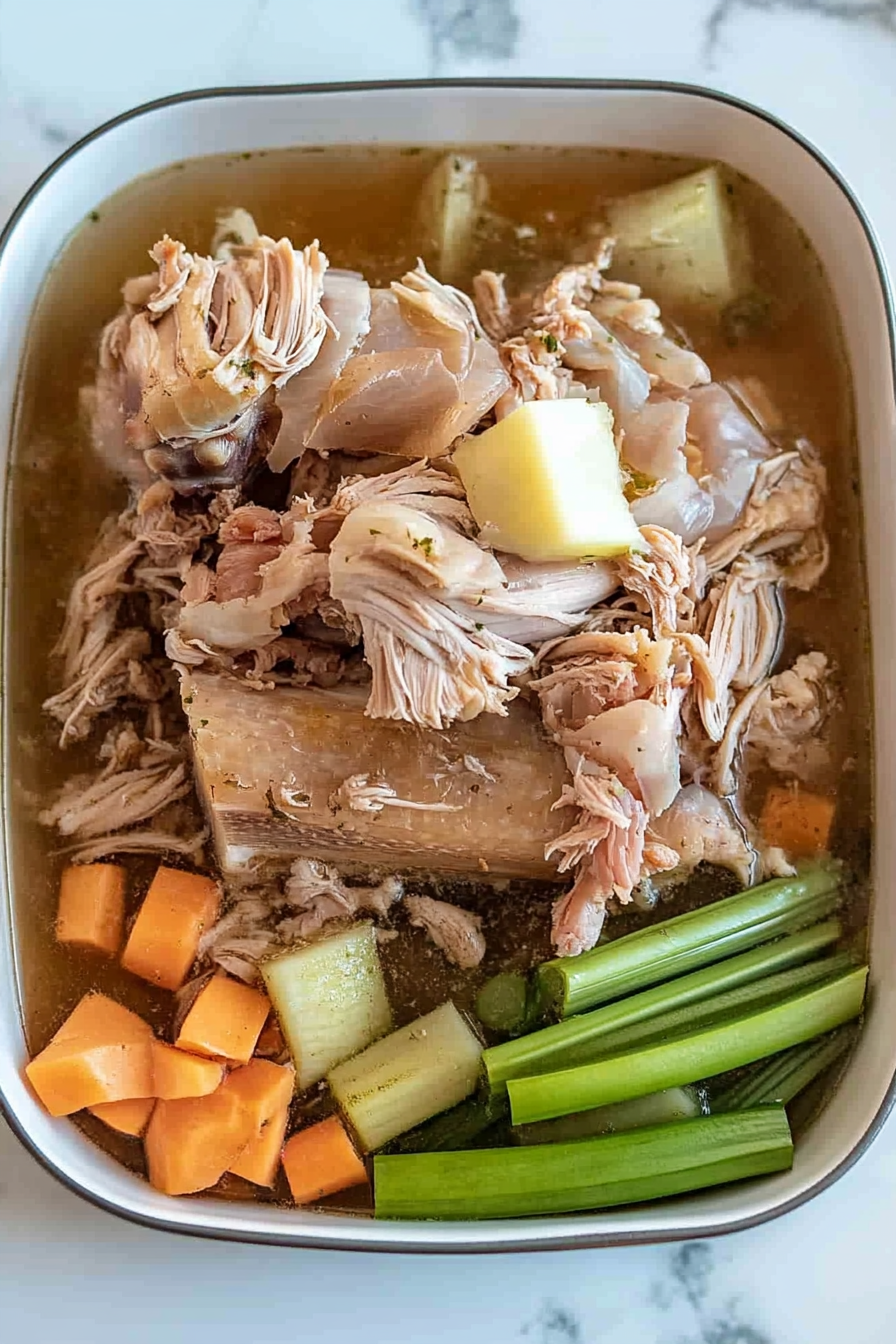
poultry broth
Ingredients
Method
- Wash and chop the vegetables into large pieces; no need to peel or remove leaves.
- Add the bones, vegetables, bay leaves, garlic, vinegar, and water into a large stockpot or pressure cooker.
- Bring to a boil, then reduce to a simmer or close the pressure cooker with the lid, setting it to high pressure and cooking for 4 hours.
- Allow the pressure to release naturally, then strain the broth through a colander into a bowl or container.
- Cool the broth in the refrigerator for several hours or overnight. Remove excess fat if desired.
- Store in airtight containers for up to 3 months in the freezer or 3-5 days in the fridge.
- Use as a base for soups, stews, or as a nourishing drink.