Easy Samoa Cheesecake Without Baking
There’s something about waking up to the smell of freshly baked cake that instantly puts everyone in a good mood. I remember my grandma’s kitchen filled with the sweet, comforting aroma of this zucchini upside-down cake — it’s one of those recipes that feels like a cozy hug in dessert form. Believe it or not, this cake is a sneaky way to get kids and picky eaters to enjoy their vegetables, all wrapped up in a buttery, tender crumb with a caramelized topping that’s totally addictive. It’s sort of like pineapple upside-down cake’s healthier cousin, but with a secret veggie twist that makes it feel a little more adventurous. I always do this when I want the house to smell incredible, or when I need a dessert that’s easy, quick, and totally crowd-pleasing. Honestly, I’ve made this so many times — from lazy weekends to last-minute get-togethers — and it’s literally disappeared in minutes at my house. Plus, I’ve learned a few tricks along the way that I can’t wait to share. Trust me on this one… it’s going to become a family favorite that you’ll make over and over!
What is a Zucchini Upside Down Cake?
Think of this cake as a beautiful marriage between a caramel-topped fruit tart and a moist, tender breakfast cake — but all baked into one delicious layer. It’s essentially a upside-down cake, where the sweet, caramelized layer with zucchini and maybe a hint of cinnamon sits on the bottom while the batter bakes on top. When you flip it out, voila! A stunning, slightly rustic cake with glossy caramelized zucchini slices peeking out. The name might sound fancy, but it’s really just a clever way to showcase zucchini — that humble vegetable that most of us either love or try to sneak into recipes. This dish is a perfect way to stretch a swimsuit-friendly veggie into something sweet and satisfying, especially for those who aren’t quite sold on zucchini as “dessert material” — yet. I love how versatile it is, and how every bite is a little surprise of ooey-gooey caramel and tender, subtly sweet zucchini. It’s cozy comfort food, but also a touch elegant, making it a fantastic choice for everything from brunch to a light dessert.
Why you’ll love this recipe?
Honestly, what I love most about this zucchini upside-down cake is its simplicity — you don’t need any fancy equipment or obscure ingredients. Just a handful of pantry staples, a zucchini or two, and some patience while it bakes. It’s the kind of recipe that’s perfect when you want something sweet but don’t want to fuss in the kitchen for hours. Plus, the flavor? Pure magic. The caramel turns a deep amber, coating each zucchini slice with that irresistible rich sweetness. The cake itself is moist, quick to mix, and forgiving enough that even if you’re a newbie, you’ll get excellent results every time. And don’t be fooled — it’s budget-friendly, too. Most of the ingredients are staples I keep on hand, so I can whip this up whenever friends are coming over or I need a last-minute treat. What I also love is how adaptable it is: you can add a dash of vanilla, sprinkle chopped nuts on top, or swap in a brown sugar and maple combo. It’s a warm hug and an impressive centerpiece, all in one.
My kids ask for this all the time, and honestly, I don’t mind baking it because it’s simple enough to do with the little helpers in the kitchen. The smell alone — like toasted butter, caramel, and sweet zucchini — practically beckons everyone into the kitchen. It’s comfort food with a bit of a sneaky veggie punch, and I promise, once you try it, you’ll find yourself making it on repeat. Trust me: this cake isn’t just delicious — it’s heartfelt, cozy, and totally addictive. Once you get the hang of it, I bet you’ll have your own favorite tweaks and tricks to make it even more special. That’s the beauty of a good recipe — it becomes part of your family’s story.
How do I make Zucchini cake upside down?
Quick Overview
This cake is as easy as a quick caramel prep followed by mixing a simple batter, layering everything in the pan, and baking. The key is getting that caramel and zucchini layer just right — you want it rich and sticky, but not burned. The batter comes together in a flash, mostly whisking together a handful of pantry ingredients. Pour the batter over the caramelized zucchini, bake until golden, then flip! It’s a straightforward process, but every step is crucial to achieving that perfect gooey topping and moist crumb. What makes this special is how forgiving it is: even if your caramel isn’t perfectly smooth, or you overmix a bit, it still turns out gorgeous. It’s basically foolproof — just trust the process, and watch magic happen in your oven.
Ingredients
For the Caramelized Zucchini Layer:
– 2 medium zucchinis, sliced into rounds or half-moons (I like the half-moon for presentation)
– 1/2 cup packed brown sugar
– 1/4 cup unsalted butter
– 1 teaspoon vanilla extract
– A pinch of salt
– Optional: sprinkle of cinnamon or nutmeg for added warmth
For the Cake Batter:
– 1 1/2 cups all-purpose flour (I tested with almond flour and it made it even creamier, so feel free to experiment!)
– 1 teaspoon baking powder
– 1/2 teaspoon baking soda
– 1/4 teaspoon salt
– 1/2 cup granulated sugar
– 1/2 cup packed brown sugar
– 1/2 cup vegetable oil or melted butter
– 2 large eggs
– 1 teaspoon vanilla extract
– 1/2 cup buttermilk or whole milk (or almond milk — I’ve tried both and loved the tender crumb)
– Optional: a pinch of cinnamon or a dash of nutmeg for warmth
For the Glaze (optional but highly recommended):
– 1/2 cup powdered sugar
– 1-2 tablespoons milk or cream
– A splash of vanilla or a sprinkle of cinnamon for flavor
Step-by-Step Instructions
Step 1: Preheat & Prep Pan
Set your oven to 350°F (175°C) and grease a 9-inch round cake pan or springform. Line the bottom with parchment paper if you like, just to make flipping easier. Ready your zucchini slices, and have your ingredients close by — this recipe is quick to assemble once you start!
Step 2: Make the Caramel Layer
In a small saucepan, melt the butter over medium heat. Stir in the brown sugar until it dissolves and becomes bubbly — about 2-3 minutes. Remove from heat and stir in vanilla, salt, and any spices you like. Pour this warm caramel mixture into the pan, spreading it evenly across the bottom. Arrange the zucchini slices neatly on top, overlapping slightly if needed. This layer should be sticky and fragrant — don’t rush this step; it sets the flavor tone for the whole cake.
Step 3: Prepare the Batter
In a large bowl, whisk together the flour, baking powder, baking soda, salt, and spices. In another bowl, beat the eggs with the sugars, oil, and vanilla until well combined. Mix in the milk until smooth. Pour the wet ingredients into the dry and fold gently — don’t overmix! You want a batter that’s just combined; overmixing can make it dense instead of tender.
Step 4: Assemble & Bake
Pour the batter gently over the zucchini in the pan, smoothing the top with a spatula. Place in the oven and bake for about 35-40 minutes, or until a toothpick inserted in the center comes out clean and the top is golden. Keep an eye on the edges; if they brown too quickly, tent with foil.
Step 5: Cool & Flip
Let the cake cool in the pan for about 15 minutes. Then, carefully run a knife around the edges to loosen it, and flip the cake onto a serving plate. Be gentle — the caramel will be sticky, and you don’t want to break the topping. If some zucchini sticks or caramel drips, don’t worry. That’s part of the charm!
Step 6: Glaze & Serve
If you’re using the glaze, mix together the powdered sugar with milk and vanilla until smooth. Drizzle it over the warm cake for a glossy finish. Serve slices slightly warm or at room temperature — either way, it’s luscious. My personal favorite is with a dollop of whipped cream or a scoop of vanilla ice cream on the side — perfect for that sweet, creamy contrast.
Step 7: Enjoy!
This cake is best enjoyed the day it’s made, but it’ll keep nicely for a day or two if covered tightly. Just reheat a slice in the microwave for a few seconds or warm it gently in the oven to revive that fresh-baked feel. Honestly, I think it’s even better the next day because the flavors meld beautifully overnight — talk about a cozy breakfast or a lazy afternoon treat!
What to Serve It With
This zucchini upside-down cake is wonderfully versatile and makes a lovely addition to many occasions. For breakfast, I love pairing a warm slice with a strong cup of coffee or a glass of fresh orange juice. I’ve even served slices with a smear of mascarpone or a drizzle of honey for a slightly more refined brunch. It’s great on its own after dinner, served warm with a scoop of vanilla ice cream melting over the top, or dusted lightly with powdered sugar for a charming, rustic look. When I want something extra cozy, I’ll add a handful of toasted nuts or a sprinkle of cinnamon on top — it’s amazing how small touches make all the difference. Trust me, this cake has a way of turning regular afternoons into special moments, especially when shared with loved ones gathered around the table.
Top Tips for Perfecting Your Zucchini Upside-Down Cake
Over the years, I’ve picked up a few tricks to make this cake turn out just right every time. First, zucchini is naturally moist, so I always salt and squeeze out excess water before slicing — it prevents the cake from becoming too watery or soggy. I’ve tried refrigerating the zucchini slices beforehand, which helps them stay firm during baking. When making the caramel, don’t rush — patience makes a deep, rich color, not burnt bitterness. Also, layering the zucchini neatly on the caramel base makes for a beautiful presentation; I like overlapping the slices in a circular pattern. A little tip for the batter: don’t overmix — the goal is just to combine everything until it’s smooth. I often add a dash of cinnamon or nutmeg in the batter for warmth; it complements the caramel and zucchini perfectly. If you want to make this gluten-free, swap in almond or oat flour, but reduce the liquid slightly — it’s still fantastic. Baking times can vary depending on your oven, so start checking at around 35 minutes. And finally, don’t skip the glaze — it adds a lovely sweet gloss and flavor boost. I’ve learned that adjusting the amount of sugar can turn this from mildly sweet to a real caramel lover’s dream. Play around with the toppings—sometimes I sprinkle sea salt on the caramel layer before pouring the batter, and it creates a perfect sweet-salty combo. This recipe’s really forgiving, and once you get the hang of it, you’ll be customizing it to your heart’s content. I’ve made it with apples, pears, and even pumpkin — all delicious variations! The key is to keep tasting and adjusting as you go.
Storing and Reheating Tips
Leftovers? No problem. This cake actually keeps quite well for about 2 days at room temperature, covered with a clean towel or foil. Just make sure it’s not in direct sunlight or too warm — the caramel can soften or get sticky. If you want to keep it longer, pop it into an airtight container and store in the fridge for up to 3 days. It’s surprisingly good cold — I’ve even enjoyed slices straight from the fridge! To reheat, warm a slice gently in the microwave for about 15-20 seconds, just enough to bring back that cozy warmth. If you prefer, you can warm the whole cake in a low oven (around 300°F / 150°C) for 10-15 minutes. If you’ve glazed it, it’s best to wait until right before serving to add the glaze — this keeps it shiny and fresh. Freezing is also an option: wrap tightly with plastic wrap and foil, and store for up to 3 months. When ready to enjoy, thaw overnight in the fridge and reheat gently. My trick is to reheat just enough that the caramel topping is gooey again — it makes each bite feel freshly baked. Remember, the flavor deepens after a little rest, so don’t be afraid to make this a day ahead. It’s a forgiving dessert that’s perfect for planning ahead and still tasting fabulous.
Frequently Asked Questions
Final Thoughts
This zucchini upside-down cake has become a staple in my home, especially during seasons when zucchini is abundantly fresh and cheap. It’s a great way to celebrate simple ingredients and turn them into something truly special. Every time I make it, I’m reminded how food can evoke nostalgia — that warm, sweet smell instantly transports me back to lazy Sunday mornings and family gatherings. It’s one of those recipes that feels cozy and fancy at the same time, and I love how adaptable it is. You can tweak the spices, work with different fruits, or add your own personal touch. The best part? Each slice is a confidence booster, a little slice of happiness you baked yourself! So grab those zucchinis, gather your ingredients, and give this recipe a try. I can’t wait to hear how yours turns out — happy baking!
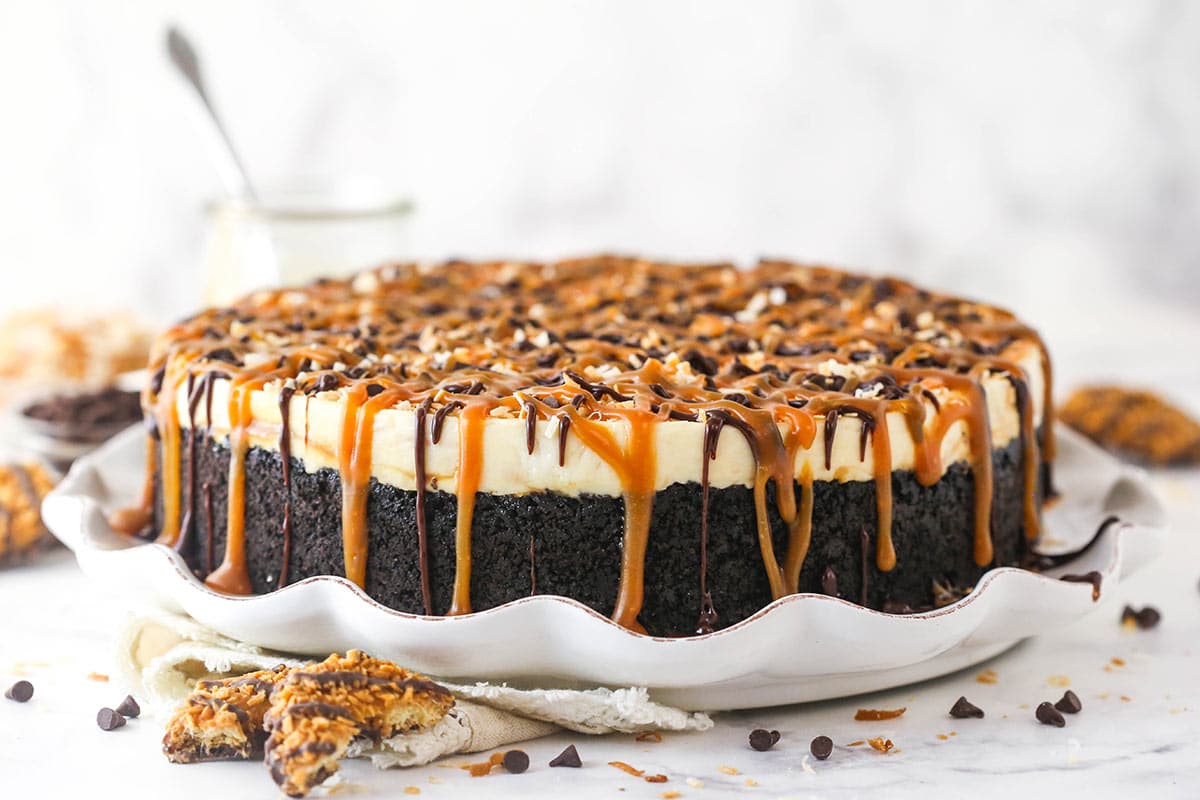
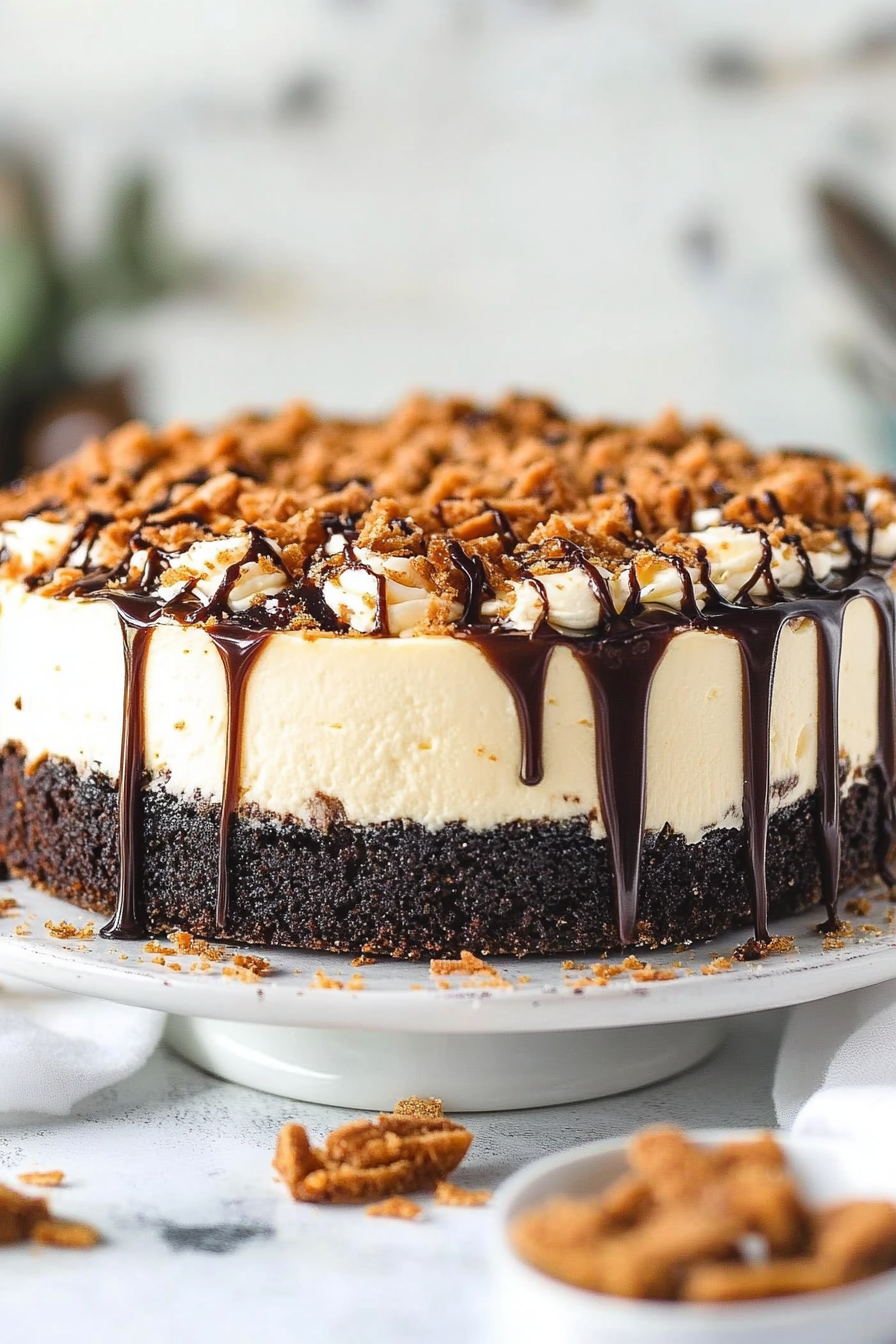
Samoa Cheesecake
Ingredients
Method
- Line a 9-inch springform pan with parchment paper and grease the sides.
- Mix Oreo crumbs with melted butter and press into the bottom of the prepared pan to form the crust. Chill while preparing the filling.
- In a large bowl, beat cream cheese, sugar, light brown sugar, vanilla, and coconut extract until smooth.
- Add half of the caramel sauce and mix until combined.
- Fold in broken vanilla wafer cookies and toasted coconut flakes.
- In a separate bowl, whip heavy cream with powdered sugar until stiff peaks form.
- Gradually fold whipped cream into cream cheese mixture until fully combined.
- Pour filling over crust and smooth the top. Drizzle with remaining caramel sauce and swirl gently.
- Refrigerate the cheesecake for at least 4 hours or until set.
- Prepare chocolate ganache by melting semi-sweet chocolate chips with heavy cream and whisk until smooth. Drizzle over set cheesecake.
- Garnish with extra toasted coconut flakes and chocolate chips if desired. Slice and serve.