Peanut Butter Balls How to Make Them Easy
There’s something about spring mornings, sunlight streaming through the windows, that totally puts me in the mood for a comforting slice of coffee cake. I remember watching my grandma bake her famous zucchini bread as a kid, but as I got older, I realized zucchini isn’t just for bread — it’s also perfect for a tender, moist coffee cake that’s practically impossible to resist. This recipe has become a weekend staple in my house. It’s one of those treats that’s equally good for brunch, an afternoon snack, or even a late-night craving. Honestly, I’ve made it so many times I know it by heart, and I love how versatile it is — plus, the little surprise of zucchini keeps it incredibly moist and soft, no matter how many slices we polish off. If you’re looking for something that feels fancy but is actually a breeze to whip up, trust me on this—you’re gonna love it. The smell alone will fill your kitchen with cozy vibes I know you’ll instantly crave. Ready to bake something that my kids ask for all the time? Let’s do this!
What is Zucchini Coffee Cake?
Think of this as a twist on the classic coffee cake, but with a secret ingredient — zucchini! Its name comes straight from the way it’s usually served: alongside coffee in the morning or with tea in the afternoon. It’s essentially a soft, buttery cake topped with a crumbly streusel and a drizzle of glaze, but here’s the kicker: the zucchini melts into the batter, adding moisture and a subtle vegetable sweetness that pairs perfectly with the sweet, cinnamon-spiced flavor. It’s almost like a mash-up of a quick bread and a cake, but the real magic is how effortlessly it all comes together. What I love most about this is how it stays unbelievably moist, even after a couple of days — that’s the zucchini magic. It’s comfort food with a little bit of a health kick, which makes it a win-win in my book. Plus, you get to sneak some veggies into your family’s breakfast routine — nobody ever complains!
Why you’ll love this recipe?
What makes this zucchini coffee cake a favorite of mine?
- Flavor: It’s tender, buttery, with a warm cinnamon-spice kick that makes you want to curl up with a cup of coffee or tea. The zucchini adds a unique, slightly earthy sweetness that balances the sugar beautifully.
- Simplicity: No complicated techniques here — just a handful of ingredients mixing together in one bowl, a swirl of filling, and a quick bake. It’s a perfect weeknight or weekend bake when you want something homemade without the fuss.
- Cost-effective: You probably already have most of what you need in your pantry — flour, sugar, cinnamon, and a couple of zucchinis. That makes this a budget-friendly treat that doesn’t skimp on flavor.
- Versatility: Love pecans or walnuts? Toss them in the streusel! Want to make it gluten-free? Swap in almond or oat flour. Looking for a dairy-free version? I tested it with almond milk and it actually made it even creamier — trust me on this one.
What I love most about this is how it’s a bit nostalgic, like family baking days, but with a little modern twist that keeps it fresh. It’s one of those recipes that makes you feel warm and cozy inside, plus you get to share it with loved ones — what’s better than that?
How to Make Zucchini Coffee Cake
Quick Overview
This zucchini coffee cake comes together in just a few simple steps. Mix the batter until smooth, fold in shredded zucchini, layer half in your prepared pan, sprinkle over the cinnamon-sugar streusel, then swirl the rest of the batter on top. Bake until golden and a toothpick comes out clean. What makes this special is the swirl technique — it creates a beautiful, marbled look and ensures every bite is packed with flavor. The whole process from mixing to baking takes about an hour, and the best part is how forgiving it is — I’ve learned to adjust baking times depending on my oven’s quirks, but it always turns out perfectly tender and moist. This is the kind of baking that fills your kitchen with comforting scents — you’ll want to make it every weekend.
Ingredients
For the Main Batter:
– 2 cups all-purpose flour (or a gluten-free blend if needed) — I like unbleached because it adds a richer flavor.
– 1 cup granulated sugar — feel free to cut back if you want it less sweet.
– 1 teaspoon baking powder
– ½ teaspoon baking soda
– ½ teaspoon salt
– 1 teaspoon ground cinnamon — it’s the secret to that warm, cozy aroma.
– 2 large eggs — room temperature helps with a smoother mix.
– ¾ cup vegetable oil or melted coconut oil — whatever you prefer, I tested both and loved the coconut oil for added flavor.
– 1 teaspoon vanilla extract
– 1 cup shredded zucchini — squeeze out excess moisture, but don’t peel if you want that vibrant green peek in your slices.
For the Filling:
– ¼ cup packed brown sugar
– 1 teaspoon ground cinnamon
– 2 tablespoons butter, melted
– Optional: handful of chopped nuts or a sprinkle of oats for crunch, which is a total game-changer.
For the Glaze:
– ½ cup powdered sugar
– 1-2 teaspoons milk or almond milk
– A dash of vanilla — add more if you want a stronger vanilla hit.
Step-by-Step Instructions
Step 1: Preheat & Prep Pan
Warm your oven to 350°F (175°C). Grease a 9-inch round or square baking pan, or line it with parchment paper for easy removal. I usually lightly spray with non-stick spray and then dust with a tiny bit of flour, just so it doesn’t stick. Get all your ingredients ready — grated zucchini, melted butter, everything within reach. I do this because once I start mixing, I don’t want to stop to hunt things down. Plus, a hot oven makes sure your cake bakes evenly and gets that perfect golden color.
Step 2: Mix Dry Ingredients
In a big bowl, whisk together the flour, sugar, baking powder, baking soda, salt, and cinnamon. This step is super important because it ensures everything is evenly distributed. It’s the foundation of a light, fluffy cake. When I do this right, I never get dense spots or uneven texture — just consistent, tender bites.
Step 3: Mix Wet Ingredients
In a separate bowl, beat the eggs lightly, then add the oil, vanilla, and shredded zucchini. Mix well until it looks a bit creamy. I’ve tested with milk instead of oil, and honestly, it still works great — especially if you want a slightly lighter, more spreadable batter. The zucchini shouldn’t be runny — just moist enough to add that subtle sweetness and moisture. My trick: I always squeeze out excess moisture from the zucchini after shredding to prevent the batter from becoming too soggy.
Step 4: Combine
Pour the wet mixture into the dry ingredients and fold together gently. Don’t overmix — just until everything is combined. Overmixing can make the cake tough, and nobody wants that, especially in a delicate crumb like this. The batter should be thick but pourable. If it feels stiff, a splash of milk can loosen it up.
Step 5: Prepare Filling
Mix the brown sugar, cinnamon, and melted butter until crumbly. If you’re feeling adventurous, throw in some chopped nuts or oats here for extra crunch.
Step 6: Layer & Swirl
Pour half the batter into your prepared pan and spread it out gently. Sprinkle over the cinnamon-sugar filling, then dollop the remaining batter on top. Using a skewer or a butter knife, swirl the batter carefully to create a marbled effect — don’t overdo it, just a few gentle swirls. This pattern looks pretty and makes each slice interesting. It’s like a little chocolate swirl but with cinnamon and zucchini — so tasty!
Step 7: Bake
Pop it in the oven and bake for 35–40 minutes. Use a toothpick inserted in the center; if it comes out clean, it’s ready. Keep an eye on it around the 35-minute mark — ovens vary. If your kitchen runs cool, extend by a few minutes. The top should be golden brown, and your kitchen will smell like cinnamon toast heaven. I’ve learned to cover it loosely with foil if it’s browning too fast, just to prevent burning before it’s baked through.
Step 8: Cool & Glaze
Let the cake cool in the pan for about 10 minutes, then transfer to a wire rack and cool completely before glazing. The glaze needs a little time to thicken up—I like it thick enough to spread easily but still glossy. Drizzle it over the top once the cake is cooled for the prettiest, most inviting look.
Step 9: Slice & Serve
Use a sharp knife to cut into slices — I always wipe it with a warm cloth between cuts for neat edges. This cake is best enjoyed warm or at room temperature. It’s even better the next day, if you can resist! Serve with a cup of coffee or tea, and watch it disappear in minutes at my house. My kids ask for this all the time, and I never get tired of hearing how delicious it is. Definitely makes weekend mornings extra special!
What to Serve It With
This cake is so adaptable, I’ve got a few favorites depending on the occasion:
- For Breakfast: Pair with a strong cup of black coffee or a milky chai tea. I love it with a smear of butter or a dollop of Greek yogurt on the side. It’s wholesome enough to start your day, but rich enough to feel like a treat.
- For Brunch: Serve slices alongside a fresh fruit salad or a cheese platter. A splash of orange juice or sparkling water with a twist of lemon makes everything feel fancy and fresh.
- As Dessert: Warm with a scoop of vanilla ice cream or a dollop of whipped cream. The cinnamon flavor complements vanilla nicely, making your dessert table look professional even if you’re just at home.
- For Cozy Snacks: Cut into smaller squares, and enjoy with a cup of hot cocoa or herbal tea. It’s perfect for snuggling up on cold days or when friends pop over unexpectedly.
Since I’ve started baking this regularly, it’s become a family tradition. my kids ask for it on lazy Sunday mornings, and I love that I can whip it up quickly without missing out on that warm, homemade feel. It’s one of those recipes that makes the house smell amazing and instantly lifts everyone’s spirits!
Top Tips for Perfecting Your Zucchini Coffee Cake
Over the years, I’ve learned a few tricks that make this cake turn out even better:
- Zucchini Prep: Always squeeze out excess moisture after shredding. A soggy cake is no fun, and too much water can lead to a dense crumb. I use a clean kitchen towel or cheesecloth to gently press out the liquid — quick and easy!
- Mixing Advice: Be gentle when folding the wet into the dry. Overmixing can turn the batter dense, so mix until just combined. You want a light, airy texture, not a hockey puck.
- Swirl Technique: Don’t overmix after adding the swirl. A few gentle strokes give you that beautiful marbled look and ensure every bite has a bit of cinnamon goodness.
- Ingredient Swaps: Whole wheat flour works but can slightly alter the texture; use a combination of whole wheat and all-purpose for best results. For a dairy-free version, coconut oil and almond milk work wonderfully. I’ve even tried adding shredded carrots instead of zucchini for a different flavor profile — delicious!
- Baking Tips: Position your oven rack in the middle and keep an eye on the cake in the last 10 minutes. If it starts browning too quickly, tent it with foil. Every oven is different, so trust your toothpick test.
- Glaze Variations: Want a tangy kick? Mix some cream cheese into the glaze. Or, for a citrus twist, add a bit of lemon or orange zest.
Honestly, making this cake a few times has helped me perfect my technique, and I learned to be flexible with ingredients. The key is to keep an eye on the texture and smell — that’s how you know it’s going to turn out amazing.
Storing and Reheating Tips
This cake stays moist and tasty for days, which is part of why I love it so much. Here’s how I keep it fresh:
- Room Temperature: Wrap it tightly with plastic wrap or store in an airtight container. It’ll stay good for 2–3 days, but I always find it best within the first day or two, as the zucchini keeps it really moist.
- Refrigerator: For longer storage, cover and keep in the fridge for up to 5 days. When reheating, a quick 10-15 seconds in the microwave or a few minutes in a low oven works perfectly to bring back the softness.
- Freezing: Wrap slices individually in plastic wrap, then place in a freezer bag. They’ll last up to 3 months. To serve, thaw overnight in the fridge or reheat directly from frozen, wrapped in foil. The texture stays tender, and the flavor remains lovely.
- Glaze Timing: Add the glaze after cooling, so it stays glossy and fresh-looking. If you’re storing the cake for a couple of days, I recommend glazing just before serving for maximum visual appeal.
Trust me, this cake was made for sharing and leftovers taste just as good — if not better — the next day. It’s a real keeper!
Frequently Asked Questions
Final Thoughts
This zucchini coffee cake has become a beloved part of our weekend mornings. It’s a quick, forgiving recipe that never disappoints, thanks to the secret of zucchini—moisture, nutrition, and just a little bit of sneaky healthiness! Every time I bake this, it fills my home with warm cinnamon-scented goodness, and I know I’ve got a real winner on my hands. Whether you’re baking for guests, family brunch, or just a cozy treat for yourself, I promise this will become a go-to in your recipe box. And don’t forget to experiment — try swapping ingredients, adding nuts, or icing it differently. That’s the fun of baking, after all, creating comfort and joy in every slice. Happy baking, and I can’t wait to hear how yours turns out! Drop a comment, share your swaps, or post a photo — I love seeing everyone’s beautiful versions of this cake. Enjoy every delicious crumb!
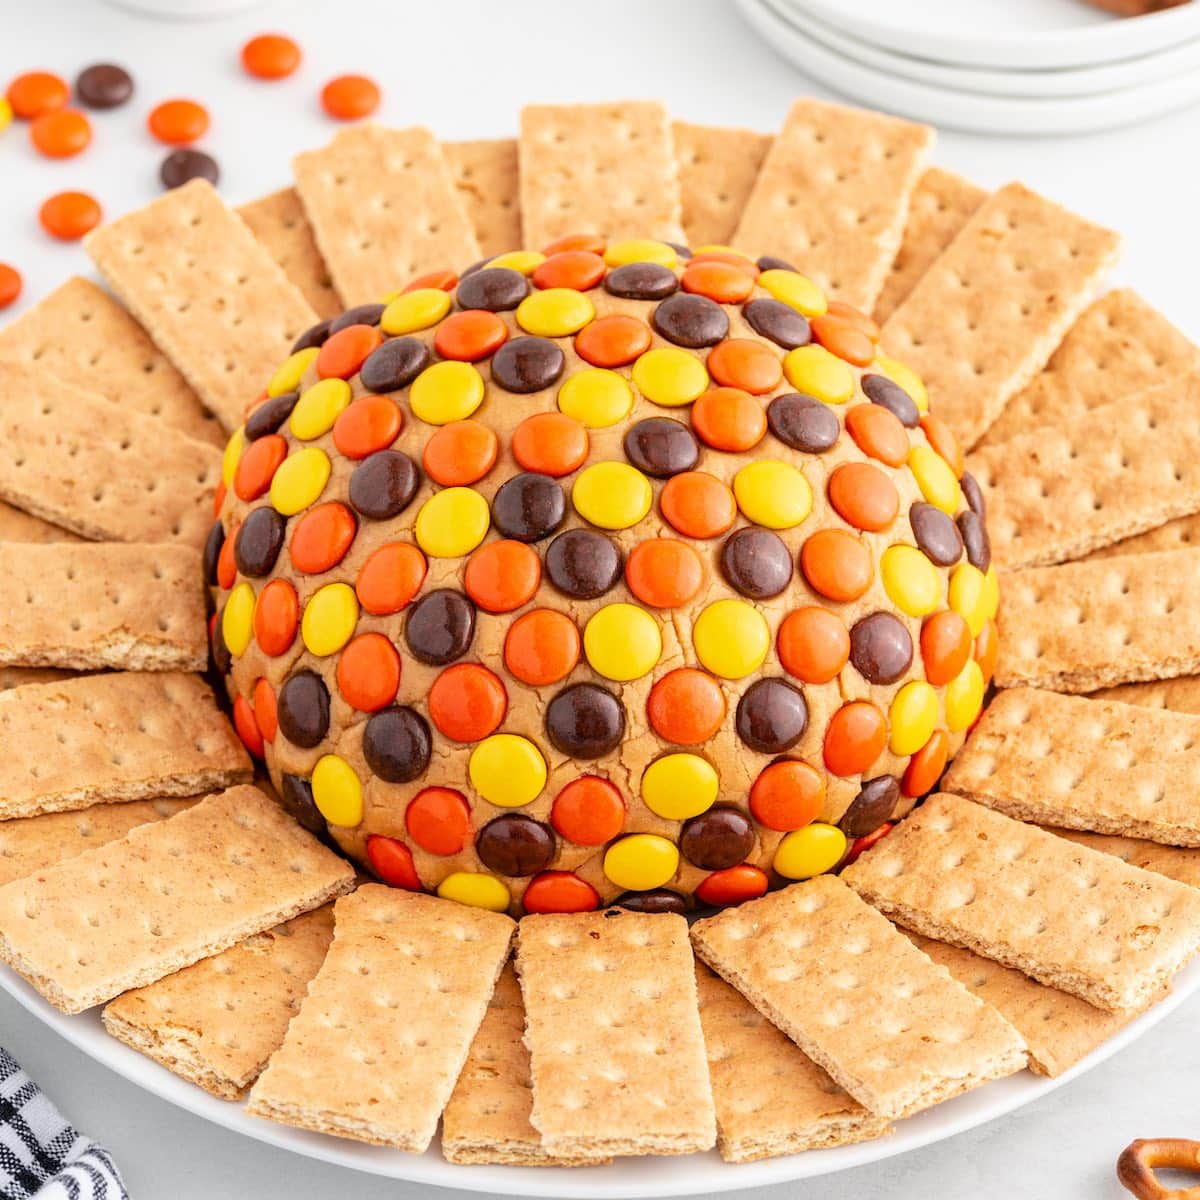
peanut butter balls
Ingredients
Method
- Using a stand mixer or a medium-sized mixing bowl with a handheld mixer, beat the softened cream cheese, peanut butter, and vanilla extract for 1.5-2 minutes until smooth.
- Add the sifted powdered sugar and continue mixing for another 1-1.5 minutes.
- Spoon the mixture onto plastic wrap, shape into a ball, and refrigerate for 2 hours.
- Before serving, unwrap the ball, place on a serving plate, and press Reese’s pieces onto the surface. Arrange graham cracker pieces around it.