Simple Sweet Bourbon Chicken Recipe
There’s something about that smell when I pull this zucchini banana bread out of the oven — it’s like a warm hug on a chilly morning. I remember the first time I made it; my kids were busy raiding the kitchen counter for snacks, and the aroma had everyone wandering into the kitchen, noses twitching with curiosity. Honestly, this recipe is one of those lifesavers on busy nights, or when I need something sweet that’s still kind of healthy. The best part? It’s so forgiving and flexible—my secret weapon for using up those overgrown zucchinis lurking in my garden or the way-too-ripe bananas that nobody wants to eat plain anymore. Trust me, I’ve made this with almond milk, and it made the crumb even creamier — give it a try! It’s a little bit of heaven, baked into every loaf, and it disappears faster than I can say “more, please.” Whether you’re craving a quick snack or a cozy breakfast, this zucchini banana bread is my go-to—and I promise, once you get the hang of it, you’ll be making it weekly, too.
What is Zucchini Banana Bread?
Think of zucchini banana bread as the lovechild of a moist, sweet cake and a hearty vegetable loaf—kind of like a sneaky way to get your kids to eat their greens without hearing any fuss. It’s essentially a bread that’s tender, super flavorful, and boasts that perfect balance of sweetness from ripe bananas and a subtle earthiness from zucchini. The name kind of says it all: zucchini provides moisture and a little nutritional boost, while bananas give it that soft, sweet richness. This isn’t your typical banana bread, though. The addition of zucchini makes it extra moist and adds a hint of freshness that keeps each slice light and airy, even when it’s packed with flavor. Think of it as a cozy weekend bake or a treat you’d happily enjoy with a cup of coffee or tea. It’s one of those recipes that’s great for using up produce, but honestly? It’s so good, I don’t mind making a batch just because I crave that smell filling my house.
Why you’ll love this recipe?
What I love most about this zucchini banana bread is how it combines two of my favorite things — banana bread’s comforting sweetness and the sneaky health benefits of zucchini. The flavor is rich and satisfying without feeling heavy, and every bite bursts with that mellow banana undertone, complemented by a subtle veggie freshness that surprises everyone. Plus, it’s crazy easy to make; I always do this when I need something quick but still want to feel like I’ve baked something special. The ingredients are budget-friendly and simple — no exotic items here, just staples I keep in my pantry and fridge. I’ve tested this with all kinds of tweaks: swapping different flours, adding nuts, or even a handful of chocolate chips to feel like a treat. The versatility is what keeps it interesting. My kids ask for this all the time—usually with a glass of cold milk—and I swear, it’s gotten better every single time I’ve made it. It’s perfect when you’re craving something sweet at 10 p.m. but don’t want to turn on the oven for a full cake. This is a little every-day luxury that feels special — a true comfort food in disguise.
How do you make Zucchini Banana Bread?
Quick Overview
In just a few easy steps, you’ll have a loaf that’s tender, moist, and packed with flavor. First, grate your zucchini and make sure to squeeze out any excess moisture — this keeps the bread from becoming soggy. Then, mash your ripe bananas until smooth; I like to do this by hand to keep some texture. Mix your dry ingredients in one bowl (flour, baking powder, spices), and your wet ingredients (banana, zucchini, eggs, oil, vanilla) in another. Combine them, fold in any extras like nuts or chocolate chips, and then layer everything into a loaf pan. A quick swirl of the batter before baking creates that beautiful marbled look you see in the photos. It’s baked until golden and a toothpick inserted in the center comes out clean. The smell alone will have everyone buzzing by the time it’s cool enough to slice. Trust me, this recipe is foolproof—just keep an eye on your oven, and you’ll be rewarded with a moist, flavorful bread every time.
Ingredients
For the Main Batter:
- 2 cups all-purpose flour (or whole wheat for a healthier twist)
- 1 teaspoon baking soda
- ½ teaspoon baking powder
- ½ teaspoon salt
- 1 teaspoon ground cinnamon (or more if you love that warmth)
- ½ teaspoon nutmeg (optional, but adds lovely depth)
- ¾ cup granulated sugar or honey (for a touch of sweetness)
- ⅓ cup vegetable or olive oil (or applesauce for a lighter version)
- 3 ripe bananas, mashed
- 2 large eggs (or flax eggs for vegan)
- 1 teaspoon vanilla extract
- 1 cup grated zucchini (squeezed dry)
For the Filling (Optional):
- ½ cup chopped nuts (walnuts, pecans, or almonds)
- ½ cup chocolate chips or dried fruit for extra flair
For the Glaze (Optional):
- ½ cup powdered sugar
- 1–2 teaspoons milk or lemon juice to thin out
- Sprinkle of cinnamon or vanilla for added flavor
Step-by-Step Instructions
Step 1: Preheat & Prep Pan
Set your oven to 350°F (175°C). Grease a standard loaf pan with butter or non-stick spray, then lightly flour it or line it with parchment paper. This step matures your patience — don’t skip it, or you might end up with a sticky underside. Make sure your zucchini is grated and squeezed dry before you start; it helps prevent excess moisture, which can make the bread dense. When you’re ready, gather all your ingredients to keep the process smooth.
Step 2: Mix Dry Ingredients
In a medium bowl, whisk together the flour, baking soda, baking powder, salt, cinnamon, and nutmeg. Mixing these first creates an even distribution of leavening agents and spices, which is essential for an even rise and a lovely aroma. I always do this first so I don’t forget and end up overmixing the wet ingredients later — which can cause a dense loaf.
Step 3: Mix Wet Ingredients
In a large bowl, mash the bananas really well — I do this with a fork, but a potato masher works great too. Add the eggs, vanilla, and oil, then stir until smooth. If your bananas are extra ripe, they’ll be super juicy, so I sometimes add a splash of milk to loosen it up. It’s all about getting that velvety batter that’s not too thick or runny. You want to see a nice, even mixture with no streaks of banana hiding out.
Step 4: Combine
Pour the dry ingredients into the wet, then fold gently with a spatula until just combined. Overmixing is the enemy here — it can make the bread dry and tough. You’ll see some streaks of flour, but that’s okay. Just stop mixing when everything looks fairly evenly incorporated. If you’re adding chocolate chips or nuts, toss them in now and fold again to distribute evenly.
Step 5: Prepare Filling
If you’re using the optional filling, sprinkle your chopped nuts or chips onto the batter layer in the pan. For a visual treat, I often swirl a little more plain batter here and there — it creates a pretty marbled effect when sliced. You can also add swirls of nut butter or fruit preserves for extra flavor.
Step 6: Layer & Swirl
Pour half the batter into your prepared loaf pan. Then, add your filling ingredients, followed by the rest of the batter. Use a knife or skewer to gently swirl through the layers, creating beautiful marbled patterns. This little trick makes every piece feel special — like a showstopper for your snack table.
Step 7: Bake
Slide the pan into your preheated oven and bake for 50-60 minutes, or until a toothpick in the center comes out clean. If you notice the top browning too fast, tent it loosely with foil to prevent burning while the inside cooks through. Every oven is a little different — I’ve had mine cook faster or slower depending on the day, so trust your toothpick test above all.
Step 8: Cool & Glaze
Let the bread cool in the pan for about 15 minutes before transferring it to a wire rack. If you want to add a glaze, mix powdered sugar with a splash of milk and drizzle while it’s still warm — the glaze seeps into the cracks and adds an extra touch of sweetness. I love a hint of cinnamon in my glaze for that cozy feeling.
Step 9: Slice & Serve
Use a serrated knife to cut when it’s just cool enough to handle but still a little warm. This keeps the slices neat and prevents tearing. Serve with a pat of butter or a dollop of whipped cream — or just as it is, because really, this loaf is a treat all on its own. My family loves it toasted for breakfast or alongside a glass of cold milk for an afternoon pick-me-up.
What to Serve It With
Oh, this bread is so versatile — I like to think of it as my kitchen chameleon. For breakfast, I slice thick and slather with butter, paired with a strong cup of coffee or tea. It’s also stunning as part of a brunch platter, alongside fresh fruit, yogurt, or a cheese board. For dessert, I like to add a little extra glaze or serve it warm with a scoop of vanilla ice cream. Sometimes, if I’ve made a batch, I keep slices wrapped up for quick snacks — my kids definitely ask for seconds and thirds! It’s fantastic toasted with a smear of almond butter, too. This bread has become a real family favorite, and I love how it feels like a small, wholesome gift in every bite. Plus, it’s a sneaky way to get some veggies in, so I feel good about serving it often.
Top Tips for Perfecting Your Zucchini Banana Bread
After making this so many times, I’ve picked up a few tricks worth sharing. First, don’t skip squeezing out excess moisture from the zucchini. I’ve learned that wet zucchini can turn your bread into a soggy mess — and nobody wants that! Use a clean kitchen towel or paper towels to squeeze out the water after grating. Second, for a super tender crumb, don’t overmix once you combine the dry and wet ingredients; just fold until they’re just combined. Overworking the batter results in a dense loaf. When adding extras like chocolate chips or nuts, toss them in flour first—this keeps them from sinking to the bottom during baking. If you prefer a healthier version, swap half the flour with whole wheat, or replace sugar with mashed dates or honey. Just remember that honey or maple syrup can make the batter a touch wetter, so add an extra tablespoon of flour if needed. When baking, keep an eye on the loaf toward the end—every oven has its quirks. I’ve also found that tenting the top helps prevent burning while waiting for the inside to fully cook. For the glaze, I’ve tested everything from lemon juice to vanilla—to me, a simple powdered sugar glaze with a dash of cinnamon just hits the spot. Trust your senses and don’t be afraid to experiment a little; that’s part of the fun, right?
Storing and Reheating Tips
This bread is best enjoyed fresh but keeps well with a few simple tricks. If you’re planning to eat it within a day or two, keep it wrapped in parchment or foil at room temperature — just don’t leave it in the sun or warm spots, or it might get moldy. For longer storage, pop slices into an airtight container or resealable bag and refrigerate for up to five days. To keep the moisture intact, I recommend gently warming slices in the microwave for about 15 seconds before serving. If you want to stash it away for later, this bread freezes beautifully—double wrap it in plastic, then foil, and it’ll hold for up to three months. Thaw overnight at room temperature or pop slices directly from the freezer into the toaster for a quick, warm snack. If you’ve added glaze, wait until the bread is fully cooled before glazing again — or for the freshest look, drizzle on fresh when you serve it. Reheating not only brings back softness but also revitalizes that irresistible aroma. Just trust your nose — it will tell you when it’s just right.
Frequently Asked Questions
Final Thoughts
This zucchini banana bread has become my family’s little secret (well, not so secret anymore!). It’s a sweet, moist, veggie-packed treat that’s so easy to whip up, you’ll find yourself reaching for the ingredients without a second thought. It’s one of those recipes I keep on repeat because it’s endlessly customizable and honestly, just plain comforting. Whether it’s breakfast, snack time, or a sneaky dessert, this loaf always steals the show. Plus, it’s a great way to use up those garden zucchinis and overripe bananas without wasting a thing. I honestly think you’ll love how the warm aroma fills your kitchen, and how eager everyone is to dig in. Don’t be surprised if this becomes a weekly tradition! Feel free to tweak it—add chocolate chips, nuts, or even a swirl of peanut butter. I’d love to hear how yours turns out, so leave a comment or share your variations. Happy baking, my friend, and enjoy every delicious bite!
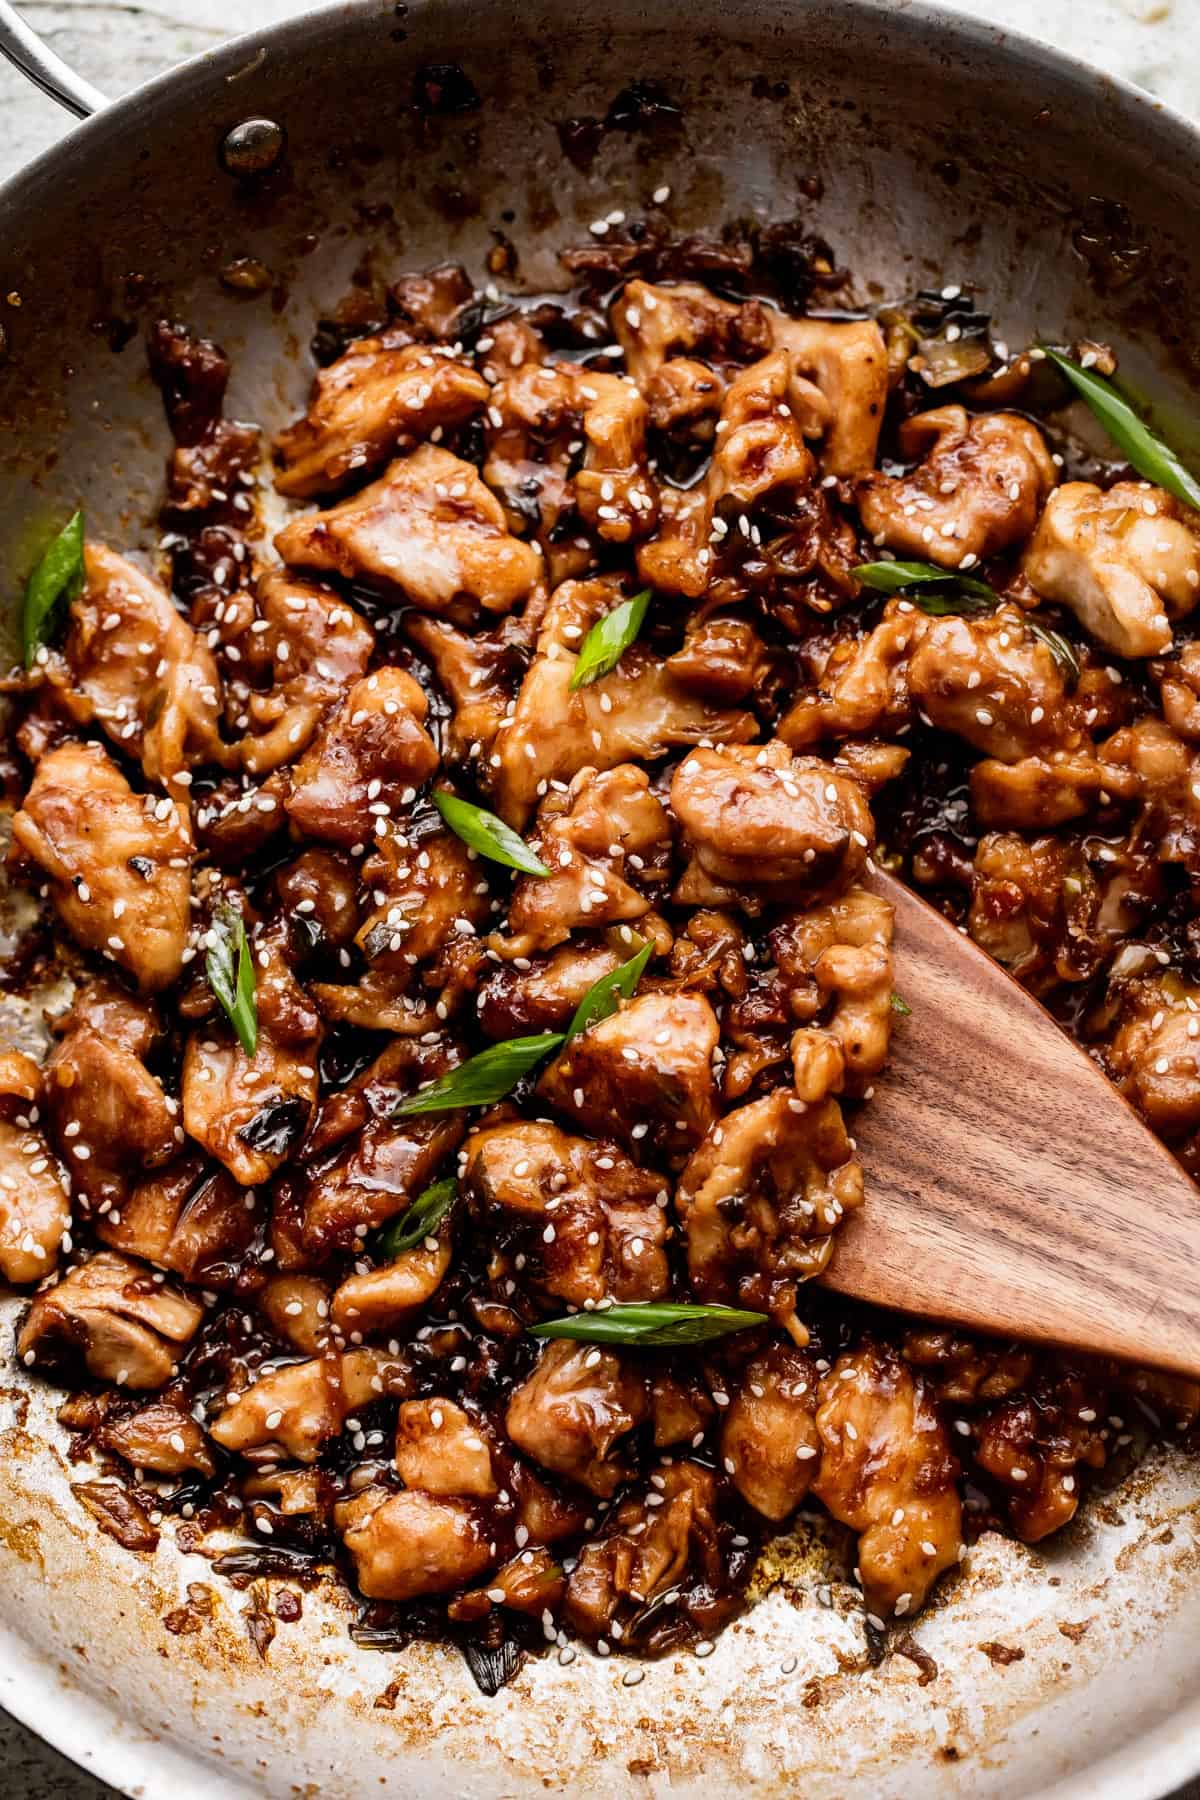
bourbon chicken
Ingredients
Method
- Coat the chicken. In a large mixing bowl, toss the chicken pieces with cornstarch, salt, and pepper.
- Pan-fry the chicken. Heat a wok or a large skillet over medium heat. Add 1 tablespoon vegetable oil to the wok, then add the chicken pieces. Cook for about 6 to 8 minutes until browned and cooked through. Remove from skillet and set aside.
- Sauté the aromatics. Add remaining oil, then sauté scallions for 30 seconds. Add garlic and cook for 20 seconds, stirring frequently.
- Make the sauce. In a bowl, whisk together chicken broth, soy sauce, bourbon, brown sugar, apple juice, apple cider vinegar, and ginger. Pour into the skillet and cook for 3 minutes.
- Combine. Return chicken to skillet, bring to a boil, then reduce heat and simmer for 5-8 minutes until sauce thickens.
- Finish and serve. Garnish with sesame seeds and green onions, serve over rice.