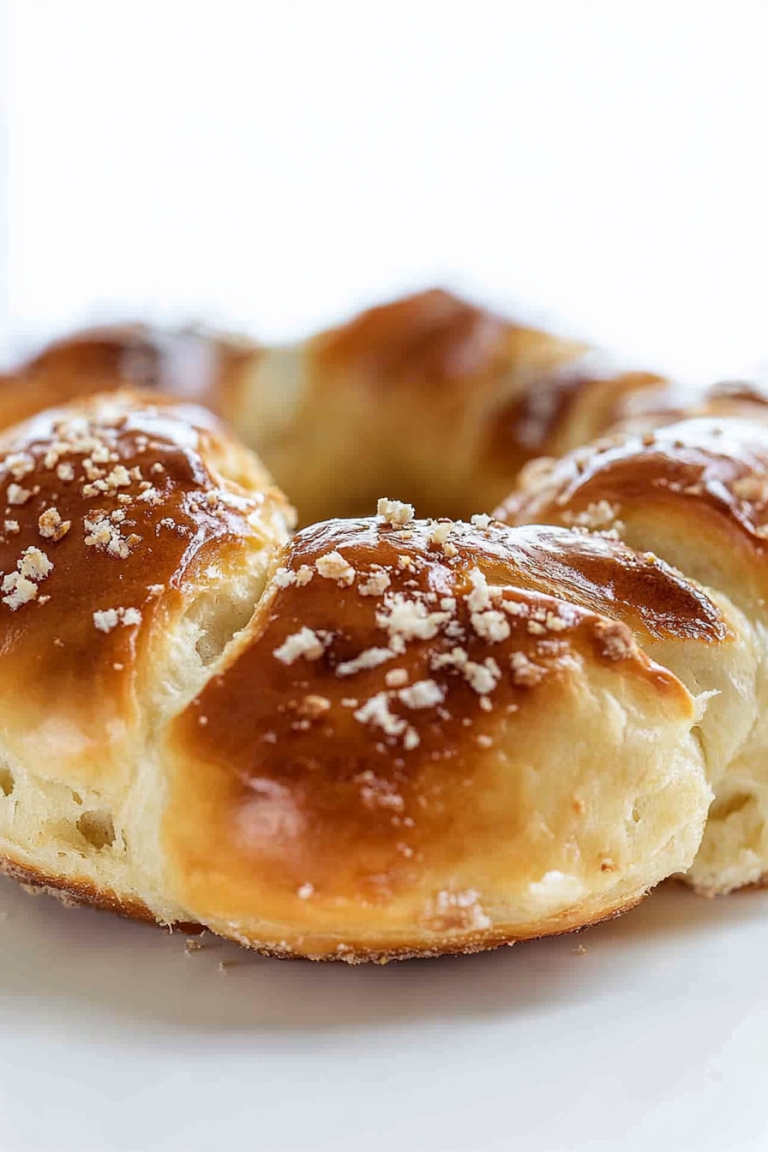
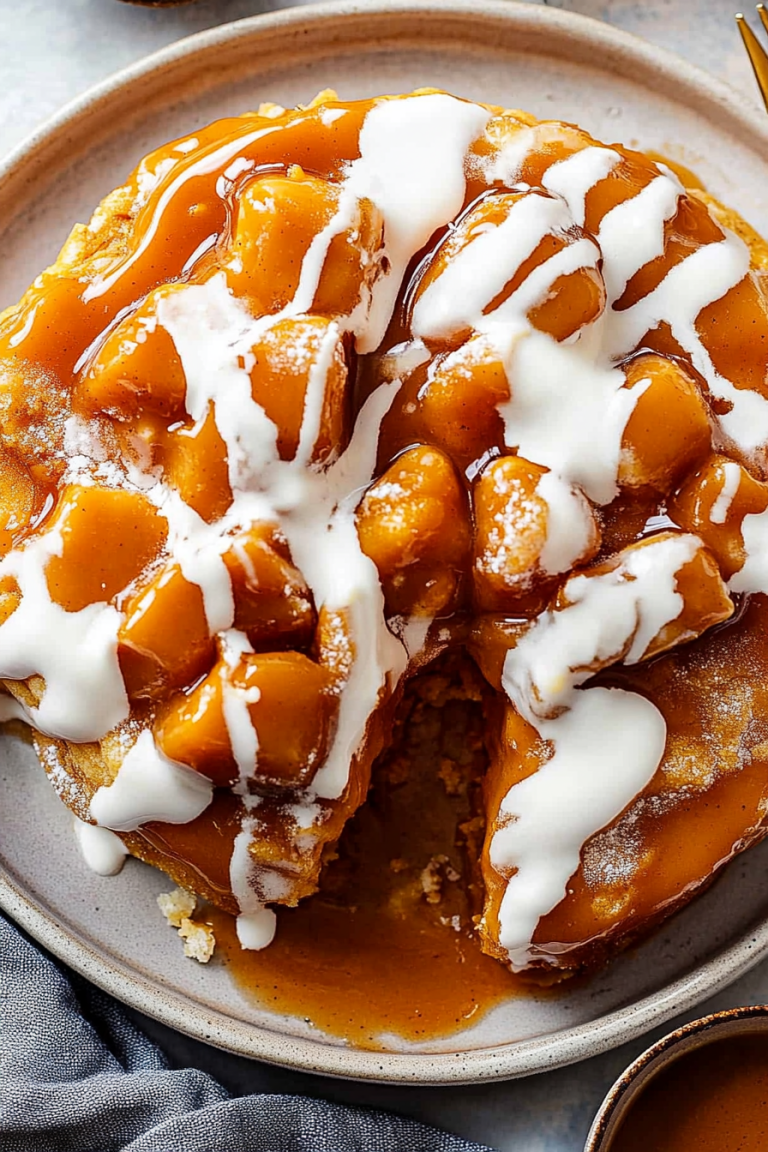
How to Make Sweet Apple Caramel Sauce
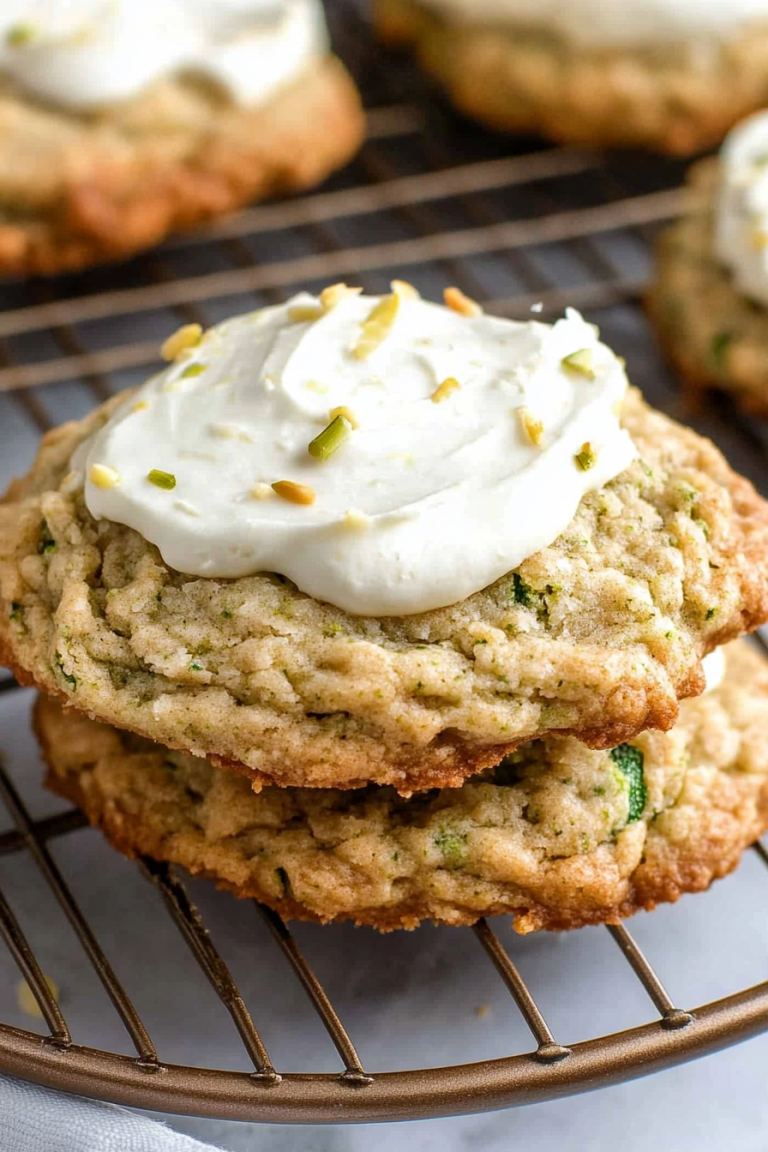
Ever since I was a kid, my grandma’s kitchen has been my sanctuary. The smell of baking bread, the soft hum of her voice telling stories, and the warm glow of the oven—those are the things I hold closest. One of my all-time favorites to make now is this zucchini cinnamon swirl cake. It sounds fancy, I know, but trust me, it’s so simple and incredibly comforting. This one’s a lifesaver on busy nights when I want something homemade without spending hours in the kitchen. Plus, my kids ask for this all the time—especially when I hide a little extra zucchini inside! What I love most about this is how moist and tender it is, with just the right amount of sweetness and that beautiful cinnamon swirl running through. I’ve made this countless times, and every round, it disappears in minutes at my house. If you’ve got zucchini hanging out in your fridge or just want a cozy treat—this is it. Let me share all my tips and tricks so you can make this your new family favorite too!
What is a Zucchini cinnamon swirl cake?
Think of this as a cozy, homey cake that’s packed with hidden veggies—but don’t worry, it’s not overtly healthy-tasting. It’s essentially a moist, tender loaf with a swirl of cinnamon-spiced goodness running through the middle, like those fancy bakery muffins but way better because it’s made with love (and zucchini!). The name might sound sophisticated, but really, it’s just a perfect way to use up that summer zucchini in a fun, nostalgic way. The cake’s texture is similar to a coffee cake—soft and crumbly—while the cinnamon swirl gives it a lovely warm spice punch. I like to think of it as the elegant cousin of those go-to banana bread recipes. Its versatility means you can serve it for breakfast, as a dessert, or even as an afternoon snack. And honestly, I’ve tested this with a handful of variations—whole wheat flour, almond milk—and it always comes out just right.
Why you’ll love this recipe?
What I love most about this zucchini cinnamon swirl cake is how incredibly forgiving it is—perfect for bakers of all levels. The flavor? Oh, it’s a dream—warm cinnamon, sweet, tender zucchini, and just a hint of vanilla that makes every bite comforting. Plus, it’s practically impossible to mess up! You just mix, layer, and bake—done. The ingredients are simple, budget-friendly, and most of us already have everything on hand. And here’s the thing—this cake is supremely versatile. You can add chopped nuts, swap out the cinnamon for almond or cardamom, or even toss in some blueberries. It’s great for breakfast, but honestly, I’ve enjoyed it warm with a dollop of mascarpone or a drizzle of honey for dessert. What I really appreciate is that it’s a clever way to sneak in vegetables without anyone batting an eye—my kids actually ask for seconds, and I smile knowing they’re eating something nutritious. It’s not just delicious; it’s a sneaky healthy hit that everyone in the family loves.
How do I make Zucchini Swirl Cake?
Quick Overview
This cake comes together in a few simple steps—grate your zucchini, mix dry ingredients, then wet, swirl in your cinnamon mixture, layer in the batter, and bake. The key here is not overmixing so the cake stays light and fluffy, and taking your time with the cinnamon swirl to get that beautiful marbled effect. Trust me, once you see it come out of the oven all golden and fragrant, you’ll be hooked. It’s perfect for baking on a lazy afternoon or when you want to have something lovely to share with friends. And since it doesn’t require fancy equipment, anyone can make this from scratch. Best part? You won’t need to wait long—about an hour total, including cooling—and you’ll have a show-stopping treat ready to enjoy!
Ingredients
For the Main Batter:
- 2 cups grated zucchini (about 2 small zucchinis; squeeze out excess moisture)
- 1 1/2 cups all-purpose flour (or half whole wheat for extra nutrition)
- 1/2 cup granulated sugar
- 1/2 teaspoon baking baking powder
- 1/2 teaspoon baking soda
- 1/4 teaspoon salt
- 1 teaspoon ground cinnamon
- 1/2 teaspoon vanilla extract
- 1/2 cup vegetable or melted butter (or coconut oil, if you prefer)
- 3 large eggs
For the Filling:
- 1/4 cup packed brown sugar
- 1 1/2 teaspoons ground cinnamon
- 2 tablespoons melted butter
For the Glaze:
- 1/2 cup powdered sugar
- 2 teaspoons milk (or almond milk)
- Optional: a splash of vanilla or lemon zest for extra flavor
Step-by-Step Instructions
Step 1: Preheat & Prep Pan
Set your oven to 350°F (175°C). Grease a loaf pan or line it with parchment paper. I always do this first so I don’t forget later! If your zucchini is extra juicy, give it a quick squeeze with a paper towel to remove excess water—this keeps the batter from getting too wet.
Step 2: Mix Dry Ingredients
In a large bowl, whisk together the flour, sugar, baking powder, baking soda, salt, and cinnamon. This step ensures everything is evenly distributed and prevents clumps. I like to do this to get fluffy, perfect muffins—same idea here.
Step 3: Mix Wet Ingredients
In another bowl, beat the eggs, then add the vanilla, melted butter, and grated zucchini. I find using a whisk or a fork makes it easier to blend everything smoothly. The zucchini should be well incorporated—this is what makes the cake so moist and tender.
Step 4: Combine
Pour the wet mixture into the dry ingredients. Gently fold together just until combined—don’t overmix! If you do, the cake might turn out dense instead of fluffy. A few lumps are totally fine.
Step 5: Prepare Filling
Mix the brown sugar, cinnamon, and melted butter in a small bowl. It should resemble a crumbly spread—think of it as the cinnamon sugar swirl’s best friend. Feel free to increase the cinnamon if you like it extra spicy, or add some chopped nuts for crunch.
Step 6: Layer & Swirl
Pour half of the batter into your prepared loaf pan. Sprinkle half of the cinnamon sugar filling over it, then pour the remaining batter on top. Use a skewer or a butter knife to gently swirl the cinnamon mixture through the batter—try creating figure eights or gentle circles. The marbled look is where all the magic happens!
Step 7: Bake
Pop it into the oven and bake for about 50-60 minutes. Every oven is different, so start checking around the 50-minute mark. When a toothpick inserted in the center comes out clean, your cake is ready! The house will smell incredible—wait until you catch that waft of cinnamon.
Step 8: Cool & Glaze
Let the cake cool in the pan for about 10-15 minutes before transferring it to a wire rack. Once completely cooled, whisk together the powdered sugar, milk, and vanilla for the glaze. Drizzle it over the cake for that pretty finishing touch. Trust me, a little glaze makes it even more irresistible.
Step 9: Slice & Serve
Use a sharp serrated knife to cut slices gently—hot cakes crumb easily! Serve warm or at room temperature. I love enjoying a slice with a cup of coffee or a glass of cold milk. It’s equally good for breakfast or dessert. And leftovers? They keep really well in an airtight container for a few days—though I doubt they’ll last that long!
What to Serve It With
This glorious cake is so versatile, my mind spins with ideas. For breakfast, pair it with a steaming mug of coffee or hot cocoa—nothing beats that cozy morning feeling. My kids ask for this as a quick breakfast before school—sometimes I add a smear of almond butter for extra richness. For brunch or a casual weekend get-together, serve slices with fresh fruit and a dollop of Greek yogurt or whipped cream. If it’s dessert time, warm slices with a scoop of vanilla ice cream or a drizzle of caramel sauce instantly elevate it. I also love gifting slices wrapped in pretty parchment paper with a ribbon—that’s such a sweet, homemade treat for friends and neighbors. Whatever the occasion, this cake always gets smiles and happy tummies!
Top Tips for Perfecting Your Zucchini Cinnamon Swirl Cake
Over the years, I’ve learned a few tricks I want to share so your cake turns out just perfect every time. First, when grating zucchini, I recommend using a fine grater and then pressing out excess moisture with a clean kitchen towel—I learned this trick after a few too-wet batches. If your batter feels too thick or dry, a splash of milk can loosen it up. For the cinnamon swirl, don’t skimp—spread it generously and swirl thoroughly for that beautiful marbling. I once tried just sprinkling the filling on top, and let’s just say, it’s not nearly as appealing visually or flavor-wise. When baking, oven calibration varies—if your top starts browning too fast, tent it with foil and keep checking. For a richer glaze, add a touch of cream cheese or a pinch of cinnamon. I’ve also experimented with swapping out the white sugar for honey or maple syrup—I love how natural sweetness adds depth without overpowering. Remember, always taste your batter before baking, and don’t overmix—your cake will thank you with a light, fluffy crumb.
Storing and Reheating Tips
This cake is best enjoyed fresh, but guess what? It’s actually fantastic the next day. Store leftovers in an airtight container at room temperature if you’ll finish it within a day or two—just keep it away from direct sunlight. If you want to keep it longer, slide it into the fridge (wrapped tightly)—it stays moist and delicious for about 3-4 days. To reheat, just warm a slice in the microwave for 15-20 seconds or in the oven at a low temp for about 10 minutes. About the glaze—if you’re making it ahead, I recommend adding the drizzle just before serving so it stays shiny and fresh. Alternatively, if it’s already glazed, you can reheat the whole loaf gently to perk up the flavors. Freezing works like a charm—wrap slices individually in plastic wrap, then foil, and they’ll keep for up to 3 months. Thaw at room temperature overnight or warm gently in the microwave. My top tip: warm slices taste even better with a little extra drizzle of glaze or a dusting of powdered sugar when serving again.
Frequently Asked Questions
Final Thoughts
This zucchini cinnamon swirl cake is one of those recipes that feels like a warm hug in baked form. It’s forgiving, versatile, and charming enough to serve to guests—or just to savor on a cozy weekend morning with a mug of coffee. I’ve shared it with friends, taken it to potlucks, and watched my kids devour it with enthusiastic grins. The secret, I think, is in the tender zucchini, the fragrant cinnamon, and that little swirl of magic running through the middle. Once you get the hang of it, I promise you’ll find yourself making this time and time again. Don’t be surprised if it becomes a staple in your home—trust me, it’s that good. Happy baking! And I’d love to hear how yours turns out—please leave a comment or share your variations below.
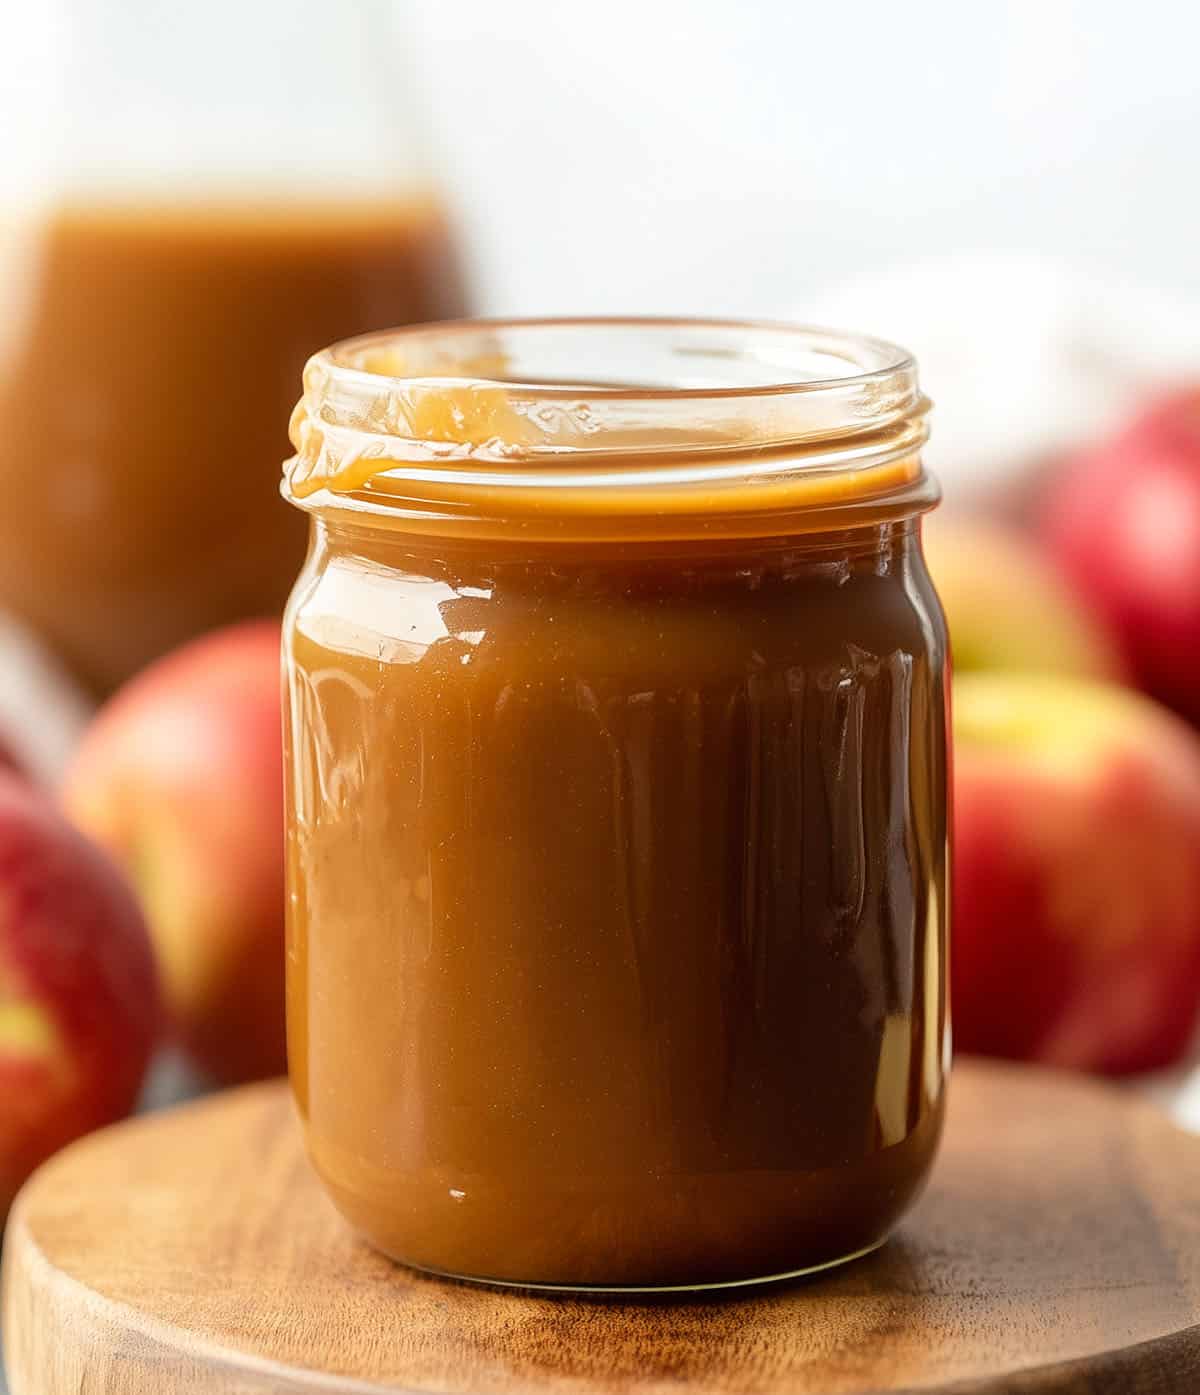
apple caramel sauce
Ingredients
Method
- To a small saucepan over medium-high heat, add the apple cider and cinnamon. Cook for 18-20 minutes until it is reduced to about ¼ cup. Set aside.
- Add the granulated sugar to a separate medium heavy-bottomed saucepan. Spread it out evenly over the bottom of the pan. Set the saucepan over medium-low heat. Do not stir the sugar at this point. Allow the sugar to begin melting on its own.
- As the sugar starts to melt around the edges, gently tilt the pan to help the sugar melt evenly. Once you see a significant amount of melted sugar, start gently stirring with a wooden spoon or heatproof silicone spatula to ensure all the sugar melts evenly. Be patient. It may seem slow at first, but the sugar will eventually melt completely and begin to turn golden.
- Continue to cook the sugar, stirring gently, until it reaches a deep amber color (about 5-10 minutes). Be careful not to let it burn.
- Once the sugar is a deep amber color, reduce the heat to low. Carefully add the butter, stirring constantly until melted.
- Gradually add the warm heavy cream while stirring. The mixture will bubble up, so be cautious.
- Stir in the reduced apple cider and vanilla until well combined. Add a pinch of kosher salt and stir to incorporate.
- Continue cooking on low until smooth, about 5-10 minutes.
- Remove from heat and allow the sauce to thicken as it cools. Use warm or cold.