Easy Cheese Tortellini with Veggies
Okay, so I have this thing… when a craving hits for something chocolatey and baked, but I also want to sneak in a little bit of goodness, this chocolate zucchini bread recipe is my absolute go-to. Seriously, it’s a lifesaver. My kids ask for this all the time, and the funny part? They have no clue there’s even zucchini in it! It’s that good. It’s like a secret weapon in my baking arsenal, and honestly, it’s even better than some of the plain chocolate loaf cakes I’ve tried. The zucchini makes it unbelievably moist without being heavy, and the chocolate… well, it’s chocolate, so that’s always a win, right? This recipe has been passed down from my grandma, with a few little tweaks I’ve picked up over the years. It’s the perfect balance of rich, fudgy, and just a hint of sweetness, making it ideal for that 10 pm sweet tooth attack when you don’t have time for a whole cake.
What is chocolate Zucchini bread?
So, what exactly *is* chocolate zucchini bread? Think of it as your favorite chocolate quick bread’s slightly more virtuous cousin. It’s essentially a moist, rich chocolate cake or quick bread that gets its incredible tenderness and moisture from finely grated zucchini. Don’t worry, I know what you might be thinking – zucchini? In a chocolate bread? But trust me on this one. Once it’s baked into the batter, you can’t taste it at all. What you *do* taste is pure, unadulterated chocolatey goodness, with a texture that’s just out-of-this-world soft and moist. It’s the kind of bread that feels like a treat, but you can feel a little better about serving it because of that hidden veggie boost. It’s a classic, simple bake that’s perfect for a cozy afternoon or even a decadent breakfast.
Why you’ll love this recipe?
There are so many reasons why this chocolate zucchini bread has earned a permanent spot in my recipe binder, and I just know you’re going to fall in love with it too. First off, the flavor is just phenomenal. We’re talking deep, rich chocolate notes that are perfectly balanced with just the right amount of sweetness. It’s not overly sweet, which I love, letting the cocoa really shine through. Then there’s the texture. Oh, the texture! This is where the zucchini really works its magic. It makes the bread unbelievably moist and tender, almost like a brownie in loaf form. It’s never dry or crumbly, which is a huge win in my book. And the best part? It’s ridiculously simple to make. You don’t need any fancy equipment or complicated techniques. I’m talking one-bowl wonders here, folks! It’s also incredibly budget-friendly, using common pantry staples you probably already have on hand. I tested this with almond milk once, just on a whim, and it actually made it even creamier – a happy accident! Plus, it’s super versatile. You can add nuts, chocolate chips, or even a swirl of peanut butter. It’s like my Chocolate Chip Banana Bread, but with a decadent chocolate twist and a secret healthy ingredient. What I love most about this is how forgiving it is. Even if I’m a little off on my measurements or my timing, it always turns out perfectly.
How do I make Zucchini bread?
Quick Overview
Making this chocolate zucchini bread is surprisingly straightforward. You’ll mix up a quick batter, fold in some grated zucchini and plenty of chocolate, and bake it until it’s perfectly done. The secret to its incredible moisture and flavor lies in the simple combination of cocoa powder, oil, and that hidden zucchini. It’s a one-bowl wonder for most of the process, making cleanup a breeze, and the result is a loaf that’s rich, fudgy, and wonderfully tender. Trust me, you’ll be amazed at how easy it is to create something so delicious!
Ingredients
For the Main Batter:
2 cups all-purpose flour: I usually just grab my trusty bag of all-purpose flour. Make sure it’s not expired, though! For a slightly denser texture, you could try whole wheat pastry flour, but I stick to all-purpose for this one because it gives that perfect tender crumb.
1 ¾ cups granulated sugar: You can reduce this slightly if you prefer it less sweet, but this amount really balances the bitterness of the cocoa.
¾ cup unsweetened cocoa powder: Use good quality cocoa powder! It makes a huge difference in the depth of chocolate flavor. Dutch-processed will give a richer, darker color and a smoother taste.
1 ½ teaspoons baking soda: This is what gives the bread its lift and helps create that lovely tender texture.
1 teaspoon baking powder: A little extra help for rise and tenderness.
½ teaspoon salt: Essential for bringing out all the flavors and balancing the sweetness.
2 large eggs: Room temperature eggs incorporate better into the batter. Just pop them out of the fridge about 30 minutes before you start.
1 cup milk: I usually use whole milk for richness, but buttermilk or even unsweetened almond milk works beautifully. I tested this with almond milk and it actually made it even creamier!
½ cup vegetable oil: Or canola oil. You can also use melted unsalted butter, but oil keeps it extra moist for longer.
1 teaspoon vanilla extract: Pure vanilla extract is key for that warm, comforting flavor.
2 cups grated zucchini: This is the magic ingredient! About 2 medium zucchinis. Make sure to squeeze out as much excess moisture as you can.
For the Filling (Optional, but highly recommended!):
½ cup semi-sweet chocolate chips: Or dark chocolate chips if you prefer. Mini chips are great too!
¼ cup chopped nuts (walnuts or pecans): If you’re a nut fan, this adds a lovely crunch. Totally optional, though!
For the Glaze (Optional, but so pretty!):
1 cup powdered sugar: Sifted is best to avoid lumps.
2-3 tablespoons milk (or water): Start with 2 and add more until you reach your desired drizzling consistency.
½ teaspoon vanilla extract (optional): For an extra hint of flavor.
Step-by-Step Instructions
Step 1: Preheat & Prep Pan
First things first, get your oven preheated to 350°F (175°C). Grab a 9×5 inch loaf pan and grease it really well with butter or cooking spray. Then, lightly dust it with a little flour or cocoa powder, tapping out any excess. This little step ensures your beautiful loaf slides out like a dream. I always do this when I’m baking anything in a loaf pan – it’s a lifesaver for preventing stuck-on bits!
Step 2: Mix Dry Ingredients
In a large mixing bowl, whisk together the flour, granulated sugar, cocoa powder, baking soda, baking powder, and salt. Give it a really good whisk to make sure everything is evenly distributed. This ensures your leavening agents are spread throughout, so you get an even rise and a perfectly tender crumb. Nobody wants a dense patch!
Step 3: Mix Wet Ingredients
In a separate medium bowl, whisk together the eggs, milk, vegetable oil, and vanilla extract until everything is well combined and slightly frothy. Make sure your milk isn’t ice cold, especially if you’re using whole milk – room temperature is ideal for a smoother batter.
Step 4: Combine
Pour the wet ingredients into the bowl with the dry ingredients. Stir with a spatula or wooden spoon until *just* combined. It’s really important not to overmix here! A few streaks of flour are okay; they’ll disappear as you add the zucchini. Overmixing can develop the gluten too much, resulting in a tough bread, and we want tender and moist, remember?
Step 5: Prepare Filling
If you’re adding chocolate chips or nuts, gently fold them into the batter now. Don’t overmix, just get them evenly distributed. This is where you can really customize it! Sometimes I’ll even swirl in a spoonful of peanut butter for an extra layer of flavor.
Step 6: Layer & Swirl
Now for the star ingredient! Stir in the grated zucchini. Again, mix until just combined. The batter will look quite thick. Pour about half of the batter into your prepared loaf pan. If you’re making a swirl, now’s the time to add it. I often make a separate batch of batter and swirl in extra cocoa and sugar, or just a handful of extra chocolate chips. Then, spoon the remaining batter over the top. For a marbled effect, you can gently run a knife or skewer through the batter a few times. Don’t go crazy, you just want a little swirl.
Step 7: Bake
Pop the loaf pan into your preheated oven. Bake for 50-65 minutes, or until a wooden skewer or toothpick inserted into the center comes out clean or with a few moist crumbs attached (but no wet batter). Oven temperatures can vary, so keep an eye on it, especially towards the end. If the top starts to brown too quickly, you can loosely tent it with foil.
Step 8: Cool & Glaze
Once it’s done, let the bread cool in the pan for about 10-15 minutes. This helps it set up. Then, carefully invert it onto a wire rack to cool completely. While it’s cooling, you can whip up the glaze if you’re using it. Whisk together the powdered sugar, a couple tablespoons of milk, and vanilla extract until smooth and drizzle-able. Once the bread is completely cool, drizzle the glaze over the top. It looks so pretty and adds a little extra touch of sweetness!
Step 9: Slice & Serve
Once the glaze has set a bit (or if you skipped the glaze!), slice your glorious chocolate zucchini bread with a serrated knife. I like to serve it slightly warm, but it’s also fantastic at room temperature. Enjoy every moist, chocolatey bite!
What to Serve It With
This chocolate zucchini bread is seriously versatile, making it a go-to for so many occasions. For breakfast, it’s absolutely divine with a hot cup of coffee or a glass of cold milk. The rich chocolate flavor is a wonderful way to start the day, and that hint of hidden veggie makes me feel a little virtuous. If you’re planning a brunch spread, a slice of this bread is always a crowd-pleaser. I love serving it alongside fresh fruit salad or a yogurt parfait. It adds a decadent touch without being too heavy. As a dessert, it’s perfect for satisfying those late-night cravings. A warm slice with a scoop of vanilla bean ice cream or a dollop of whipped cream is pure heaven. Or, for a cozy snack, just grab a slice with a glass of milk while you’re curled up with a good book. My family loves it with a smear of butter or a thin layer of cream cheese. It’s also fantastic toasted and served with a drizzle of honey.
Top Tips for Perfecting Your Chocolate Zucchini Bread
Over the years, I’ve learned a few little tricks that take this chocolate zucchini bread from good to absolutely spectacular. Let’s talk zucchini prep first. Grating is key, and I prefer a medium grate – not too fine, not too coarse. The absolute most important step, though, is squeezing out as much moisture as you possibly can. I usually wrap the grated zucchini in a clean kitchen towel or cheesecloth and wring it out over the sink. This is crucial for preventing a soggy loaf and ensuring that perfect tender texture. When it comes to mixing, remember my earlier advice: don’t overmix! Stir until the dry and wet ingredients are *just* combined. A few small lumps are totally fine. For swirl customization, if you’re adding extra chocolate chips or nuts, try tossing them with a tablespoon of flour before adding them to the batter. This helps prevent them from sinking to the bottom during baking. I’ve learned this trick after years of making it! Ingredient swaps are fun too. If you don’t have milk, water or even coffee can work in a pinch for the liquid. For a dairy-free version, unsweetened almond or oat milk are excellent substitutes. I’ve tested this with almond milk and it actually made it even creamier! Baking tips are pretty standard, but I always recommend the toothpick test. Insert it into the thickest part of the loaf; if it comes out with moist crumbs attached, it’s perfect. If it’s wet batter, it needs more time. If it’s completely dry, it might be a little overbaked. Glaze variations are endless! You can add a pinch of cinnamon to your powdered sugar glaze, or even a little espresso powder for a mocha twist. If you want a thinner glaze, just add more liquid, a teaspoon at a time, until it’s pourable.
Storing and Reheating Tips
This chocolate zucchini bread is so wonderfully moist, it stays fresh for quite a while, which is another reason I love it so much. If you plan to eat it within a couple of days, storing it at room temperature is perfectly fine. Just wrap the cooled loaf tightly in plastic wrap or place it in an airtight container. It should stay fresh and delicious for about 3-4 days this way. If you think you won’t get through the whole loaf that quickly, or if your kitchen tends to be warm, the refrigerator is your best friend. Wrap it well in plastic wrap and then pop it into an airtight container or a zip-top bag. It will stay good in the fridge for about a week. For longer storage, this bread freezes beautifully! Once the loaf is completely cool, wrap it very tightly in plastic wrap, then in a layer of aluminum foil, or place it in a freezer-safe bag. It can be frozen for up to 3 months. When you’re ready to enjoy it, you can thaw it overnight in the refrigerator or at room temperature. If you like it warm, you can gently reheat slices in a toaster oven or microwave for a few seconds. For the glaze, I usually add it once the bread has cooled completely, especially if I’m planning to freeze it. If you glaze it and then freeze, it can sometimes get a little sticky, so often I’ll freeze the bread plain and add the glaze after thawing. If you do freeze with the glaze, make sure it’s completely set before wrapping.
Frequently Asked Questions
Final Thoughts
So there you have it – my go-to, tried-and-true, absolutely delicious chocolate zucchini bread! It’s the kind of recipe that brings a smile to everyone’s face, whether they know about the secret ingredient or not. The moist crumb, the rich chocolate flavor, and the surprising ease of making it all add up to pure baking perfection. It’s truly a winner for busy weeknights, lazy weekend mornings, or anytime you need a comforting slice of something sweet. If you loved this recipe, you might also enjoy my Moist Chocolate Chip Banana Bread or my Fudgy Brownies – they’re all about that rich, comforting flavor! I can’t wait to hear how yours turns out, so please leave a comment below and let me know your favorite additions or any variations you tried. And if you snap a picture, tag me on social media – I’d love to see your beautiful loaves! Happy baking!
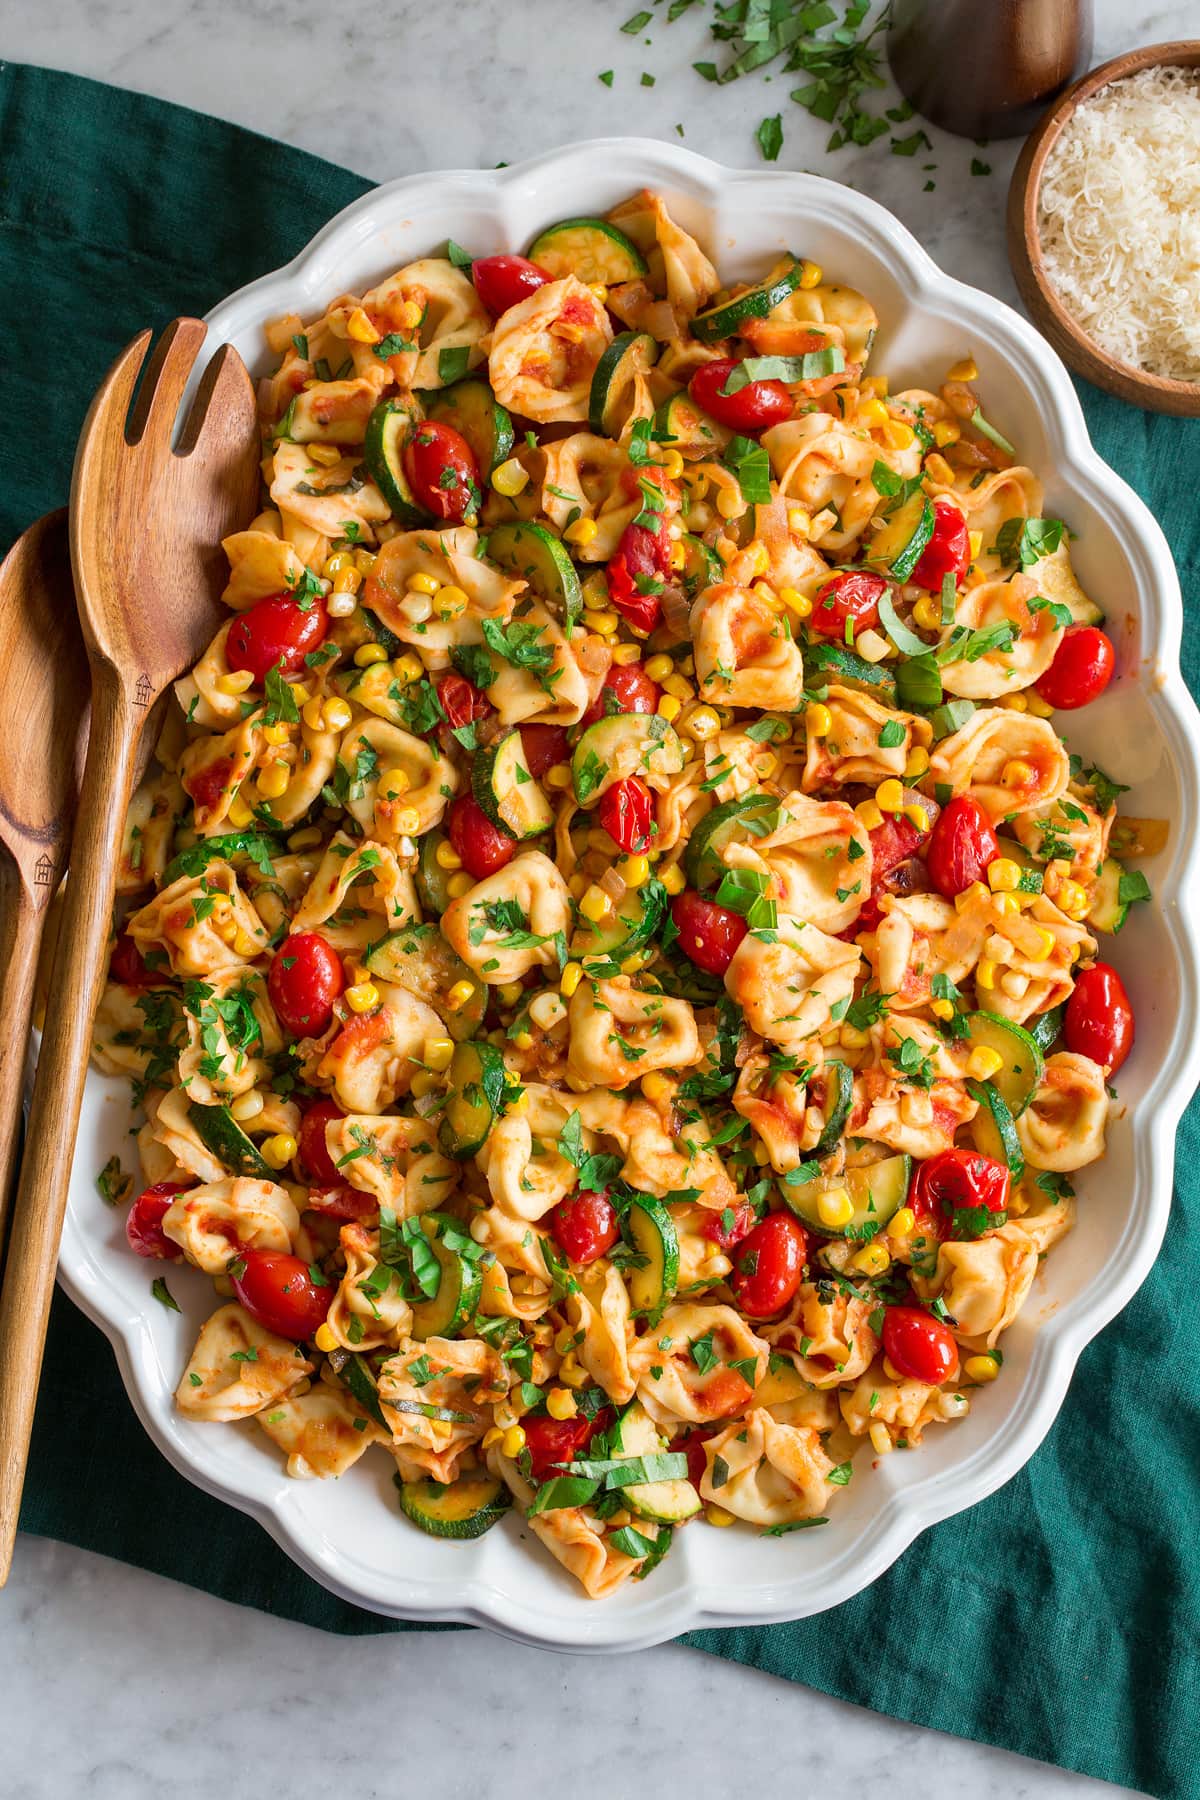
Cheese Tortellini with Summer Veggies
Ingredients
Method
- Bring a large pot of lightly salted water to a boil to cook tortellini, cook tortellini a minute shy of cook time according to directions on package. While water is coming up to a boil it's a good time to prep and cook the vegetables.
- In a 12-inch saute pan or deep skillet heat olive oil over medium-high heat.
- Add onion and saute 3 minutes. Add corn and saute 2 minutes more.
- Add tomatoes then saute 3 minutes. Add zucchini and garlic and saute until veggies are tender and many of the tomatoes have burst, about 6 to 8 minutes longer (note that during this period it's about the right time to add the tortellini to pot of boiling water so they finish up at the same time).
- Drain the tortellini while reserving about 0.25 cup of the pasta water.
- Transfer tortellini and the marinara sauce to the pan with veggies. Cook and toss until tortellini is tender about 1 to 2 minutes. If needed add a splash of pasta water to thin.
- Season with salt and pepper to taste. Toss in 0.25 cup parmesan, the basil and the parsley.
- Serve right away topping individual servings with remaining 0.25 cup parmesan.