Easy Stuffed Peppers with Savory Ground Meat
You know those recipes that just… stick with you? The ones that smell like your childhood kitchen, taste like pure comfort, and have a way of making everyone around the table smile? This zucchini bread recipe is exactly that for me. I swear, the moment it hits the oven, my whole house fills with this incredible aroma, and I can practically hear my family’s footsteps heading towards the kitchen. It’s not just a quick bread; it’s a hug in edible form. I’ve made countless variations over the years, trying to find that perfect balance of moistness, sweetness, and spice, and I honestly think I’ve nailed it. It’s a bit like a really good chocolate chip cookie, but somehow even better because it sneaks in a vegetable! My kids, who can be notoriously picky, gobble this up without a second thought, and they have no idea they’re eating zucchini. It’s my little secret weapon for those busy mornings or when a serious sweet craving hits and I don’t have time for anything complicated. Forget those dry, bland loaves you might have encountered; this is the real deal, and it’s surprisingly simple to get right.
What is Zucchini bread?
So, what exactly is this magical thing I keep raving about? Well, it’s a moist, tender quick bread, packed with shredded zucchini that lends an incredible softness and keeps it from ever feeling dry. Think of it as a classic quick bread, but with a secret superpower that makes it ridiculously delicious and good for you (okay, maybe mostly delicious!). It’s got that perfect hint of cinnamon and a touch of sweetness that makes it feel like a treat, but it’s hearty enough to actually satisfy you. The name is pretty straightforward – it’s zucchini bread! But the magic is in the details, the way the zucchini melts into the batter, the subtle spices that warm you up, and that irresistible slightly crisp crust with a soft, yielding interior. It’s the kind of thing that reminds you of home, even if you’ve never made it before. It’s the antipasto of baked goods – a delightful starter that makes you feel instantly good.
Why you’ll love this recipe?
Honestly, where do I even begin? The reasons I keep coming back to this recipe are endless, but let me try to narrow it down. First and foremost, the flavor. It’s got this warm, comforting taste that’s perfectly balanced. The zucchini doesn’t make it taste like vegetables at all, promise! Instead, it contributes to this incredibly moist and tender crumb that’s just divine. Then there’s the sheer simplicity of it. I’ve had nights where I’m completely wiped, but I can still whip up this zucchini bread in about 15 minutes before it even goes into the oven. It’s truly a lifesaver on busy weeknights when the last thing I want to do is fuss in the kitchen. And let’s talk about the cost-efficiency! Zucchini is usually pretty budget-friendly, and the other ingredients are pantry staples. You can make a loaf (or two!) without breaking the bank. I also love how versatile it is. It’s not just a breakfast item; it’s perfect for an afternoon snack, a light dessert, or even as a side for a hearty soup. It’s like a more sophisticated, grown-up version of banana bread. What I love most about this specific recipe, compared to others I’ve tried, is the texture. It’s never gummy, never dry, always just right. The cinnamon and a hint of nutmeg create this cozy, inviting aroma that literally makes my house feel like a home. If you’re a fan of my classic banana bread or my easy blueberry muffins, you are going to adore this zucchini bread. It hits all the same comfort notes but with its own unique charm.
How do I make Zucchini bread?
Quick Overview
The process is ridiculously easy, and that’s a huge part of its charm! You’ll basically whisk together your dry ingredients, mix your wet ingredients, then combine them, fold in the star of the show (zucchini!), and bake. That’s it! No fancy techniques, no complicated steps. The result is a wonderfully moist and flavorful loaf that tastes like it took hours. It’s the perfect bake for beginners and a guaranteed winner for seasoned bakers looking for a reliable go-to.
Ingredients
For the Main Batter:
3 cups all-purpose flour: I always use all-purpose, but I’ve had friends successfully swap in a good quality gluten-free blend, and it still turned out great! Just make sure it’s a 1:1 baking blend.
1 teaspoon baking soda: This is what gives it that lovely lift.
1/2 teaspoon baking powder: A little extra boost for fluffiness.
1 teaspoon ground cinnamon: Don’t skimp here, it’s key for that warm flavor.
1/2 teaspoon ground nutmeg: Just a whisper, it really rounds out the cinnamon.
1/4 teaspoon ground cloves (optional, but highly recommended!): This is my secret weapon for adding a bit more depth.
1 teaspoon salt: Balances all the sweetness.
1 1/2 cups granulated sugar: You can reduce this slightly if you prefer it less sweet, maybe to 1 1/4 cups.
1/2 cup unsalted butter, softened: Make sure it’s softened, not melted! This is crucial for creaming properly.
2 large eggs: Room temperature is best for emulsifying smoothly.
1 teaspoon vanilla extract: Always use pure vanilla extract for the best flavor.
1/2 cup milk (any kind works!): I’ve tested this with almond milk and it actually made it even creamier! Whole milk is great too, or even buttermilk for an extra tender crumb.
2 cups finely shredded zucchini, squeezed dry: This is the star! Don’t shred it too coarse, and seriously, squeeze out as much moisture as you can. I usually use a clean kitchen towel for this. About 2-3 medium zucchinis usually yields this amount.
For the Filling:
1/2 cup chopped walnuts or pecans (optional): I love the crunch they add, but it’s totally fine without them if you’re nut-free.
1/2 cup chocolate chips (mini or regular, your call!): Milk chocolate, dark chocolate, semi-sweet… use whatever makes your heart sing. My kids always ask for extra chocolate chips, and who am I to say no?
For the Glaze:
1 cup powdered sugar: Sifted, if you want it super smooth.
2-3 tablespoons milk (any kind): Start with 2 and add more until you get the right consistency.
1/2 teaspoon vanilla extract (optional): For a little extra flavor.
Step-by-Step Instructions
Step 1: Preheat & Prep Pan
First things first, get your oven preheating to 350 degrees Fahrenheit (175 degrees Celsius). I like to grease and flour a standard 9×5 inch loaf pan. You can also line it with parchment paper for super easy removal – that’s my favorite trick! Make sure the parchment has some overhang so you can lift the whole thing out easily once it’s cooled a bit.
Step 2: Mix Dry Ingredients
In a large bowl, whisk together the flour, baking soda, baking powder, cinnamon, nutmeg, cloves (if using), and salt. Give it a good whisk so everything is evenly distributed. This ensures you won’t get any random pockets of baking soda or spice. Then, stir in the granulated sugar. Make sure you’ve got your zucchini squeezed super dry before you get to this point – I can’t stress that enough!
Step 3: Mix Wet Ingredients
In a separate medium bowl, cream together the softened butter and sugar until light and fluffy. This is where you build the foundation of that tender crumb. Beat in the eggs one at a time, mixing well after each addition. Then, stir in the vanilla extract and the milk. It might look a little separated, but that’s okay.
Step 4: Combine
Now, pour the wet ingredients into the bowl with the dry ingredients. Gently fold them together with a spatula until *just* combined. Do NOT overmix! Seriously, a few streaks of flour are perfectly fine. Overmixing develops the gluten too much, which can lead to a tough bread. Then, gently fold in your squeezed-dry shredded zucchini and your optional nuts or chocolate chips. Again, just fold until everything is incorporated.
Step 5: Prepare Filling
If you’re using chocolate chips or nuts, this is where you’ll add them! I like to toss them with a tablespoon of the dry flour mixture before adding them to the batter. It helps prevent them from sinking to the bottom of the loaf during baking. So, just mix them into the batter until they’re evenly distributed.
Step 6: Layer & Swirl
Pour half of the batter into your prepared loaf pan and spread it evenly. If you’re doing a swirl effect with extra chocolate chips or a cinnamon-sugar mix, sprinkle half of that over the first layer. Then, spoon the remaining batter on top and spread it out. Finish with the rest of your filling. If you’re going for a more uniform distribution, just spread the batter evenly in the pan. I find it’s not really necessary to “swirl” this recipe in the traditional sense; the zucchini and any additions integrate beautifully as is.
Step 7: Bake
Pop that pan into your preheated oven. Bake for 50-65 minutes. The exact time will depend on your oven, of course. How do you know it’s done? The best test is inserting a toothpick or a thin knife into the center. If it comes out clean or with just a few moist crumbs attached, it’s ready. If it comes out with wet batter, give it another 5-10 minutes and test again. The top should be golden brown and slightly springy to the touch.
Step 8: Cool & Glaze
Once it’s out of the oven, let the loaf cool in the pan for about 10-15 minutes. This is important so it doesn’t fall apart when you try to remove it. Then, carefully invert it onto a wire rack to cool completely. Patience here is key! Once it’s fully cooled, you can whip up the glaze. Whisk together the powdered sugar, 2 tablespoons of milk, and vanilla extract until smooth. If it’s too thick, add a little more milk, a teaspoon at a time, until it’s a pourable but not runny consistency. Drizzle it over the top of the cooled zucchini bread. It’s so satisfying to watch it drip down the sides!
Step 9: Slice & Serve
Once the glaze has set a little (or if you’re impatient like me, dive right in!), slice it up and enjoy. I find using a serrated knife works best for a clean cut. Serve it at room temperature for the best texture and flavor. It’s absolutely perfect on its own, but feel free to pair it with a cup of coffee or tea!
What to Serve It With
This zucchini bread is wonderfully self-sufficient, but it can also play well with others! For a simple breakfast, I love pairing a thick slice with a steaming mug of good coffee. The slightly sweet, spiced bread is the perfect complement to a robust brew. On lazy weekend mornings, I’ll sometimes toast a slice lightly and serve it with a dollop of Greek yogurt or a smear of butter. For a more elegant brunch spread, it’s a delightful addition. I’ll cut it into smaller, more delicate slices and arrange it on a platter alongside fresh fruit salad and maybe some mini quiches. It’s a more refined take on a homey classic. As a dessert, it’s surprisingly versatile. It’s delicious simply on its own, perhaps with a light dusting of powdered sugar if you skipped the glaze. Or, if you’re feeling indulgent, a small scoop of vanilla bean ice cream alongside a warm slice is pure bliss. And for those cozy, quiet moments, when you just need a little something sweet to curl up with, this bread is the answer. Serve it with a cup of herbal tea or even a glass of milk, and enjoy the simple pleasure. I’ve even seen friends serve it with a mild cheese, like a creamy brie, which is unexpectedly amazing!
Top Tips for Perfecting Your Zucchini Bread
Over the years, I’ve learned a few things that make a big difference in turning a good zucchini bread into a truly great one. Let’s dive into some of my best tips! First, regarding the zucchini prep: squeezing out the moisture is *non-negotiable*. If you skip this, you’ll end up with a soggy, dense loaf. I usually grate my zucchini using the large holes of a box grater, then wrap the shreds in a clean kitchen towel or several layers of paper towels and wring out as much liquid as humanly possible. You’ll be surprised how much comes out! For mixing advice, remember that the golden rule for quick breads is: do not overmix! Once the wet and dry ingredients come together, mix only until they are *just* combined. A few little lumps or streaks of flour are totally fine. Overmixing develops the gluten in the flour, which will result in a tough, chewy bread instead of a tender, moist one. When it comes to swirl customization, while this recipe doesn’t strictly require a swirl, if you decide to add extra chocolate chips or a cinnamon-sugar mixture between layers, just sprinkle them evenly. For ingredient swaps, I’ve found that you can easily reduce the sugar by about 1/4 cup and it won’t significantly impact the texture or sweetness too much. For dairy-free, using your favorite plant-based milk and a dairy-free butter substitute works beautifully. I tested this with almond milk and it actually made it even creamier! When it comes to baking tips, always trust the toothpick test. Ovens vary, so start checking around the 50-minute mark. If the top is browning too quickly before the center is cooked, you can loosely tent it with aluminum foil for the remainder of the baking time. For glaze variations, don’t be afraid to experiment! A little bit of lemon zest in the glaze adds a lovely brightness, or a drop of almond extract can complement the cinnamon nicely. You can also skip the glaze entirely and just dust the cooled loaf with powdered sugar for a simpler finish.
Storing and Reheating Tips
Proper storage is key to keeping this delicious zucchini bread tasting fresh. At room temperature, if it’s well-wrapped (think plastic wrap or an airtight container), it should stay fresh for about 2-3 days. I usually like to store it at room temperature because I find that’s when the texture is at its best. If you live in a particularly warm or humid climate, or if you want it to last a bit longer, the refrigerator is your friend. Stored in an airtight container in the fridge, it can last up to 5 days. It might firm up a little in the fridge, but you can easily bring it back to life by gently warming a slice. For longer storage, this zucchini bread freezes beautifully! Let the loaf cool completely, then wrap it tightly in a double layer of plastic wrap, followed by a layer of aluminum foil or a freezer-safe bag. It will keep well in the freezer for up to 3 months. To reheat, you can either let a slice thaw at room temperature for an hour or so, or gently warm it in a toaster oven or a low oven for a few minutes until it’s heated through. If you’ve glazed your bread, I recommend glazing it *after* reheating if you’re planning on freezing it, or just be prepared for the glaze to be a bit softer. If you’re storing it unfrosted at room temperature, the glaze will set up nicely over the first day.
Frequently Asked Questions
Final Thoughts
So there you have it – my absolute favorite zucchini bread recipe! It’s more than just a recipe for me; it’s a feeling, a memory, a taste of home. It’s the kind of recipe that proves you don’t need complicated steps or fancy ingredients to create something truly spectacular. The moist crumb, the warm spices, and that subtle sweetness make it utterly irresistible. It’s proof that healthy ingredients can taste utterly decadent. If you love recipes like my classic cinnamon swirl bread or my easy apple crumble bars, you’re going to fall head over heels for this one. It’s perfect for any occasion, whether you’re feeding a hungry family, bringing a treat to a friend, or just indulging in a quiet moment for yourself. I truly hope you give this a try and that it brings as much joy to your kitchen as it does to mine. I can’t wait to hear how yours turns out! Don’t forget to leave a comment below with your thoughts or any variations you tried – I love hearing from you all! Happy baking!
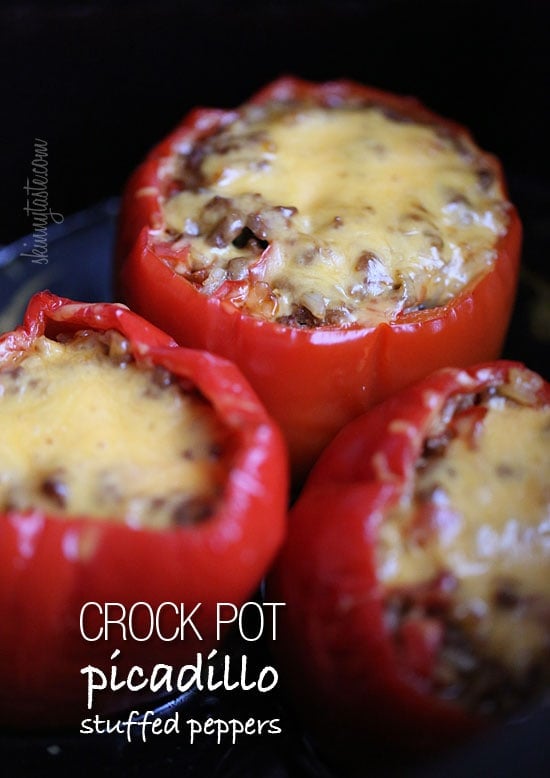
Crock Pot Picadillo Stuffed Peppers
Ingredients
Method
- Cut 0.5 inch of the tops of the bell peppers and dice fine.
- In a medium bowl combine cooked brown rice, picadillo and diced pepper tops. Stuff the peppers with the picadillo and rice filling and place upright in the crock pot.
- Pour the water into the bottom of the crock pot, cover and cook 3 hours on HIGH -or- 4 to 6 hours on LOW.
- Just before serving, top each pepper with 2 tablespoons shredded cheese, cover and leave until it melts, 2-3 minutes.
- Preheat oven to 350°F. Place peppers in an oven-proof dish, pour about 0.33 cup water in the bottom of the dish, cover and bake 50 minutes, or until the peppers become soft.
- Remove foil, top each with cheese and bake uncovered 5 minutes.