Creamy Baked Mac and Cheese Recipe
You know those recipes that just feel like a warm hug? The ones that smell like childhood and instantly make your home feel cozier? This zucchini bread is that recipe for me. It’s the kind of thing I’ve been making for years, tweaking it here and there, until it became *perfect*. It’s not just any zucchini bread; it’s a moist, tender, flavor-packed masterpiece that even picky eaters (yes, I’m talking about my kids!) devour. Forget those dry, bland loaves you might have tried elsewhere. This one has a touch of cinnamon and nutmeg that just sings, and the texture is unbelievably good. It’s honestly my go-to when I need a little pick-me-up or have unexpected guests. I’ve found it’s incredibly forgiving, which is a lifesaver for busy weeknights. Think of it as a more sophisticated, deeply satisfying cousin to a classic chocolate chip cookie, but with sneaky veggies! The secret, I’ve found, is in how you prepare the zucchini and a few key ingredient ratios that make all the difference. If you’ve ever been intimidated by baking, or just want a truly outstanding zucchini bread, you’ve come to the right place.
What is Zucchini bread?
So, what exactly *is* this amazing zucchini bread? At its heart, it’s a quick bread, meaning it doesn’t rely on yeast for leavening. It’s typically a sweet loaf, packed with grated zucchini that, believe it or not, adds incredible moisture and a tender crumb without a strong zucchini flavor. The name “zucchini bread” pretty much says it all, but it’s so much more than just bread with zucchini in it. It’s a delightful confection that’s sweet enough to be a dessert but hearty enough to be enjoyed with a cup of coffee in the morning. My grandma used to make something similar, and I think that’s where my love for this kind of comforting bake started. It’s essentially a way to use up all that garden zucchini you might have overflowing in the summer, transforming it into something truly magical. It’s less like a cake and more like a very moist, slightly sweet, spiced loaf that’s just pure comfort. It’s incredibly versatile, which is a huge part of its charm. You can have it for breakfast, a snack, or even a light dessert.
Why you’ll love this recipe?
What are some of the best reasons to eat zucchini bread?flavor is out of this world. It’s perfectly spiced with cinnamon and a hint of nutmeg, which gives it this warm, inviting aroma that fills your entire house. The sweetness is just right – not too much, not too little – and it has this wonderful richness that makes you want another slice the moment you finish the first. Then there’s the simplicity. I’m not kidding when I say this is easy. If you can stir a few things together, you can make this. I’ve had friends who claim they “can’t bake” make this, and they’ve come back raving about it. It’s genuinely foolproof, which is a huge win in my book, especially on those days when you just need a win. Plus, it’s surprisingly cost-effective. Zucchini is usually pretty affordable, and the other ingredients are pantry staples. This is aversatility! Oh my goodness. You can eat this warm with a dollop of butter, toasted with cream cheese, or even as is. It’s fantastic for breakfast, brunch, a snack, or a simple dessert. It’s a lifesaver when you’re craving something sweet but don’t want to go through the hassle of a complicated cake. What I love most about this specific recipe, compared to others I’ve tried over the years, is how incredibly moist it stays. I’ve had loaves sit on the counter for a couple of days (if they last that long!), and they’re still just as tender and delicious as the first day. It’s a real crowd-pleaser, and the fact that it sneaks in a vegetable? That’s just a bonus my kids conveniently overlook while they’re asking for seconds.
How to Make Zucchini Bread
Quick Overview
Making this amazing zucchini bread is surprisingly straightforward. You basically mix your dry ingredients, then your wet ingredients, and then combine them gently. The zucchini is added in, and then you pour it all into a loaf pan and bake until golden and glorious. What makes this method so special is the balance of ingredients that ensures maximum moisture and tenderness without any fuss. It’s a simple one-bowl (or two-bowl, if you’re being tidy!) process that yields professional-level results. You’ll be amazed at how easy it is to achieve such a delicious outcome. It’s perfect for beginners and experienced bakers alike.
Ingredients
For the Main Batter:
You’ll need about 2 cups of grated zucchini. Make sure to use medium-sized zucchini; the big overgrown ones can be a bit watery. I find that grating it on the larger holes of a box grater works best – you want small pieces, not mush. Don’t peel it either! The skin adds nutrients and a nice little texture. You’ll also need 2 cups of all-purpose flour. Make sure it’s spooned and leveled, not scooped directly from the bag, which can pack it down too much. 1 teaspoon of baking soda and 1/2 teaspoon of baking powder for that perfect rise. A pinch of salt to balance out the sweetness. And, of course, the warming spices: 1 teaspoon of ground cinnamon and 1/4 teaspoon of ground nutmeg. Trust me, this spice blend is key! For sweetness, we’re using 1 cup of granulated sugar. You can swap half of this for brown sugar for an extra layer of caramel flavor, but I usually stick with white for this recipe.
For the Filling:
This is where we add an extra layer of decadence. You’ll need 1/2 cup of chopped walnuts or pecans. I love the crunch they add, but if nuts aren’t your thing, you can totally omit them or swap them for chocolate chips – a classic pairing! If you do use nuts, toasting them lightly beforehand really brings out their flavor. For the spiced sugar swirl, you’ll need 1/4 cup of packed brown sugar and another 1 teaspoon of cinnamon. This little swirl is what takes it from good to absolutely unforgettable.
For the Glaze:
This is optional, but highly recommended! For a simple, sweet glaze, you’ll need 1 cup of powdered sugar. Make sure it’s nice and fine – sift it if you’re worried about lumps. Then, you’ll need about 2-3 tablespoons of milk (any kind works, I’ve even tested this with almond milk and it actually made it even creamier!) or lemon juice for a bit of tang. The trick is to add the liquid just a little at a time until you reach your desired drizzling consistency. You want it pourable but not too thin.
Step-by-Step Instructions
Step 1: Preheat & Prep Pan
First things first, get that oven preheating to 350 degrees Fahrenheit (175 degrees Celsius). This is a pretty standard temperature, and it’s crucial for even baking. While the oven is warming up, grab a 9×5 inch loaf pan. Grease it really well with butter or cooking spray, and then dust it lightly with flour. You can also line the bottom and sides with parchment paper, leaving a little overhang on the sides – this makes lifting the baked loaf out so much easier. I’ve learned from experience that a well-greased pan prevents those frustrating moments where the bread sticks!
Step 2: Mix Dry Ingredients
In a large bowl, whisk together your flour, baking soda, baking powder, salt, cinnamon, and nutmeg. Whisking them thoroughly ensures that the leavening agents are evenly distributed, which means a nice, uniform rise for your bread. Don’t skip this step! It’s easy to just dump everything in, but a good whisking now makes a difference later. Make sure there are no little pockets of baking soda or powder.
Step 3: Mix Wet Ingredients
In a separate, medium-sized bowl, crack your eggs. Add your granulated sugar, melted butter (make sure it’s cooled slightly so it doesn’t cook the eggs!), and vanilla extract. Whisk it all together until it’s well combined and looks smooth. The mixture should be a lovely pale yellow color.
Step 4: Combine
Now, pour the wet ingredients into the bowl with the dry ingredients. Gently fold them together with a spatula or wooden spoon. The key here is *not to overmix*. Mix just until you no longer see streaks of dry flour. A few lumps are totally okay! Overmixing develops the gluten in the flour, which can lead to a tough loaf. We want tender, delicious bread, so be gentle. Once combined, fold in your grated zucchini. Make sure it’s evenly distributed throughout the batter.
Step 5: Prepare Filling
In a small bowl, combine the brown sugar and the extra teaspoon of cinnamon for the swirl. If you’re using nuts, give them a quick chop and add them to this bowl as well. This little spiced mixture is what gives you those delightful pockets of extra flavor and sweetness throughout the bread.
Step 6: Layer & Swirl
Pour about half of the zucchini batter into your prepared loaf pan. Sprinkle half of the brown sugar and cinnamon mixture (and nuts, if using) evenly over the batter. Then, pour the remaining batter on top, and sprinkle the rest of the brown sugar mixture over that. Now, grab a butter knife or a skewer and gently swirl it through the batter, creating a marbled effect. You don’t want to mix it completely, just a few gentle passes to create pretty patterns. This swirl adds visual appeal and bursts of cinnamon-sugar goodness.
Step 7: Bake
Place the loaf pan in your preheated oven. Bake for 50-65 minutes. Baking times can vary depending on your oven, so start checking around the 50-minute mark. The best way to tell if it’s done is to insert a toothpick or a thin knife into the center. If it comes out clean, with no wet batter attached, it’s ready! If it comes out with wet batter, bake for another 5-10 minutes and test again. You’re looking for a golden brown top and a firm texture.
Step 8: Cool & Glaze
Once it’s baked, take the loaf pan out of the oven and let it cool in the pan for about 10-15 minutes. This allows it to set up properly. Then, carefully invert the pan to remove the loaf. If you used parchment paper, you can lift it right out. Let the loaf cool completely on a wire rack before glazing. While it’s cooling, whisk together your powdered sugar and milk (or lemon juice) for the glaze. Start with 2 tablespoons of liquid and add more, a tiny bit at a time, until it’s the consistency you like. Once the bread is totally cool, drizzle the glaze over the top, letting it drip down the sides. It looks so pretty!
Step 9: Slice & Serve
Once the glaze has set a bit, it’s time to slice and enjoy! Use a serrated knife for clean cuts. This bread is absolutely divine when it’s slightly warm, with that melty glaze, but it’s also fantastic at room temperature. Cut yourself a generous slice, maybe add a little pat of butter if you’re feeling indulgent, and savor every bite. It’s perfect for a mid-morning treat or an afternoon snack.
What to Serve It With
This zucchini bread is so versatile, it fits into almost any meal or occasion! For a perfect breakfast, I love serving a thick slice warm with a cup of strong, hot coffee. The coffee’s bitterness cuts through the sweetness beautifully. Sometimes, I’ll toast a slice and spread a thin layer of good quality butter on it – simple but utterly divine. For brunch, it’s a fantastic addition to a buffet spread. I often cut it into smaller, bite-sized squares for easy grabbing. It pairs wonderfully with fresh fruit salad or a yogurt parfait. For a slightly more elegant presentation, I’ll drizzle a little extra glaze in a decorative pattern on top. As a dessert, this zucchini bread is surprisingly satisfying. It’s sweet enough on its own, but you can elevate it by serving it with a scoop of vanilla bean ice cream or a dollop of lightly sweetened whipped cream. A drizzle of caramel sauce is also heavenly! For those cozy snacks, especially on a rainy afternoon, it’s the ultimate comfort food. Just grab a slice (or two!), curl up on the couch with a mug of tea or hot chocolate, and let the worries melt away. My family also loves it with a glass of cold milk, which is such a nostalgic combination for me. It’s a recipe that just brings people together and makes any moment feel a little more special.
Top Tips for Perfecting Your Zucchini Bread
I’ve learned a thing or two over the years of making this, so let me share some of my best tips to ensure your zucchini bread turns out absolutely perfect every single time. Regarding zucchini prep, I cannot stress enough how important it is to get the excess moisture out. After you grate your zucchini, place it in a fine-mesh sieve and gently press down with a spoon or your hands to squeeze out as much liquid as possible. You can also do this by wrapping it in a clean kitchen towel or cheesecloth and squeezing. This step is crucial for preventing a soggy, dense loaf and ensuring a tender crumb. For mixing advice, remember that the key to a tender quick bread is minimal mixing. Once you combine the wet and dry ingredients, mix *just until* the flour streaks disappear. A few lumps are perfectly fine and will disappear during baking. Overmixing will create a tough, chewy bread, and nobody wants that! When it comes to swirl customization, get creative! You can add a pinch of cocoa powder to half of the brown sugar mixture for a chocolate-cinnamon swirl, or even a bit of finely chopped crystallized ginger for a zesty kick. Don’t over-swirl; you want distinct layers of flavor. For ingredient swaps, if you don’t have butter, you can use a neutral-flavored oil like vegetable or canola oil, using the same amount. For a dairy-free option, use plant-based milk in the glaze. I’ve also tested this with applesauce instead of some of the oil, and it adds even more moisture, though it can make it a bit denser. For baking tips, always rely on the toothpick test rather than just the clock. Ovens can be finicky! If your loaf is browning too quickly on top but isn’t cooked through, you can loosely tent it with aluminum foil for the remainder of the baking time. Position your oven rack in the center for the most even heat distribution. Finally, for glaze variations, if you prefer a less sweet glaze, use lemon juice instead of milk; it adds a lovely tang. You can also skip the glaze entirely and just dust the cooled loaf with a little powdered sugar for a more subtle finish. Or, try a cream cheese glaze – it’s absolutely divine!
Storing and Reheating Tips
Proper storage is key to keeping this delicious zucchini bread tasting fresh and moist. If you’re planning to eat it within a day or two, keeping it at room temperature is perfectly fine. Just make sure to wrap it tightly in plastic wrap or place it in an airtight container. This prevents it from drying out. It usually stays wonderfully moist for about 2-3 days this way, though honestly, it rarely lasts that long in my house! For longer storage, the refrigerator is your best friend. Wrap the cooled loaf very well in plastic wrap, and then place it in an airtight container or a heavy-duty zip-top bag. It should keep well in the fridge for up to a week, though the texture might become slightly firmer. To reheat, you can simply let it come to room temperature or warm individual slices gently in a toaster oven or a low-heat oven for a few minutes. If you want to freeze it for later, freezer instructions are simple. Make sure the bread is completely cool. Wrap it tightly in a layer of plastic wrap, followed by a layer of aluminum foil, or place it in a freezer-safe bag, squeezing out as much air as possible. It can be stored in the freezer for up to 3 months. To thaw, remove it from the freezer and let it thaw at room temperature. The glaze timing advice is important: if you plan to freeze the bread, I highly recommend glazing it *after* it has thawed and is ready to be eaten. Glazing before freezing can sometimes result in a sticky or uneven texture after thawing. If you’re just refrigerating it, you can glaze it before storing, but wrapping it very securely is even more crucial.
Frequently Asked Questions
Final Thoughts
So there you have it – my absolute favorite zucchini bread recipe. It’s more than just a recipe to me; it’s a little piece of home, a comforting classic that always delivers. I truly hope you give this a try, because I’m convinced it’s going to become a staple in your kitchen too. The moist texture, the perfect spice blend, and that irresistible swirl make it a winner every single time. It’s the kind of bake that makes you feel incredibly accomplished, even though it’s surprisingly easy. If you’re a fan of this, you might also enjoy my recipe for moist banana bread or my easy apple crumble; they have that same comforting, homemade vibe. I’d be absolutely thrilled if you’d leave a comment below to let me know how your zucchini bread turned out, or share any fun variations you’ve tried! And if you loved it, please consider leaving a rating – it really helps other bakers discover this gem. Happy baking, and enjoy every single delicious bite!
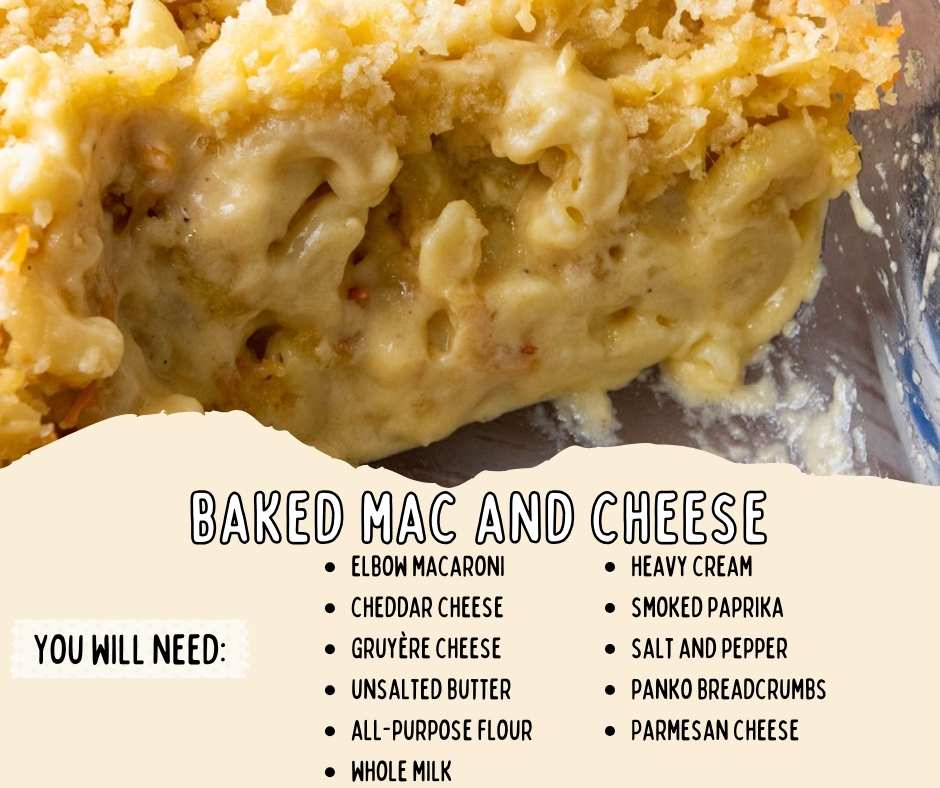
baked mac and cheese
Ingredients
Method
- Preheat the oven to 350° Fahrenheit. Lightly spray a 9 by 13-inch baking dish with nonstick spray.
- Cook the macaroni in a large pot of salted water according to the package instructions until it’s al dente. Drain it and set it aside.
- In a large saucepan, melt 0.5 stick (4 tablespoons) of butter over medium heat. Whisk in flour and cook for 1-2 minutes. Gradually add milk and cream, whisking constantly until thickened, about 5-7 minutes. Stir in smoked paprika, salt, and pepper.
- Remove the saucepan from heat. Stir in the shredded sharp cheddar and Gruyère cheeses until fully melted and smooth. Season to taste with salt and pepper.
- Add the cooked macaroni to the cheese sauce and stir until well combined. Pour the macaroni and cheese mixture into the prepared casserole dish.
- In a small saucepan, melt the remaining 0.5 stick (4 tablespoons) of butter. Once melted, mix in the panko breadcrumbs until they are well coated. Remove from heat.
- In a small bowl, combine the buttered panko breadcrumbs and grated Parmesan cheese.
- Sprinkle the breadcrumb mixture evenly over the macaroni and cheese.
- Bake in the preheated oven for 20-25 minutes, or until the top is golden brown and the sauce is bubbling around the edges.
- Remove from the oven and let it sit for a few minutes before serving.