Simple Apple Tart Recipe for Sweet Moments
Oh, you know, some days you just crave something warm, something comforting, something that smells like a hug from Grandma. That’s exactly how I feel about this zucchini bread recipe. It’s not just any zucchini bread, mind you. This is *the* zucchini bread. The one that makes my kids ask for seconds (and thirds, if I let them!), the one that disappears from the cooling rack faster than you can say “more, please.” Honestly, I’ve tried so many zucchini bread recipes over the years, searching for that perfect balance of moistness, sweetness, and that little hint of spice that just makes it sing. And I think I’ve finally, truly found it. It reminds me a bit of those classic lemon poppy seed muffins, but with this wonderfully earthy depth that only zucchini can bring. If you’re looking for a guaranteed crowd-pleaser that’s surprisingly simple to whip up, you’ve landed in the right spot. This one’s a lifesaver on busy nights, and honestly, even better the next morning with a cup of coffee.
What is Zucchini bread?
So, what exactly *is* this magical zucchini bread? At its heart, it’s a quick bread, which means it doesn’t rely on yeast to rise. Instead, we use chemical leaveners like baking soda and baking powder. The star ingredient, of course, is zucchini. Now, don’t get me wrong, you won’t *taste* the zucchini directly, but it’s the secret weapon that gives this bread its incredible, moist crumb. Think of it as a very, very delicious vehicle for all those wonderful spices and a touch of sweetness. It’s essentially a sweet quick bread batter loaded with grated zucchini, often with the addition of nuts or chocolate chips for extra texture and flavor. The name itself is pretty straightforward – it’s bread, made with zucchini! But this particular version is all about hitting that perfect texture and flavor profile that makes it utterly irresistible, not just a way to use up garden surplus (though it’s fantastic for that too!).
Why you’ll love this recipe?
Okay, let me tell you why this zucchini bread is my absolute go-to, the one I pull out when I need a little comfort or want to impress someone without breaking a sweat. First off, the flavor is just… phenomenal. It’s perfectly spiced with cinnamon and a hint of nutmeg, making it incredibly warming and cozy. The zucchini keeps it unbelievably moist, so you never have to worry about it being dry or crumbly, which is a common pitfall with quick breads. And the texture? Oh, it’s just divine. Slightly tender on the inside, with a beautiful golden-brown crust. What I love most about this recipe is its incredible simplicity. Seriously, you can have this mixed up and in the oven in about 15 minutes flat. It’s the kind of recipe that makes you feel like a baking superstar, even if you’re a total beginner. Plus, it’s ridiculously cost-efficient! Zucchini is usually pretty affordable, and the other ingredients are pantry staples for most bakers. And versatility? You bet! While I adore it plain with a simple glaze, it’s also incredible with a handful of walnuts or some dark chocolate chips stirred in. It’s the kind of treat that’s perfect for breakfast, a mid-afternoon snack, or even a light dessert. It’s a true winner in my kitchen, and I have a feeling it will be in yours too.
How do you make Zucchini bread?
Quick Overview
This recipe is all about ease and deliciousness. We’ll quickly combine our dry ingredients, then our wet ingredients, gently mix them together with the star – grated zucchini – and bake it until it’s perfectly golden and wonderfully fragrant. The real magic happens with the simple, yet decadent, cinnamon-sugar swirl and a light, tangy glaze that ties it all together. It’s genuinely straightforward, and I promise you, the most daunting part might just be waiting for it to bake!
Ingredients
For the Main Batter:
2 cups all-purpose flour (I love King Arthur for its consistency)
1 teaspoon baking soda
½ teaspoon baking powder
½ teaspoon salt
1 teaspoon ground cinnamon
¼ teaspoon ground nutmeg (freshly grated is a game-changer if you have it!)
1 ½ cups granulated sugar (you can reduce this slightly if you prefer, but I find this amount perfect)
2 large eggs, at room temperature
½ cup vegetable oil (or a neutral-flavored oil like canola; I’ve even used melted, unsalted butter in a pinch, but oil keeps it extra moist)
¼ cup milk (whole milk gives the best richness, but I’ve tested this with almond milk and it actually made it even creamier!)
1 teaspoon vanilla extract
2 cups grated zucchini (about 2 medium zucchinis, excess moisture squeezed out – I’ll tell you how in a bit!)
For the Cinnamon-Sugar Swirl:
2 tablespoons granulated sugar
1 teaspoon ground cinnamon
For the Simple Glaze:
1 cup powdered sugar
2-3 tablespoons milk (or lemon juice for a tangier flavor!)
½ teaspoon vanilla extract
Step-by-Step Instructions
Step 1: Preheat & Prep Pan
First things first, let’s get our oven all fired up to 350°F (175°C). This allows it to preheat evenly while we’re mixing. Now, grab a standard 9×5 inch loaf pan. Grease it really well with butter or cooking spray, and then dust it with a little flour. You can also line it with parchment paper, leaving an overhang on the sides – this makes it super easy to lift the bread out later. Make sure to get into all the corners!
Step 2: Mix Dry Ingredients
In a large bowl, whisk together the flour, baking soda, baking powder, salt, cinnamon, and nutmeg. Whisking these together ensures that all the leavening agents and spices are evenly distributed, which means no surprise pockets of salt or baking soda in your finished loaf. You want everything nicely combined so the bread rises evenly and has consistent flavor throughout. Give it a good few whisk-throughs!
Step 3: Mix Wet Ingredients
In a separate medium bowl, beat the eggs. Then, stir in the granulated sugar, oil, milk, and vanilla extract. Whisk it all until it’s smooth and well combined. The sugar might not completely dissolve, and that’s totally fine. You’re just looking for everything to be incorporated. Don’t overbeat here, just a nice, gentle mix.
Step 4: Combine
Now, pour the wet ingredients into the bowl with the dry ingredients. Using a spatula or a wooden spoon, mix them together *just until combined*. This is a crucial step, my friends! Overmixing develops the gluten in the flour, which can lead to a tough, dense bread. A few streaks of flour are okay – they’ll disappear as we add the zucchini. You want a batter that’s just coming together. Then, gently fold in the grated zucchini until it’s evenly distributed. It will look thick and maybe a little lumpy, and that’s exactly what we’re going for.
Step 5: Prepare Filling
This is the fun part! In a small bowl, combine the 2 tablespoons of sugar with the 1 teaspoon of cinnamon. Give it a quick stir with a fork to make sure the cinnamon is evenly mixed throughout the sugar. This simple mixture is what gives our zucchini bread that irresistible spiced swirl throughout the loaf.
Step 6: Layer & Swirl
Pour about half of the batter into your prepared loaf pan and spread it out evenly. Sprinkle about half of the cinnamon-sugar mixture over the top. Then, gently pour the remaining batter over this layer, spreading it to the edges. Sprinkle the rest of the cinnamon-sugar mixture over the top of the second batter layer. Now, take a knife or a skewer and gently swirl it through the batter a few times. Don’t overdo it – you just want to create some pretty ribbons of cinnamon-sugar throughout the loaf. It doesn’t need to be perfect; the imperfections are part of its charm!
Step 7: Bake
Pop the loaf pan into your preheated oven. Bake for about 55-70 minutes. The exact time will depend on your oven, so start checking around the 55-minute mark. You’ll know it’s done when a wooden skewer or toothpick inserted into the center comes out clean, with no wet batter clinging to it. If the top is browning too quickly, you can loosely tent it with aluminum foil. The aroma that fills your kitchen during this time is just heavenly – a mix of warm spices and sweet batter.
Step 8: Cool & Glaze
Once baked, let the zucchini bread cool in the pan on a wire rack for about 15-20 minutes. This allows it to set up properly. Then, carefully remove the loaf from the pan and let it cool completely on the wire rack. It’s important to let it cool completely before glazing, otherwise, the glaze will just melt and run off. While it’s cooling, whisk together the powdered sugar, 2 tablespoons of milk (or lemon juice), and vanilla extract in a small bowl. Add more liquid, a teaspoon at a time, until you reach your desired drizzling consistency. It should be thick enough to coat the bread but still pourable.
Step 9: Slice & Serve
Once the bread is completely cool, it’s time for the grand finale: the glaze! Drizzle that luscious glaze all over the top of the loaf. Let the glaze set for a few minutes, then slice it up and enjoy! The best way to slice it is with a serrated knife for clean cuts. I love serving this warm, but it’s also fantastic at room temperature, and honestly, sometimes even cold straight from the fridge (don’t judge!).
What to Serve It With
This zucchini bread is a total chameleon when it comes to pairings! For a simple and satisfying breakfast, I love it toasted lightly and served with a smear of butter or cream cheese. It’s also absolutely delightful alongside a steaming mug of coffee or a creamy latte. When I’m entertaining for brunch, it feels a little more elegant. I’ll slice it neatly and arrange it on a nice platter, maybe with a scattering of fresh berries on the side. It pairs beautifully with a mimosa or some sparkling cider. As a simple dessert, especially when I’m craving something sweet at 10 pm but don’t want to bake a whole cake, this is my secret weapon. A thin slice, perhaps with a dollop of whipped cream or a small scoop of vanilla bean ice cream, is pure bliss. And for those truly cozy snacks, it’s perfect just as is. I often cut a thick slice, grab a glass of milk (my kids ask for this all the time!), and curl up with a good book. My personal family tradition is to make a batch on Sunday afternoons; the smell alone brings everyone to the kitchen, and it’s the perfect accompaniment to our relaxed weekend vibes.
Top Tips for Perfecting Your Zucchini Bread
Alright, let’s talk about elevating your zucchini bread game. There are a few little tricks I’ve picked up over the years that really make a difference. First, for the zucchini prep: grating is key, and the size of the grate matters. I prefer a medium grate. After grating, it’s *super* important to squeeze out as much excess moisture as you can. I usually do this by placing the grated zucchini in a clean kitchen towel or cheesecloth and wringing it out thoroughly. This prevents your bread from becoming too wet and dense. Trust me on this one; it’s a game-changer!
When it comes to mixing advice, remember that gentleness is your friend. You’re not making a tough sourdough here! Mix the wet and dry ingredients just until they’re *barely* combined. A few little lumps or streaks of flour are actually a good sign. Overmixing is the quickest way to a dense, chewy loaf, and we’re aiming for tender and moist!
For the swirl customization, don’t be afraid to experiment! While the cinnamon-sugar is classic, you can also try adding a swirl of melted chocolate, some finely chopped nuts like pecans or walnuts, or even a spoonful of jam. Just make sure whatever you add doesn’t make the batter too wet. For a more intricate swirl, try adding dollops of your swirl mixture and then using a skewer to gently drag it through the batter. For visual appeal, ensure the swirl is distributed throughout the layers.
When it comes to ingredient swaps, I’ve played around quite a bit! If you need to make this gluten-free, a good 1-to-1 gluten-free baking blend usually works well, though you might need a touch more liquid. I’ve also experimented with different fats; while oil provides unbeatable moisture, melted unsalted butter lends a lovely flavor. For the sugar, you can reduce it by about ¼ cup if you prefer a less sweet bread, but it will affect the overall texture and browning slightly. And for chocolate chip lovers, about ¾ to 1 cup of semi-sweet or dark chocolate chips folded in with the zucchini is pure decadence.
My go-to baking tips include making sure your oven is accurately calibrated. An oven thermometer is a great tool! I usually bake this in the center rack of the oven to ensure even heat distribution. If your oven tends to brown the top too quickly, don’t hesitate to loosely tent it with aluminum foil for the last 15-20 minutes of baking. The doneness test is key: a clean toothpick is your best friend.
Finally, for glaze variations, you can play with the liquid. Lemon juice adds a lovely tang that cuts through the sweetness beautifully. For a richer glaze, you can use heavy cream instead of milk. If you want a thicker glaze, just use less liquid. For a thinner glaze that drizzles more readily, add a touch more liquid. Some people even like a cream cheese glaze, which is also fantastic!
Storing and Reheating Tips
This zucchini bread is surprisingly forgiving when it comes to storage. If it’s going to be devoured within a day or two (which is usually the case in my house!), I’ll keep it stored at room temperature. Just make sure it’s completely cool, then wrap it tightly in plastic wrap or place it in an airtight container. It usually stays wonderfully moist for about 2-3 days. If you need it to last longer, the refrigerator is your best bet. Again, ensure it’s completely cool, then wrap it tightly in plastic wrap, and then place it in an airtight container or a zip-top bag. It should stay good for up to a week, though the texture might change slightly after a few days. When you’re ready to enjoy a slice from the fridge, you can eat it cold, or warm it up gently. I usually pop a slice in the microwave for about 10-15 seconds, or toast it lightly in a toaster oven or under the broiler for a minute or two until warmed through.
For longer storage, freezer instructions are your friend. Once the bread is completely cooled, I like to wrap the entire loaf (or individual slices, which is super convenient!) tightly in a layer of plastic wrap, followed by a layer of aluminum foil, or just place them in a heavy-duty freezer bag. It will keep well in the freezer for up to 2-3 months. To thaw, simply remove it from the freezer and let it come to room temperature on the counter, or for a quicker thaw, gently reheat it as described above. I usually wait to add the glaze until *after* the bread has been thawed and is ready to be served, especially if it’s been frozen. Adding glaze to a frozen or partially thawed loaf can make it gummy or just not set properly.
Frequently Asked Questions
Final Thoughts
So there you have it – my absolute favorite zucchini bread recipe. It’s more than just a recipe to me; it’s a little piece of comfort, a taste of home, and proof that simple ingredients can create something truly extraordinary. It’s the kind of baking that fills your home with the most wonderful aroma and brings smiles to everyone’s faces. If you love this recipe, you might also enjoy my Lemon Blueberry Scones or my Ultimate Chocolate Chip Cookie recipe – they’re all about that same feeling of warmth and homemade goodness. I truly hope you give this zucchini bread a try. I can’t wait to hear what you think! Please, leave a comment below and tell me how yours turned out, or share any fun variations you tried. Happy baking, my friends!

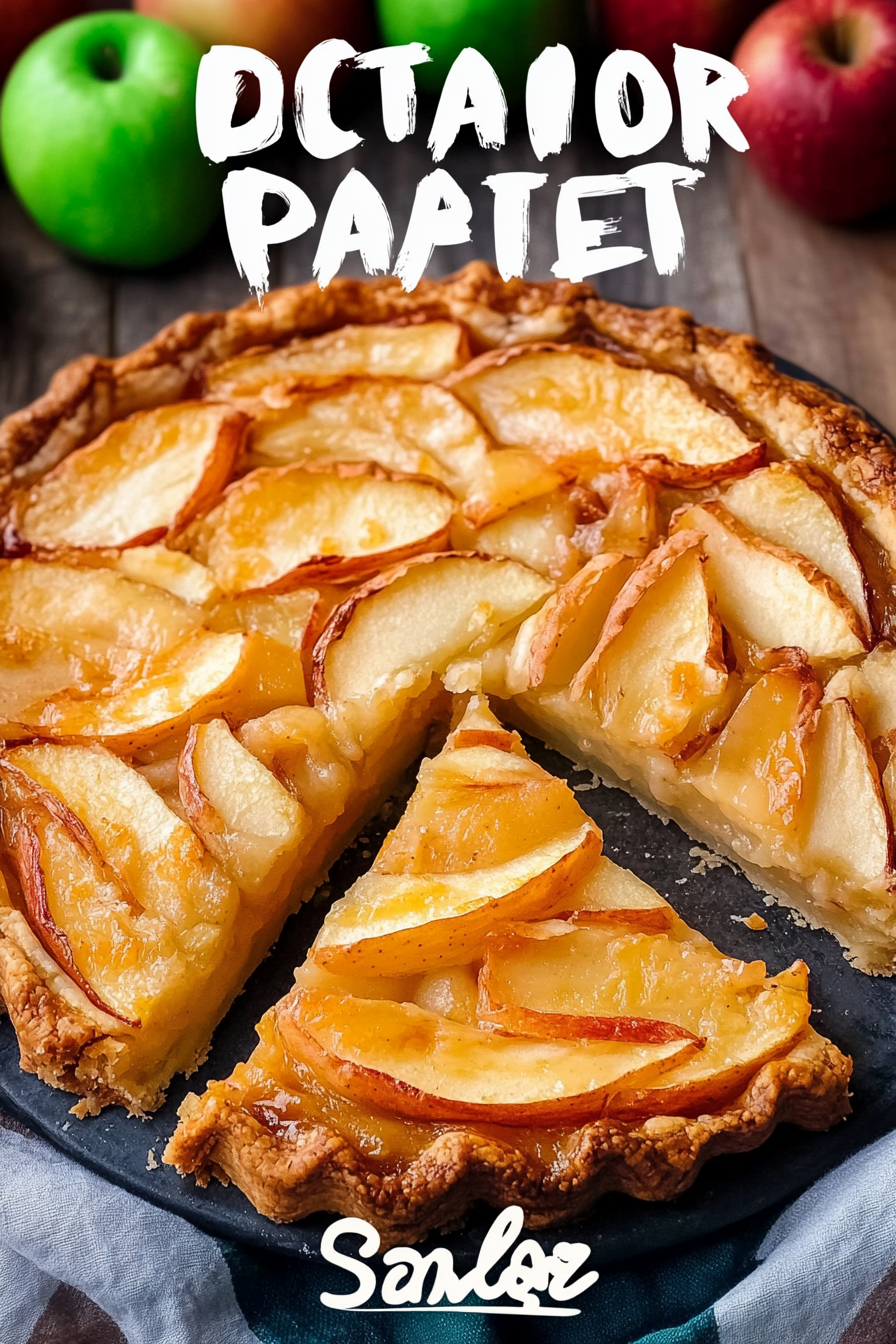
apple tart
Ingredients
Method
- Preheat oven to 400°F (200°C). Line a large baking sheet with parchment paper or a silicone baking mat.
- In a small bowl, stir together the brown sugar, cinnamon, and nutmeg. Set aside.
- In a large bowl, toss the thinly sliced apples with lemon juice. Add the reserved sugar mixture and toss until the apples are evenly coated.
- Unroll the pie crust onto the prepared baking sheet. Gently roll it out slightly to form a 12 to 13-inch circle.
- Arrange the apple slices in the center of the pie crust circle, leaving a 2-inch border around the edges. Try to keep the apples mounded slightly in the center.
- Gently fold the edges of the pie crust up over the apples, overlapping as necessary to create a rustic, free-form tart. In a small bowl, whisk together the egg and milk for the egg wash, then brush it over the exposed crust.
- Bake for 28-32 minutes, or until the crust is golden brown and the apples are tender. If the crust begins to brown too quickly, you can loosely tent it with aluminum foil.
- Let the apple tart cool to room temperature on the baking sheet before serving. It can be served plain, warm, or with a scoop of vanilla ice cream. Store any leftovers in the refrigerator.