Easy Grilled Herb Chicken Couscous Bowls
You know those recipes that just feel like home? The ones that smell incredible, taste even better, and somehow always seem to turn out perfectly, no matter what? Well, I’ve got one of those for you today, and it’s my absolute favorite Zucchini Bread. I know, I know, “zucchini” might not sound like the most exciting word when you’re thinking about dessert, but trust me on this one! This isn’t just any zucchini bread; it’s the kind of moist, flavorful loaf that disappears in minutes. It’s the perfect antidote to a “what should I bake?” dilemma, especially when you’ve got a few zucchini lurking in your fridge. It reminds me of my grandma’s kitchen, filled with the aroma of cinnamon and something sweet baking. If you love a good quick bread, something that’s a bit of a hug in edible form, you are going to adore this.
What is Zucchini bread?
So, what exactly *is* zucchini bread? In the simplest terms, it’s a quick bread, much like banana bread or pumpkin bread, but with grated zucchini as its star ingredient. Don’t let that vegetable name fool you, though! The zucchini doesn’t really add a pronounced “zucchini” flavor; what it does is magic. It lends an unbelievable moisture and a super tender crumb to the finished loaf. Think of it as a secret weapon for a wonderfully soft texture. The name “zucchini bread” is pretty straightforward, but the concept is all about transforming simple ingredients into something truly special and comforting. It’s essentially a cake-like bread that’s fantastic for breakfast, a snack, or even a light dessert. It’s hearty enough to feel substantial but sweet and spiced enough to satisfy any craving!
Why you’ll love this recipe?
Honestly, there are so many reasons why this zucchini bread has earned a permanent spot in my recipe rotation. For starters, the flavor is just spot-on. It’s got that warm, cozy hug of cinnamon and nutmeg, perfectly balanced with just the right amount of sweetness. It’s not overly sweet, which I really appreciate, especially for a morning treat. But the real showstopper? The texture. Thanks to the zucchini, this bread is unbelievably moist and tender. It’s the kind of bread that doesn’t dry out easily, which is a huge win in my book. And it’s surprisingly simple to whip up. Even on those nights when I’m running late and need a quick dessert or a bake sale contribution, this is my lifesaver. The ingredients are all pantry staples, making it incredibly cost-effective. Plus, it’s so versatile! You can toss in chocolate chips (my kids’ favorite addition!), nuts, or even a swirl of cream cheese for a decadent twist. What I love most about this recipe is how forgiving it is. Even if you’re new to baking, you’ll find this easy to follow. It’s a crowd-pleaser, too – I’ve made this countless times for parties and family gatherings, and it always disappears in minutes. It’s a true testament to how simple ingredients can create something so delicious and satisfying. It’s a far cry from some of those dry, crumbly quick breads you might have encountered before!
How do you make Zucchini bread?
Quick Overview
The beauty of this zucchini bread is its straightforward approach. We’re essentially mixing our dry ingredients, then our wet ingredients, and then bringing them together before folding in that essential grated zucchini. A quick swirl of cinnamon-sugar mixture is optional but highly recommended for that extra layer of flavor and a beautiful ribboned effect. Bake until golden and fragrant, let it cool slightly, and you’re ready to enjoy a slice of pure comfort. It’s a foolproof method that guarantees a perfectly moist and delicious loaf every time.
Ingredients
For the Main Batter:
Here’s what you’ll need for the foundation of our delicious bread. I always try to use fresh, good-quality ingredients for the best results. The flour is your standard all-purpose, nothing fancy needed. For the sugar, I use a mix of granulated and brown sugar – the brown sugar adds a lovely depth of flavor and extra moisture. Make sure your baking soda and baking powder are fresh; expired leaveners can really affect the rise. And don’t skimp on the spices! A good amount of cinnamon and a pinch of nutmeg make all the difference. I also add a bit of salt to balance out the sweetness.
2 ½ cups all-purpose flour
1 teaspoon baking soda
½ teaspoon baking powder
1 teaspoon ground cinnamon
½ teaspoon ground nutmeg
½ teaspoon salt
1 cup granulated sugar
½ cup packed light brown sugar
For the Wet Ingredients:
This is where the magic happens for that incredible moisture. You’ll need eggs to bind everything together and add richness. Unsalted butter, melted and slightly cooled, is key for flavor and tenderness. And of course, the star – fresh zucchini! Grate it finely, and *definitely* squeeze out as much excess moisture as you can. This is a crucial step I learned the hard way early on! A little bit of vanilla extract rounds out the flavors beautifully. I’ve also experimented with using almond milk instead of regular milk once, and it actually made it even creamier! So don’t be afraid to play around if you have dietary preferences.
2 large eggs, at room temperature
½ cup (1 stick) unsalted butter, melted and slightly cooled
1 cup grated zucchini (from about 1 medium zucchini), excess moisture squeezed out
1 teaspoon vanilla extract
For the Swirl (Optional but Highly Recommended!):
This is what gives our zucchini bread that beautiful marbled look and an extra punch of cinnamon flavor. It’s super simple: just mix brown sugar, cinnamon, and a tiny bit of melted butter. This little step elevates the whole experience.
½ cup packed light brown sugar
2 teaspoons ground cinnamon
2 tablespoons unsalted butter, melted
Step-by-Step Instructions
Step 1: Preheat & Prep Pan
First things first, get your oven preheated to 350 degrees F (175 degrees C). This is important so the bread bakes evenly from the moment it goes in. Then, grab a standard 9×5 inch loaf pan. Grease it really well, and then flour it. I usually use butter or cooking spray for greasing, and then a tablespoon or two of flour, tapping out any excess. This ensures your beautiful loaf doesn’t stick. You can also line the pan with parchment paper for extra insurance – it makes getting the bread out a breeze!
Step 2: Mix Dry Ingredients
In a large bowl, whisk together your flour, baking soda, baking powder, cinnamon, nutmeg, and salt. Give it a good whisk until everything is well combined. You want to make sure your leaveners are evenly distributed so you don’t get any weird pockets or flat spots in your bread. This step also helps to aerate the flour a bit.
Step 3: Mix Wet Ingredients
In a separate medium bowl, whisk together the granulated sugar and brown sugar until combined. Then, add in the eggs, one at a time, whisking well after each addition. Pour in the melted and slightly cooled butter, followed by the grated zucchini and vanilla extract. Stir everything together until it’s just combined. Don’t worry if it looks a little lumpy, that’s totally fine!
Step 4: Combine
Now, pour the wet ingredients into the bowl with the dry ingredients. Using a rubber spatula or a wooden spoon, gently fold the wet ingredients into the dry until just combined. It’s *so* important not to overmix here! Overmixing can develop the gluten too much, resulting in a tough bread. Stop mixing as soon as you no longer see streaks of dry flour. A few little lumps are okay; they’ll work themselves out during baking.
Step 5: Prepare Filling
If you’re doing the cinnamon-sugar swirl, now’s the time to prepare it. In a small bowl, mix together the ½ cup of brown sugar, 2 teaspoons of cinnamon, and the 2 tablespoons of melted butter. Stir until it forms a thick, spreadable paste. This is going to be heavenly.
Step 6: Layer & Swirl
Pour about half of the batter into your prepared loaf pan and spread it evenly. Dollop about half of the cinnamon-sugar mixture over the batter. Then, pour the remaining batter on top, spreading it gently. Dollop the rest of the cinnamon-sugar mixture over the second layer of batter. Now, take a knife or a skewer and gently swirl the cinnamon mixture into the batter. You don’t need to go all the way to the bottom; just a few passes will create beautiful ribbons. Be careful not to over-swirl, or you’ll lose the distinct layers.
Step 7: Bake
Pop that beautiful pan into your preheated oven. Bake for 50-65 minutes. The baking time can vary depending on your oven, so start checking around the 50-minute mark. You’ll know it’s done when a wooden skewer or toothpick inserted into the center comes out clean, or with just a few moist crumbs attached. If the top starts to brown too quickly before the center is cooked, you can loosely tent it with aluminum foil.
Step 8: Cool & Glaze
Once it’s baked, take the loaf pan out of the oven and let it cool in the pan for about 10-15 minutes. This allows the bread to set up a bit before you try to remove it. After that initial cooling, carefully invert the pan onto a wire rack to release the bread. Let it cool completely on the wire rack before slicing and glazing (if you choose to glaze it – I sometimes do!).
Step 9: Slice & Serve
Once the bread is completely cool, slice it into thick, generous pieces using a serrated knife. This is the best way to get clean slices without squishing the loaf. Serve it as is, or with a smear of butter. It’s perfect warm or at room temperature. Enjoy the moist, spiced goodness you just created!
What to Serve It With
This zucchini bread is so wonderfully versatile, it fits into so many moments of your day! For a simple and comforting breakfast, I love it toasted with a light spread of butter and a good cup of coffee. The warmth of the coffee and the spiced bread are just divine together. If you’re having friends over for a relaxed brunch, this bread is a fantastic addition to a spread. I like to serve it alongside some fresh fruit salad, maybe some yogurt, or even a savory quiche. It offers a lovely sweet counterpoint. As a dessert, it’s a winner too! A drizzle of cream cheese frosting or a light dusting of powdered sugar takes it to the next level, especially when served with a scoop of vanilla bean ice cream. And for those cozy evenings when you just need a little something sweet? This bread is perfect. It’s satisfying enough that you don’t feel like you’re missing out on a full dessert, but sweet and comforting enough to hit the spot. My kids also love it with a glass of cold milk as an afternoon snack after school – it’s a winner for them every time!
Top Tips for Perfecting Your Zucchini Bread
I’ve made this zucchini bread more times than I can count, and over the years, I’ve picked up a few tricks that really make a difference. Here are my top tips to help you achieve zucchini bread perfection:
Zucchini Prep: This is *the* most critical step. Don’t just grate the zucchini and toss it in. Grate it on the fine side of your box grater, then gather it up in a clean kitchen towel or cheesecloth and squeeze *hard*. You’ll be amazed at how much liquid comes out. Excess moisture is the enemy of a good quick bread; it can make it gummy and dense. So, squeeze, squeeze, squeeze!
Mixing Advice: Remember what I said about not overmixing? It’s worth repeating! Gently fold the wet into the dry ingredients just until combined. A few small lumps of flour are totally okay. Overmixing develops the gluten, making your bread tough and chewy instead of tender and moist. Your goal is a tender crumb, not a bread that bounces back when you poke it.
Swirl Customization: The cinnamon-sugar swirl is optional, but oh-so-worth-it. For the best swirl effect, don’t make the cinnamon-sugar mixture too wet. You want it to be a thick, spreadable paste. When you swirl, use a gentle back-and-forth motion with a knife or skewer. Aim for about 5-7 passes. This creates beautiful ribbons without muddying the flavors too much. You can also add a few chocolate chips to the batter before swirling for an extra treat!
Ingredient Swaps: If you find yourself out of one of the ingredients, don’t fret! For the sugars, if you don’t have brown sugar, you can use all granulated sugar, but you might lose a little bit of that deep flavor and moisture. I’ve tested this with almond milk and it actually made it even creamier! If you’re not a fan of nutmeg, you can omit it or add a pinch of cardamom instead. For additions like nuts or chocolate chips, about ½ to ¾ cup is usually a good amount.
Baking Tips: Ovens can be fickle creatures! If your oven tends to run hot, start checking for doneness a little earlier. Conversely, if it runs cool, you might need a few extra minutes. The toothpick test is your best friend here – clean or with a few moist crumbs means it’s ready. Placing the loaf pan in the center of the oven ensures even heat distribution. If the top is browning too quickly, a loose tent of aluminum foil will save the day.
Glaze Variations: While I often skip the glaze on this bread because it’s so moist and flavorful on its own, a simple glaze can be lovely. For a classic powdered sugar glaze, whisk together about 1 cup of powdered sugar with 1-2 tablespoons of milk or lemon juice until smooth and pourable. Adjust the liquid for your desired consistency. A cream cheese glaze is also divine! Whisk together 4 oz softened cream cheese with ¼ cup softened butter and 1 cup powdered sugar until smooth.
Storing and Reheating Tips
This zucchini bread is pretty forgiving when it comes to storage, which is one of the reasons I love it so much. It holds up really well!
Room Temperature: Once completely cooled, you can store the loaf at room temperature, tightly wrapped in plastic wrap or in an airtight container, for about 2-3 days. It stays wonderfully moist during this time. Make sure it’s fully cooled before wrapping, otherwise condensation can form, making it soggy.
Refrigerator Storage: If you live in a warmer climate or want it to last a bit longer, it’s perfectly fine to store it in the refrigerator. Wrap it tightly in plastic wrap or place it in an airtight container. It will stay good in the fridge for about 5-7 days. The texture might become slightly firmer when cold, but it’s still delicious.
Freezer Instructions: This bread freezes beautifully, making it ideal for making ahead. Once the loaf is completely cooled, wrap it tightly in a layer of plastic wrap, then a layer of aluminum foil. You can also slice it first and wrap individual slices. It will keep well in the freezer for up to 3 months. To thaw, unwrap it and let it sit at room temperature for a few hours, or gently reheat it.
Glaze Timing Advice: If you’ve added a glaze, it’s best to add it *just* before serving or when the bread is completely cooled. If you glaze a warm loaf, the glaze will melt and become a sticky mess. For loaves stored at room temperature or in the fridge, you can add the glaze just before you’re ready to slice and serve. If freezing with glaze, it’s often better to add the glaze after thawing to prevent it from cracking or becoming watery.
Frequently Asked Questions
Final Thoughts
There you have it – my tried-and-true zucchini bread recipe! It’s the kind of recipe that feels like a warm hug, perfect for any occasion. What I love most about it is its incredible moistness and comforting spice, all thanks to a humble vegetable that works wonders. It’s a recipe I know I can always rely on, whether I’m baking for my family or bringing something to a friend. It’s proof that simple ingredients, treated with a little care, can create something truly magical. If you’re a fan of quick breads, I highly recommend giving this one a try. And if you’re new to baking with zucchini, this is the perfect place to start. I’d love to hear how yours turns out, or if you have any special additions you like to include! Feel free to leave a comment below and share your baking adventures. Happy baking!
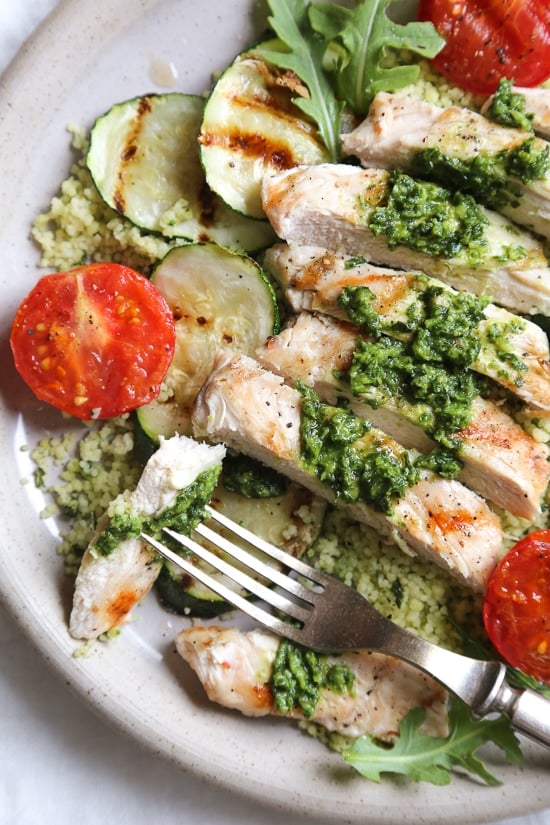
Grilled Pesto Chicken Couscous Bowls
Ingredients
Method
- To make the pesto: In a food processor, pulse basil, spinach and arugula mix, garlic, parmesan cheese, salt and pepper until smooth. Slowly add the olive oil while pulsing.
- Place couscous in a medium, heat-proof bowl. Add boiling water and 0.25 teaspoon salt. Cover.
- Let stand for 5 minutes or until liquid has been absorbed. Fluff couscous with a fork to separate grains.
- Add 2 tablespoons of the prepared pesto to the couscous. Toss to combine and set aside.
- Pound the thicker end of the chicken breasts to make both sides leveled out so they cook evenly.
- Spritz chicken with olive oil cooking spray and season with 0.5 teaspoon salt and black pepper.
- Heat a grill or grill pan on medium-high heat.
- Spritz the zucchini and tomato all over with olive oil cooking spray, season with salt and pepper.
- Cook zucchini, in batches, for 2 to 3 minutes each side or until tender. Transfer to a baking sheet. Cover to keep warm.
- Add tomatoes to the grill. Cook, turning, for 1 to 2 minutes or until softened.
- Cook the chicken 3 to 4 minutes each side or until browned and cooked through. Slice.
- Divide couscous between 4 plates, 0.75 cup each.
- Top with grilled vegetables and sliced chicken. Drizzle with remaining pesto. Serve immediately.