Crispy Air Fryer Parmesan Chicken Recipe
Honestly, there’s something so nostalgic about the smell of a warm coffee cake wafting through the house. It instantly takes me back to lazy Sunday mornings at my grandma’s place, sitting around the table with hot coffee and a slice of something sweet. But the funny thing? I always do this when I want that comforting, cozy feeling — I whip up this zucchini cinnamon swirl coffee cake. It’s kind of like a classic crumb cake, but with a sneaky veggie twist that makes me feel like I’m being a little sneaky — even though, let’s be real, everyone loves it so much they ask for seconds anyway. It’s incredibly forgiving, super moist, loaded with cinnamon flavor, and the swirl of zucchini keeps it insanely tender. And the best part? It’s a total lifesaver on busy nights when I want something homemade and sweet but don’t want to spend hours in the kitchen. Plus, my kids ask for this all the time, especially when zucchini is in season—because who doesn’t love a sneaky veggie in dessert, right?
What is Zucchini cinnamon swirl coffee cake?
This Zucchini Cinnamon Swirl Coffee Cake is basically a tender, moist cake with a generous swirl of cinnamon-sugar goodness running through it. Think of it as a cross between your favorite crumb cake and a quick bread — moist, flavorful, and just a little bit indulgent. The zucchini isn’t just there for fun; it keeps this cake from drying out and adds a subtle veggie sweetness that balances the cinnamon and sugar perfectly. Its name probably comes from the simple combination of zucchini and that addictive cinnamon swirl, but honestly, it’s more like a cozy hug in cake form. The best part? It’s so easy to make, you’re practically hands-off once everything’s mixed. Honestly, this one’s a lifesaver when you want to impress someone with a homemade treat that looks fancy but is so simple you can whip it up on a weeknight. Plus, it’s great for breakfast, brunch, or even as an afternoon snack. Think of it as a conversation starter—everyone wants to know your secret ingredient, and I love giving that little smile and saying, “Zucchini, of course!”
Why you’ll love this recipe?
What I love most about this zucchini cinnamon swirl coffee cake is how it combines all those cozy flavors we crave with almost no fuss. The smell alone—warm cinnamon, sweet vanilla, a hint of freshly grated zucchini—can make anyone’s day. It’s such a forgiving recipe; I’ve tested it with different flours, added a splash of almond milk, even used less sugar, and it still turns out amazing every time. The moistness comes from the zucchini, which makes it perfect if you’re like me and worry about dry baked goods. Plus, it’s budget-friendly—most of the ingredients are staples I keep on hand—and it’s a great way to sneak more veggies into your family’s diet without even turning on the spinach! What really makes this stand out from other coffee cakes is that beautiful cinnamon swirl—it’s basically the star of the show. The combo of sweet, spicy cinnamon and the tender cake with bits of zucchini? It’s just *so* good. And because it’s easy to make, it’s perfect for when friends drop by unexpectedly or when you just want a treat that feels special but doesn’t require hours of work. I’ve made this countless times, and honestly, I never get tired of the warm, comforting aroma filling my kitchen. Trust me on this one—you’ll be making it over and over!
How do you make Zucchini Swirl Coffee Cake?
Quick Overview
This cake comes together quickly because it’s practically a one-bowl wonder. You start by mixing your dry ingredients—flour, baking powder, a pinch of salt—while you grate the zucchini (don’t forget to squeeze out some excess moisture!). Then, you whisk your wet ingredients—milk, oil, vanilla, eggs—and fold everything together just until combined. The cinnamon-sugar swirl is made with cinnamon, brown sugar, and butter melted into a thick, fragrant paste. Layer the batter in your baking dish, dollop the cinnamon filling on top, and use a butter knife or skewer to swirl it into the batter for that gorgeous marbled effect. Bake until the edges are golden, and a toothpick inserted in the center comes out clean. Once cooled slightly, drizzle with a simple glaze if you’re feeling fancy or just dust with powdered sugar. It’s honestly so straightforward that I can make this when I’m running around with the kids or after a long day—yet it looks and tastes like I fussed over it all morning.
Ingredients
For the Main Batter:
– 2 cups all-purpose flour (I love using unbleached for extra flavor)
– 1 teaspoon baking powder
– ½ teaspoon baking soda
– ½ teaspoon salt
– 1 teaspoon ground cinnamon
– 1 cup sugar (or coconut sugar for a healthier twist)
– ½ cup vegetable oil or melted butter
– 2 large eggs
– 1 teaspoon vanilla extract
– 1 cup grated zucchini (squeeze out excess moisture — I do this by pressing it in a clean kitchen towel)
For the Filling:
– ⅓ cup brown sugar
– 1 tablespoon ground cinnamon
– 2 tablespoons unsalted butter, melted
– Optional: a pinch of nutmeg or a splash of maple syrup for extra depth
For the Glaze:
– ½ cup powdered sugar
– 1-2 teaspoons milk or cream
– ½ teaspoon vanilla (or almond extract if you’re feeling fancy)
Step-by-Step Instructions
Step 1: Preheat & Prep Pan
Start by heating your oven to 350°F (175°C). Grease a 9-inch square baking dish or line it with parchment paper — I like to do both for easy cleanup. This cake is pretty forgiving, but a well-prepped pan makes all the difference. If you’re using glass or ceramic, just remember it takes a couple of minutes longer to bake through, so keep an eye out for that perfectly golden edge.
Step 2: Mix Dry Ingredients
In a large mixing bowl, whisk together the flour, baking powder, baking soda, salt, and cinnamon. I always do this first to make sure everything’s evenly distributed — I don’t want the baking soda sitting in one spot, believe me. When I tell you this part takes less than two minutes, I mean it. This step ensures your cake is light and fluffy, not dense or uneven.
Step 3: Mix Wet Ingredients
In a separate bowl, whisk the eggs, sugar, vanilla, and oil. The eggs should be well combined, and the mixture should be slightly frothy. I’ve tested this with almond milk instead of regular milk, and it made the cake even creamier — so don’t be afraid to swap that out if you prefer dairy-free versions. Just make sure everything’s at room temperature for the best results.
Step 4: Combine
Now, pour the wet ingredients into the dry and fold gently. Do not overmix! A few lumps are okay — this keeps the cake extra tender. The batter will be thick but spreadable, almost like thick pancake batter. Stir in the grated zucchini last, making sure it’s evenly dispersed. That little bit of moisture from the zucchini helps keep the cake moist for days.
Step 5: Prepare Filling
Mix the brown sugar, cinnamon, and melted butter to make your cinnamon swirl. It should be crumbly but moist enough to spread easily. If it feels too dry, add a little more melted butter or a drizzle of honey. This filling is what makes the cake so addictive, so don’t skimp on the cinnamon—trust me, it’s worth it.
Step 6: Layer & Swirl
Spread about half the batter in the prepared pan. Dollop the cinnamon mixture in large spoonfuls over the batter, then add the rest of the batter on top. Using a butter knife, gently swirl the cinnamon into the batter — creating those beautiful ribbons. I love doing figure eights or zigzags; it makes each slice look just a little more homey and charming.
Step 7: Bake
Pop it into your preheated oven and bake for 35-40 minutes. Start checking around 35; insert a toothpick in the center — if it comes out clean, it’s ready. If not, give it another five minutes. The top should be golden, and the edges might slightly pull away from the pan. It’s totally normal if the center puffs up a little—it’ll settle after cooling.
Step 8: Cool & Glaze
Let the cake cool for at least 15 minutes before glazing or slicing. Cooling helps it set so it doesn’t fall apart when you cut into it. Mix together your powdered sugar, vanilla, and just enough milk to make a drizzle-able glaze. I decorate mine with a quick drizzle here and there — it’s a small touch that really elevates the presentation (and taste!).
Step 9: Slice & Serve
Use a sharp serrated knife to cut through the cake gently; this keeps the swirl looking pretty. Serve it warm or at room temperature — I love it both ways. For extra indulgence, a dollop of whipped cream or a scoop of vanilla ice cream really takes it over the top. Honestly, it looks fancy enough for a special brunch but is so simple I make it for a quick family treat on busy school mornings, too. Trust me, once you try this, it’ll become a regular staple in your baking rotation.
What to Serve It With
This cake is pretty versatile (like most good recipes!). For breakfast, I like to pair it with a strong cup of coffee or a frothy latte—something to wake you up and complement the cinnamon. If I’ve got friends over for brunch, I’ll set it on a pretty platter with some fresh berries and a dusting of powdered sugar—looks so inviting! It’s also fantastic as a late-night snack; warm with a drizzle of honey and a handful of nuts. And because it’s not overly sweet, my kids ask for this all the time as their “dessert,” and I don’t mind at all. I’ve even made mini muffins with this batter — just portion into muffin tins and reduce baking time by about 10 minutes. Little handheld portions are perfect for school lunchboxes or quick snacks. Honestly, you can serve it anytime—breakfast, brunch, snack, or dessert—and it’ll always feel like a special treat. Plus, it’s one of those recipes that gets better the next day, once the flavors meld a little more.
Top Tips for Perfecting Your Zucchini Cinnamon Swirl Coffee Cake
After making this dozens of times, I’ve picked up a few tricks that make all the difference. First, always squeeze out excess moisture from your zucchini. If it’s watery, your batter becomes too loose and won’t hold the swirl nicely. I do this in a clean kitchen towel — give it a good press! Second, don’t overmix the batter once you add the wet to dry—it’s tempting to go all speedy, but gentle folding keeps it fluffy. When swirling in the cinnamon mixture, don’t be afraid to be a little messy; that’s part of the charm, and it helps create those beautiful marbling patterns. For ingredient swaps, I’ve tried coconut oil, which adds a subtle flavor, and almond flour — it makes the texture denser, but still delicious. If you’re watching sugar, reduce it by a couple of tablespoons, but don’t go much lower or the swirl might lose its depth. For baking, I recommend positioning the rack in the center of your oven—I’ve learned that oven hot spots can mess with your baking, and this way, everything bakes evenly. And about the glaze — I’ve played around with a splash of lemon juice or orange zest for a citrus twist, which pairs surprisingly well with the cinnamon. Honestly, the best thing you can do is taste as you go — adjust the cinnamon if you like it spicier or sweeter. Every time I tweak this recipe, I learn a little more, and I always end up with versions that are even better than the last.
Storing and Reheating Tips
This cake is best enjoyed within a couple of days—but if you’re like me and want to save some for later, here’s what I do. At room temperature, keep it covered tightly with foil or cling wrap for up to 24 hours; after that, it starts to get a little dry. For longer storage, pop it into an airtight container and refrigerate for 3-4 days. Honestly, it’s still delicious cold, but I prefer to warm slices in the microwave for about 20 seconds — the smell alone gets everyone excited! If you’re making this ahead for a big gathering, you can freeze individual slices wrapped tightly in plastic wrap, then reheat them directly in the microwave or oven. Just be sure to add the glaze right before serving, or it’ll get a little soggy if you freeze it with the glaze on. Speaking of glaze, I like to wait until just before serving if I want a shiny, fresh appearance. Storing unglazed keeps it fresher longer, and you can always add a fresh drizzle when ready to serve. This cake keeps well because the zucchini keeps it moist—trust me, it’s just as good the next day, if not better, once the cinnamon flavors settle into the batter.
Frequently Asked Questions
Final Thoughts
If you’re craving something warm, comforting, and a little bit special without all the fuss, this zucchini cinnamon swirl coffee cake is your new best friend. It’s a recipe I keep coming back to because it’s so forgiving — perfect for beginner bakers or anyone who wants a shortcut to something homemade and tasty. The aroma alone will fill your house with cozy memories, and the taste? Well, every bite feels like a little celebration. I love how adaptable it is, too — variations with different spices, different toppings, and even different flours make it fun to experiment. My family asks for this all the time, and I hope you’ll love it just as much. So, don’t be shy — grab some zucchini from your garden or your fridge, and let’s get baking! I can’t wait to hear how yours turns out. Happy baking!
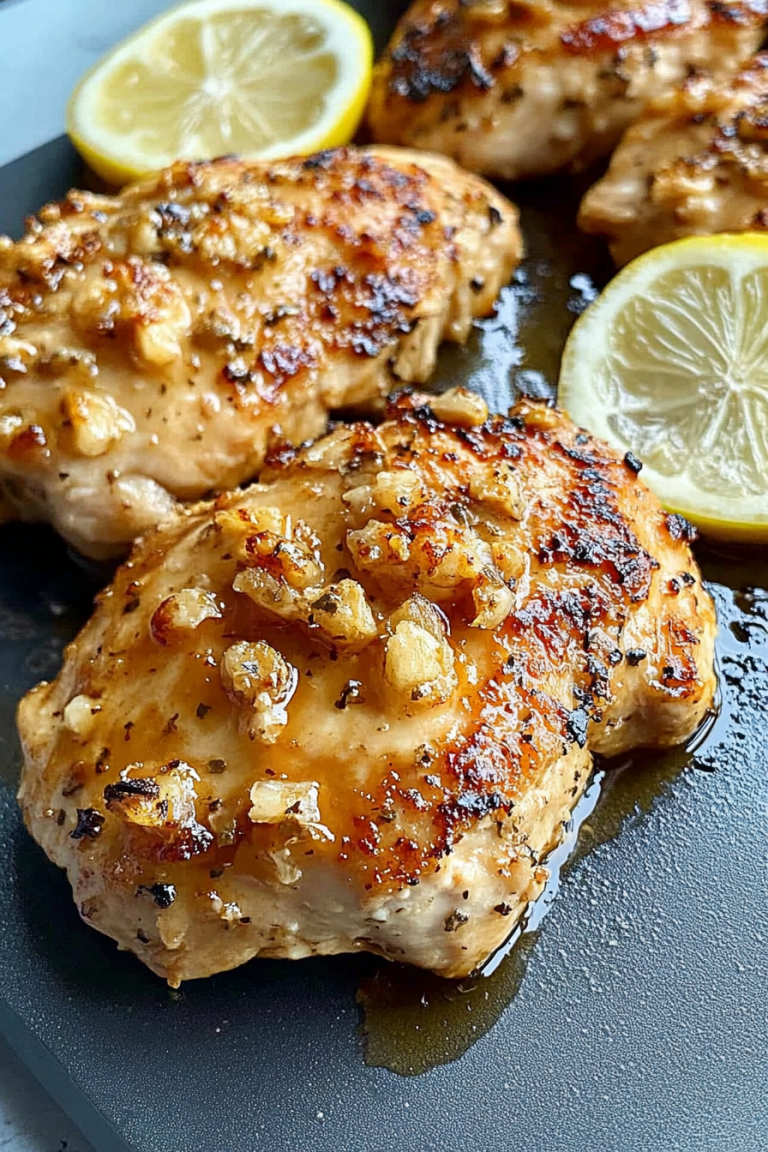
Air Fryer Chicken
Ingredients
Method
- Preheat the air fryer to 400F. In a shallow dish, mix flour, garlic powder, salt, and pepper. In a separate bowl, whisk eggs. In another dish, combine Parmesan and panko breadcrumbs.
- Dredge each chicken breast in flour mixture, then dip in beaten eggs, and press into parmesan-panko mixture to coat well.
- Spray the air fryer basket with cooking spray. Place coated chicken breasts in the basket, spraying the tops lightly with cooking spray.
- Cook in the air fryer at 400F for 6 minutes. Flip the chicken, spray again, and cook for an additional 5 minutes or until internal temperature reaches 165F.
- Allow the chicken to rest for 5 minutes before slicing. Garnish with extra Parmesan and lemon wedges if desired.