Decadent Chocolate Cheesecake Delight
There’s something about baking a coffee cake that feels like wrapping yourself in a warm blanket—comforting, inviting, and just the right touch of indulgence. I remember my grandma’s kitchen, the smell of cinnamon swirling through the air, and how she’d always say, “A good coffee cake makes any morning brighter.” Over the years, I’ve tweaked and perfected a recipe that’s become a staple in my house—this zucchini swirl coffee cake. Yes, zucchini! It’s essentially a sneaky veggie that adds moisture and a gentle, fresh flavor that pairs perfectly with the sweet crumb topping. What I love most about this is that it’s so easy to whip up on busy mornings, and trust me, this disappears in minutes at my house. My kids actually ask for seconds! It’s a comforting, slightly veggie-forward treat that’s perfect with your morning coffee, afternoon tea, or even as a cozy dessert. The best part? It’s ridiculously versatile—gluten-free, extra moist, or topped with your favorite nuts. I can’t wait for you to try it!
What is Zucchini Swirl Coffee Cake?
This zucchini swirl coffee cake is like a cross between a classic crumb cake and a zucchini bread, but with a beautiful marbled appearance that makes it feel extra special. Think of it as a moist, tender cake layered with a cinnamon-sugar filling that’s swirled into the batter—so pretty you almost don’t want to cut it, but don’t worry, it’s impossible to resist! It’s called a “coffee cake” because it’s bread-y enough to dunk into your coffee or tea, but it’s really just an excuse for me to enjoy dessert at breakfast without guilt. The zucchini adds a subtle, fresh flavor and keeps the cake insanely moist, so every bite feels like a little hug. I love that it’s a sneaky way to get greens into the kids’ diet while keeping the flavor straightforward and comforting. This recipe is all about balance: moist, sweet, with just the right hint of cinnamon and crunch from the streusel topping. It’s an easy, approachable bake that’s become a beloved family classic over here.
Why you’ll love this recipe?
What I love most about this zucchini swirl coffee cake is how it manages to be both cozy and elegant—perfect for lazy weekend brunches or quick weekday mornings. The flavor profile is warm and inviting; cinnamon, nutmeg, and that hint of zucchini really elevate the humble coffee cake to something special. Plus, this one’s a lifesaver on busy nights when I want something homemade but don’t want to fuss over complicated steps. The ingredients are simple pantry staples, so I usually have everything I need on hand. Budget-friendly, too! And because it’s so versatile, you can tweak it to suit your taste: throw in some walnuts or chocolate chips if you’re feeling indulgent, or swap the flour for almond or gluten-free options. What really makes this stand out, though, is the swirl—once you get the technique down, it creates gorgeous marbling that looks fancy but is super simple to do. This recipe is a testament that good comfort food doesn’t have to be complicated—a little bit of love, a sprinkle of cinnamon, and a few basic ingredients are all you need to make something people will ask for again and again.
How do I make Zucchini Swirl Coffee Cake?
Quick Overview
This recipe comes together in a handful of easy steps: grate your zucchini, mix up your batter, and swirl in a cinnamon-sugar filling before baking to golden perfection. I love how quickly you can get this in the oven—while it’s baking, your kitchen fills with that irresistible aroma of cinnamon and butter. It’s essentially a one-bowl deal for the batter, with just a few additional steps for the filling and streusel topping. And don’t worry—swirling the batter is easier than it looks! Just layer and give it a gentle swirl with a knife. The resulting cake is moist, flavorful, and so pretty you’ll want to take photos before slicing. This is one of those recipes that tastes even better the next day, and it keeps well in a cake tin or covered dish. Trust me on this—once you make it, you’ll find yourself reaching for that fork again and again!
Ingredients
For the Main Batter:
- 1 ½ cups all-purpose flour (or gluten-free blend, if desired)
- 1 teaspoon baking powder
- ½ teaspoon baking soda
- ½ teaspoon salt
- 1 teaspoon ground cinnamon
- ½ teaspoon nutmeg (optional, but I love the warmth)
- 1 cup granulated sugar
- ⅓ cup vegetable oil or melted butter
- 2 large eggs
- 1 teaspoon vanilla extract
- 1 cup grated zucchini (make sure to squeeze out excess moisture)
For the Filling:
- ¼ cup light brown sugar
- 1 teaspoon ground cinnamon
- 2 tablespoons unsalted butter, melted
For the Glaze (optional):
- ½ cup powdered sugar
- 1-2 teaspoons milk or lemon juice (adjust for desired consistency)
- Sprinkle of cinnamon or vanilla extract, if you like
Step-by-Step Instructions
Step 1: Preheat & Prep Pan
Start by heating your oven to 350°F (175°C). Grease your 9-inch round or square baking pan well—trust me, this saves you from a sticky cleanup later. Line it with parchment paper if you want an even easier release. I always do this, especially when I’m in a hurry—but you can just butter and flour it if you prefer.
Step 2: Mix Dry Ingredients
In a large bowl, whisk together the flour, baking powder, baking soda, salt, cinnamon, and nutmeg. Mixing these first ensures that all those spices and leavening agents are evenly distributed, which makes for a consistent rise and flavor in every slice. I like to do this step with a spoon or whisk—it’s quick and keeps things tidy.
Step 3: Mix Wet Ingredients
In another bowl, beat together sugar, oil, eggs, and vanilla until everything’s smooth and slightly frothy. I use a whisk here—trust me, it helps incorporate the ingredients well. Then, fold in the grated zucchini—make sure you squeeze out as much moisture as possible beforehand, or your batter might turn out too wet. I usually do this with my hands or a spatula; it’s the easiest way to incorporate everything evenly.
Step 4: Combine
Pour the wet mixture into the dry, folding gently until just combined. Be careful not to overmix—your batter should be a little lumpy, and that’s perfectly fine. Overmixing can make the cake dense, and we want it tender and moist!
Step 5: Prepare Filling
In a small bowl, mix sugar, cinnamon, and melted butter until crumbly. This will be your swirl! I like to keep the filling slightly chunky for more texture, but if you prefer a finer swirl, just stir longer. Once done, set aside for a moment.
Step 6: Layer & Swirl
Pour half the batter into your prepared pan, spreading it evenly. Spread the cinnamon-sugar filling over this layer. Add the remaining batter on top, then use a toothpick or knife to swirl through the batter—go in figure-eights or circles to create a marbled effect. This step is what makes this cake look so pretty and almost too good to eat!
Step 7: Bake
Place the pan in your preheated oven and bake for about 40-45 minutes. You’ll know it’s done when a toothpick inserted into the center comes out clean and the top is golden brown. Every oven is different, so start checking around 40 minutes. If it gets too dark on top, cover loosely with foil—no need to burn that beautiful top!
Step 8: Cool & Glaze
Once out of the oven, let it cool in the pan for at least 15 minutes. I like to transfer it to a wire rack after that, so it cools evenly. If you’re using the glaze, whisk powdered sugar with a splash of milk or lemon juice until smooth, then drizzle over the cake while it’s still slightly warm—this helps it set beautifully.
Step 9: Slice & Serve
Use a sharp knife to cut into slices, wiping it clean between cuts for neatness. Serve with a cup of coffee or tea, and enjoy that warm, comforting flavor. Honestly, this is best served slightly warm or at room temperature—the flavors really shine that way. Leftovers keep surprisingly well in an airtight container, and the flavor actually deepens overnight.
What to Serve It With
This coffee cake is so versatile that it’s perfect for almost any occasion. For breakfast, I love pairing it with a strong cup of brewed coffee or a mug of hot tea—nothing beats waking up to that cinnamon scent filling the house. Sometimes I sprinkle a little extra cinnamon over the top before serving, just to enhance the cozy factor. On lazy weekends, my family prefers it with a dollop of whipped cream or a drizzle of cream cheese frosting—I swear, it turns into a brunch standout. When I’m hosting friends, I set out slices on a pretty plate, add some fresh berries or a dusting of powdered sugar, and let everyone serve themselves. It’s also fabulous as a dessert—warm with a scoop of vanilla ice cream or a sprinkle of chopped nuts. My favorite weekend tradition? Cutting thick slices and serving it with a cup of spiced chai or a glass of milk. It’s the kind of thing that makes Monday mornings feel a little less daunting.
Top Tips for Perfecting Your Zucchini Swirl Coffee Cake
First off, always squeeze out as much moisture from the zucchini as you can; I learned the hard way that excess water can make your cake dense and soggy. I keep a clean dish towel handy for this—trust me, it’s worth the extra step. When mixing the batter, incorporate the ingredients just until combined—overmixing leads to a tougher crumb, and nobody wants that soft, tender texture to turn into rubber! Swirling the batter? Keep a gentle hand. Don’t overdo it—you want those lovely marbled veins, not a muddy mess. You can play around with the filling; I sometimes add chopped pecans or even chocolate chips for variety. For the glaze, I’ve tested it with lemon zest, vanilla extract, and even cream cheese—each adds a lovely twist. A key tip is to bake this starting in the middle rack—you don’t want the top to burn before the inside is cooked through. I also recommend doing a doneness test with a toothpick—if it comes out with moist crumbs, it’s perfect. Think of this recipe as a canvas—feel free to customize the spices or fillings to suit your taste. Little tricks I’ve learned? Use room-temperature eggs—they incorporate better, and your batter will be smoother. And don’t be shy—this cake gets better the next day, so if you want to prepare ahead, it’s a winner!
Storing and Reheating Tips
This cake is pretty forgiving when it comes to storage. Keep any leftovers in an airtight container at room temperature for up to 2 days—just make sure it’s covered well so it doesn’t dry out. After that, I usually pop it in the fridge; it stays fresh for about 4 days, and I find that a quick mikewarm in the microwave—or even better, a gentle heat in the oven—brings back that fresh-baked feeling. Freezing? Absolutely. Wrap slices tightly in plastic wrap, then foil, and freeze for up to 3 months. When you’re ready to enjoy it, thaw at room temperature or reheat briefly in the oven at 300°F (150°C)—your house will smell amazing all over again. The glaze is best added fresh, so consider drizzling it just before serving for that glossy, inviting look. If you’re storing for a longer period, I recommend adding the glaze after reheating to keep the glossy shine. Honestly, this cake holds up well, and I find that a little reheating makes it taste as if it just came out of the oven. Make sure to check on it—old favorites can surprise you!
Frequently Asked Questions
Final Thoughts
This zucchini swirl coffee cake is a little slice of comfort that’s become a cherished part of my baking repertoire. It’s soft, moist, and fragrant, with that beautiful marbled swirl that makes it feel fancy but is actually super straightforward. I love how the zucchini quietly boosts moisture without overpowering the flavor—trust me, no one suspects it’s hiding those greens! My family asks for this often, and I always love how it fills the house with cozy aromas. Whether you’re making it for weekend brunch, a cozy afternoon treat, or just because you need a quick win in the kitchen, this recipe is a winner. Play around with add-ins or toppings—you can make it your own—and don’t forget to share your photos! Happy baking, and I can’t wait to hear how yours turns out. Your new favorite coffee cake awaits—enjoy every bite!
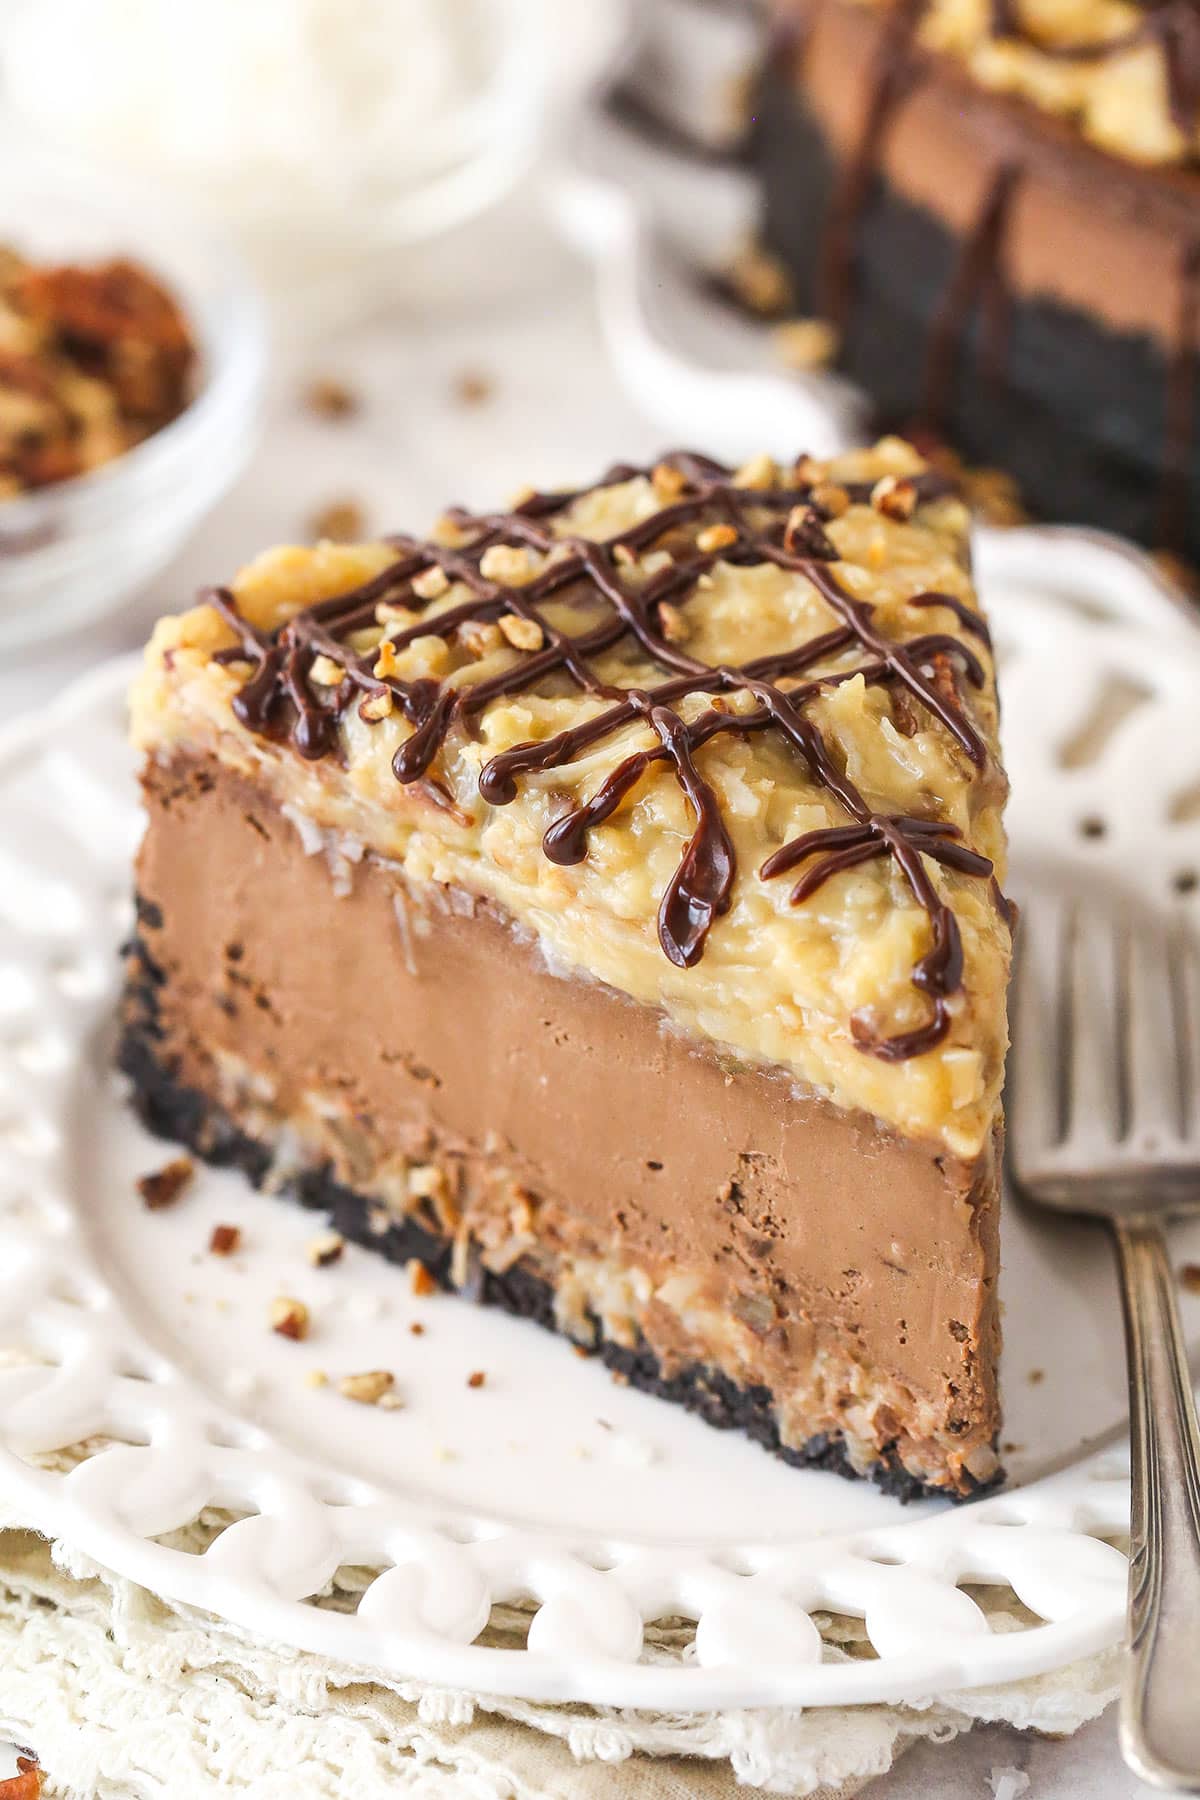
German chocolate cheesecake
Ingredients
Method
- Preheat oven to 325°F. Prepare the crust by mixing Oreo crumbs with melted butter, press into the bottom of a springform pan, and bake for 8-10 minutes.
- In a saucepan, combine egg yolks, evaporated milk, and vanilla. Cook until thickened, then stir in shredded coconut and pecans to make the topping. Cool completely.
- Beat cream cheese, sugar, and flour until smooth. Add sour cream and melted German chocolate, mix well. Incorporate eggs one at a time.
- Pour half of the filling over the crust, add a layer of coconut pecan topping, then top with the remaining filling. Smooth the surface.
- Bake in a water bath at 300°F for 1 hour 25 minutes. Turn off oven and leave cheesecake inside for 30 minutes, then cool completely in refrigerator.
- Decorate with remaining coconut pecan topping and drizzle with chocolate ganache. Chill until ready to serve.