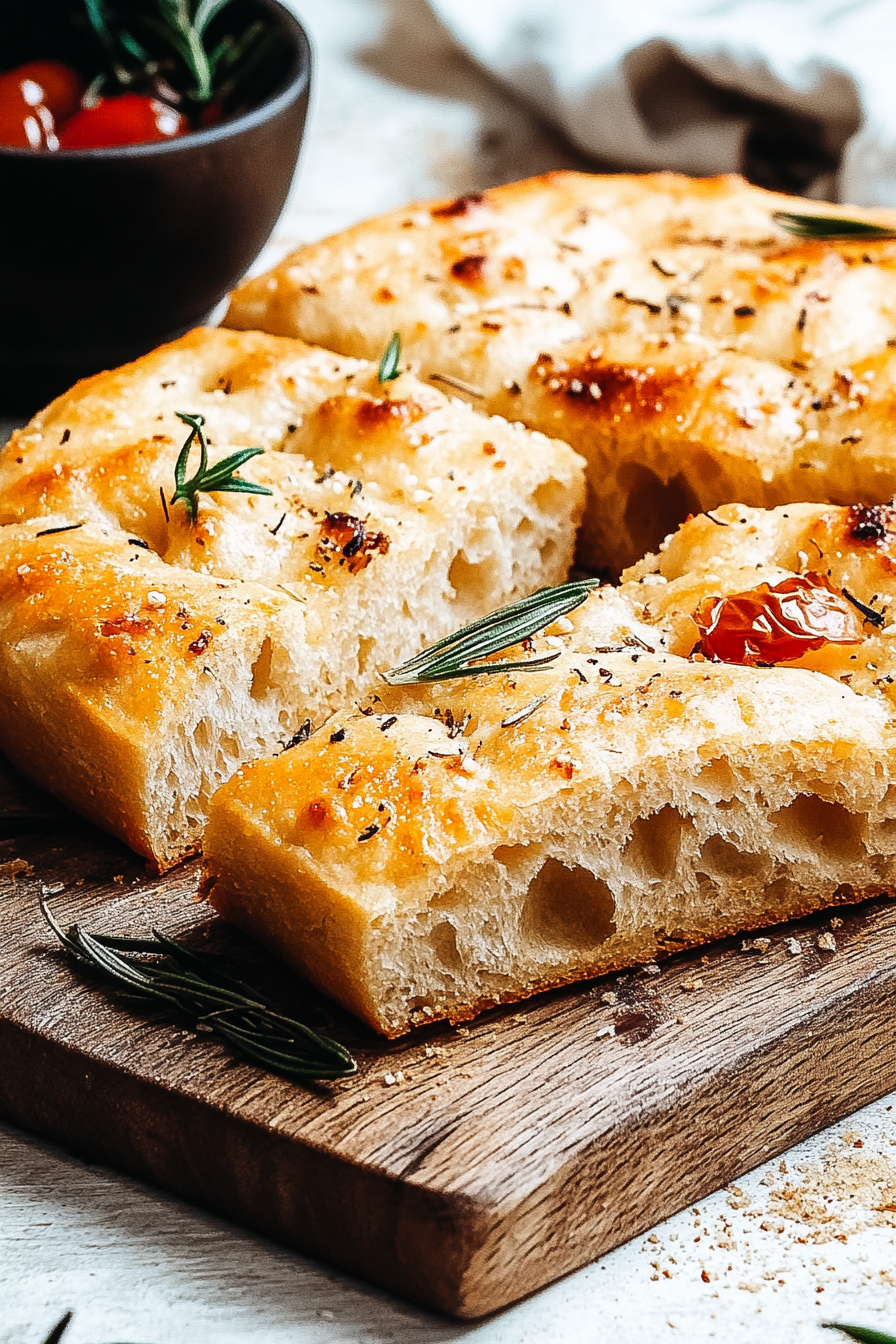
Easy Baked Tomato Olive Focaccia Bread
If there’s one thing I absolutely love, it’s how a simple, humble vegetable like zucchini can turn into something unexpectedly delicious—especially in a sweet, fluffy cake. I remember sneaking bites of this as a kid, my mom hiding slices in her fridge so I wouldn’t gobble the whole thing in one go. And now, as a mom myself, I make this recipe all the time—my kids ask for it constantly! It’s comforting, moist, and the swirl of cinnamon and sugar on top makes every bite a little bit special. This zucchini swirl cake is like a hug in food form—perfect when I crave something sweet but also want to sneak in some veggies. Trust me, this one’s a lifesaver on busy nights or when unexpected guests pop in. The smell alone when it’s baking is enough to bring everyone to the kitchen—who can resist warm, cinnamon-y goodness? Whether you’re a baking novice or a seasoned pro, I promise you’ll fall in love with how easy and delicious this cake is. Ready to get cozy in the kitchen? Let’s do it!
What is Zucchini Swirl Cake?
This zucchini swirl cake is basically a soft, tender loaf with a surprise twist—layers of cinnamon sugar swirl running through the middle. Think of it as a mash-up between a moist zucchini bread and a cinnamon roll, but in cake form. The name “swirl” comes from how you gently layer the cinnamon-sugar mixture into the batter, creating beautiful marbled ribbons when sliced. It’s essentially a way to add extra flavor and visual appeal without much fuss. What I love most about it is how versatile it is—you can serve it as a breakfast treat, an afternoon snack, or even a cozy dessert after dinner. Also, it’s a smart way to use up those zucchinis hiding in your veggie drawer that no one finished. This recipe is all about making something simple taste extraordinary with just a few pantry staples and a handful of minutes of prep. It’s a reminder that humble ingredients, handled with a little love, can turn into something truly special!
Why you’ll love this recipe?
There are so many reasons why I keep returning to this zucchini swirl cake—it’s like my go-to for satisfying that sweet tooth without feeling guilty or overly indulgent. First, the flavor. The zucchini keeps it incredibly moist, almost like a tender quick bread, but the cinnamon-sugar swirl adds warmth and richness that makes it feel like a treat. I have to admit, what I love most about this is how foolproof it is. I’ve made this countless times, and it never fails to turn out perfect—moist, fluffy, and with that irresistible cinnamon swirl shining right through. Plus, it’s super budget-friendly. The ingredients? All things I usually have on hand, and I love that I don’t need fancy flours or special ingredients. It’s also a versatile crowd-pleaser—you can serve it warm for breakfast, or chilled as a dessert. Sometimes I add a drizzle of honey or a cream cheese frosting when I want to fancy it up for guests. Honestly, nothing beats the cozy, homey smell filling the kitchen when it’s baking—I think that’s what makes it so memorable for my family. And because it’s easy to customize, I could even adapt it to be gluten-free or vegan with just a few swaps. The best part? My kids go nuts for it—they ask for seconds every single time! Truly, this recipe is a little piece of comfort in every slice.
How do I make Zucchini Swirl Cake?
Quick Overview
This zucchini swirl cake comes together in about an hour, start to finish. The batter is straightforward—mixing dry ingredients in one bowl, wet in another, then combining. The magic happens when you layer a cinnamon-sugar mixture into the batter and swirl it gently—think of it as creating a marbled effect that’s both beautiful and flavorful. Once baked, you let it cool just enough so the swirl sets, then optionally add a simple glaze or dusting of powdered sugar. It’s honestly one of those recipes where you just throw everything in, fold gently, and bake—no fuss, no stress. I always do this when I want a little baking therapy without overthinking. The smell alone will make everyone in the house come running, and it tastes even better than it looks.
Ingredients
For the Main Batter:
– 2 cups all-purpose flour (I like to use unbleached for a bit more flavor)
– 1 teaspoon baking powder
– ½ teaspoon baking soda
– ½ teaspoon salt
– 1 teaspoon cinnamon (because, spice!)
– ½ teaspoon nutmeg (optional but highly recommended)
– 1 cup granulated sugar (you can reduce a little if you like it less sweet)
– ½ cup vegetable or neutral oil
– 2 large eggs
– 1 cup grated zucchini (squeeze out excess moisture—trust me, this is key for good texture!)
– 1 teaspoon vanilla extract
For the Filling:
– 3 tablespoons brown sugar (or coconut sugar for a healthier twist)
– 1 teaspoon cinnamon
– 1 tablespoon melted butter (or coconut oil for dairy-free)
For the Glaze:
– ½ cup powdered sugar
– 1-2 tablespoons milk (dairy or plant-based)
– A dash of vanilla (optional but adds a nice depth)
Step-by-Step Instructions
Step 1: Preheat & Prep Pan
Set your oven to 350°F (175°C). Grease a loaf pan or line it with parchment paper—trust me, this makes life way easier when you’re ready to serve. I always butter the sides and dust lightly with flour or sugar for that perfect non-stick finish. While the oven warms, grate your zucchini. Remember to squeeze out as much moisture as possible—this prevents a soggy cake! I do this by wrapping the grated zucchini in a clean dish towel and giving it a good squeeze.
Step 2: Mix Dry Ingredients
In a big bowl, whisk together the flour, baking powder, baking soda, salt, cinnamon, and nutmeg. This step ensures everything’s evenly distributed, so your cake bakes uniformly. I like to do this first because it’s the least messy part—and it’s satisfying watching the powders blend together into a lovely uniform mix.
Step 3: Mix Wet Ingredients
In another bowl, whisk together the sugar, oil, eggs, vanilla, and grated zucchini. You’ll want the mixture to look a bit creamy and slightly thickened—this usually takes about a minute of whisking. I’ve tested this with almond milk instead of eggs, and honestly, it made the batter even creamier—and still came out moist and tasty!
Step 4: Combine
Pour the wet mixture into the dry ingredients and fold gently until just combined. Be careful not to overmix—this is a quick way to make your cake dense instead of fluffy. If you see a few lumps, that’s totally fine! Just don’t keep mixing until smooth—less is more here.
Step 5: Prepare Filling
Mix together the brown sugar and cinnamon. Melt the butter briefly and add that to the mixture. Set aside—this is what gives your swirl that sweet cinnamon punch. Sometimes I sprinkle a few chopped nuts or chocolate chips in here for extra crunch, but honestly, the cinnamon-sugar combo is perfect as is.
Step 6: Layer & Swirl
Pour half the batter into your prepared pan, then sprinkle/spread half the cinnamon-sugar mixture on top. Add the remaining batter, then the rest of the cinnamon mixture. Use a butter knife or skewer to swirl gently—don’t overdo it, or you’ll lose the pretty marbling. Just a few gentle zigzags work like magic and create those delightful ribbon effects.
Step 7: Bake
Pop it into your preheated oven and bake for about 45-50 minutes. To check for doneness, insert a toothpick in the center—you want it clean or with a few moist crumbs. Every oven is a little different; if the top is browning too quickly, tent it with foil after the first 30 minutes. The smell of cinnamon and zucchini baking together is my favorite home scent—it’s like a warm hug.
Step 8: Cool & Glaze
Let the cake cool in the pan for about 10 minutes, then transfer to a wire rack. Patience is key here—if you cut into it too soon, it might fall apart or lose that beautiful swirl. Meanwhile, whisk your powdered sugar and milk for the glaze—it should be smooth and pourable but not runny. Drizzle over the cooled cake and let the glaze set a bit before slicing.
Step 9: Slice & Serve
Slice once completely cooled—this helps keep the swirl neat. I love serving it slightly warm with a dollop of vanilla yogurt or a drizzle of honey if I’m feeling fancy. It’s lovely plain, too, especially with a cup of coffee or tea. Trust me, this cake disappears in minutes at my house—my kids actually ask for seconds! It’s the kind of treat that feels special but is honestly super easy.
What to Serve It With
This zucchini swirl cake is quite versatile, so how you serve it depends on the occasion. For breakfast, pair it with your favorite coffee or tea—think a big mug of black coffee with a slice of warm cake. I love adding a smear of cream cheese or a drizzle of honey for extra flair. For brunch, serve it alongside fresh fruit like berries or sliced peaches, and maybe a splash of vanilla whipped cream. When I do this, it feels so elegant, yet totally doable. As a dessert, I’ll warm up a slice and top it with a little vanilla ice cream or whipped cream—trust me, it’s magical. For a cozy snack, it’s perfect on its own, maybe with a glass of milk. It’s a family favorite, especially during fall and winter when cinnamon feels just right. I’ve served this at picnics, holiday brunches, and even as a last-minute gift—everyone always asks for the recipe. It’s become somewhat of a signature in my house, and I love how it brings people together with its warm, homey vibes.
Top Tips for Perfecting Your Zucchini Swirl Cake
After making this dozens of times, I’ve learned a few tricks that make all the difference. First, squeeze out as much moisture from the zucchini as you can—moisture is the enemy of fluffy cake. I use a clean dish towel and give it a good wring; it’s a small step but totally worth it. Overmixing the batter is a mistake I used to make all the time—I’ve since learned to fold gently, which keeps the cake light. When layering the cinnamon mixture, sprinkle it evenly and swirl carefully; if you go too wild, the swirl won’t look as nice. For ingredient swaps, I’ve tested coconut sugar instead of brown sugar, and it works beautifully, giving a subtler sweetness. Want to make it gluten-free? Swap out the all-purpose flour for a 1-to-1 gluten-free blend, and make sure to add a bit more baking time—it might need an extra 5-10 minutes. When baking, oven placement matters—middle rack is best to avoid uneven browning. Use a toothpick test often, but remember, a moist crumb is fine—it just shouldn’t be wet and gooey. For the glaze, I sometimes add a splash of lemon juice or a dash of vanilla extract to jazz it up. My biggest lesson? Don’t rush letting it cool—it sets the swirl and makes slicing a breeze. And honestly, a little experimentation makes this even more fun—sometimes I toss in chopped nuts or dried fruit for extra texture. Every batch teaches me something new, and that’s what makes baking so rewarding.
Storing and Reheating Tips
This cake stays fresh for a couple of days if kept properly. I usually store it in an airtight container at room temperature—cover it loosely with foil or wax paper if it’s warm out to prevent it from drying out. If I want it to last longer, the fridge is a good choice; just make sure it’s wrapped tightly so it doesn’t absorb fridge odors. It’s best to consume within 3 days, but I’ve noticed it’s still tasty even after that. Want to freeze it? Wrap individual slices tightly in plastic wrap, then place in a zip-top bag or airtight container. It freezes beautifully for up to a month! To reheat, microwave a slice for 15-20 seconds, or warm it in the oven at 325°F until just heated through. If you’re adding the glaze later, wait until the cake has defrosted or warmed—a fresh drizzle makes all the difference. I’ve tested this cake both chilled and at room temp, and really, it’s just as good either way. The flavor deepens slightly when it’s been in the fridge overnight, so I often bake it ahead and enjoy it as a kind of make-ahead treat. Trust me, leftovers, if there are any, will be a true delight that tastes like a fresh-baked good all over again.
Frequently Asked Questions
Final Thoughts
This zucchini swirl cake is one of those recipes that feels like a warm hug in the middle of a busy week. It’s simple enough to whip up on a regular Tuesday but impressive enough to serve to guests or bring to a brunch. Every time I bake it, I’m reminded how magic happens when you combine fresh ingredients with just a bit of patience and love. The moist crumb, aromatic cinnamon, and gorgeous swirl make it an instant hit in my house—and I hope it does in yours, too. Plus, designing variations—gluten-free, vegan, or even adding chocolate chips—keeps things exciting. I’d love to hear your thoughts if you try it or if you make your own twists—leave a comment! Happy baking, friends, and enjoy every delicious slice of this little piece of home.
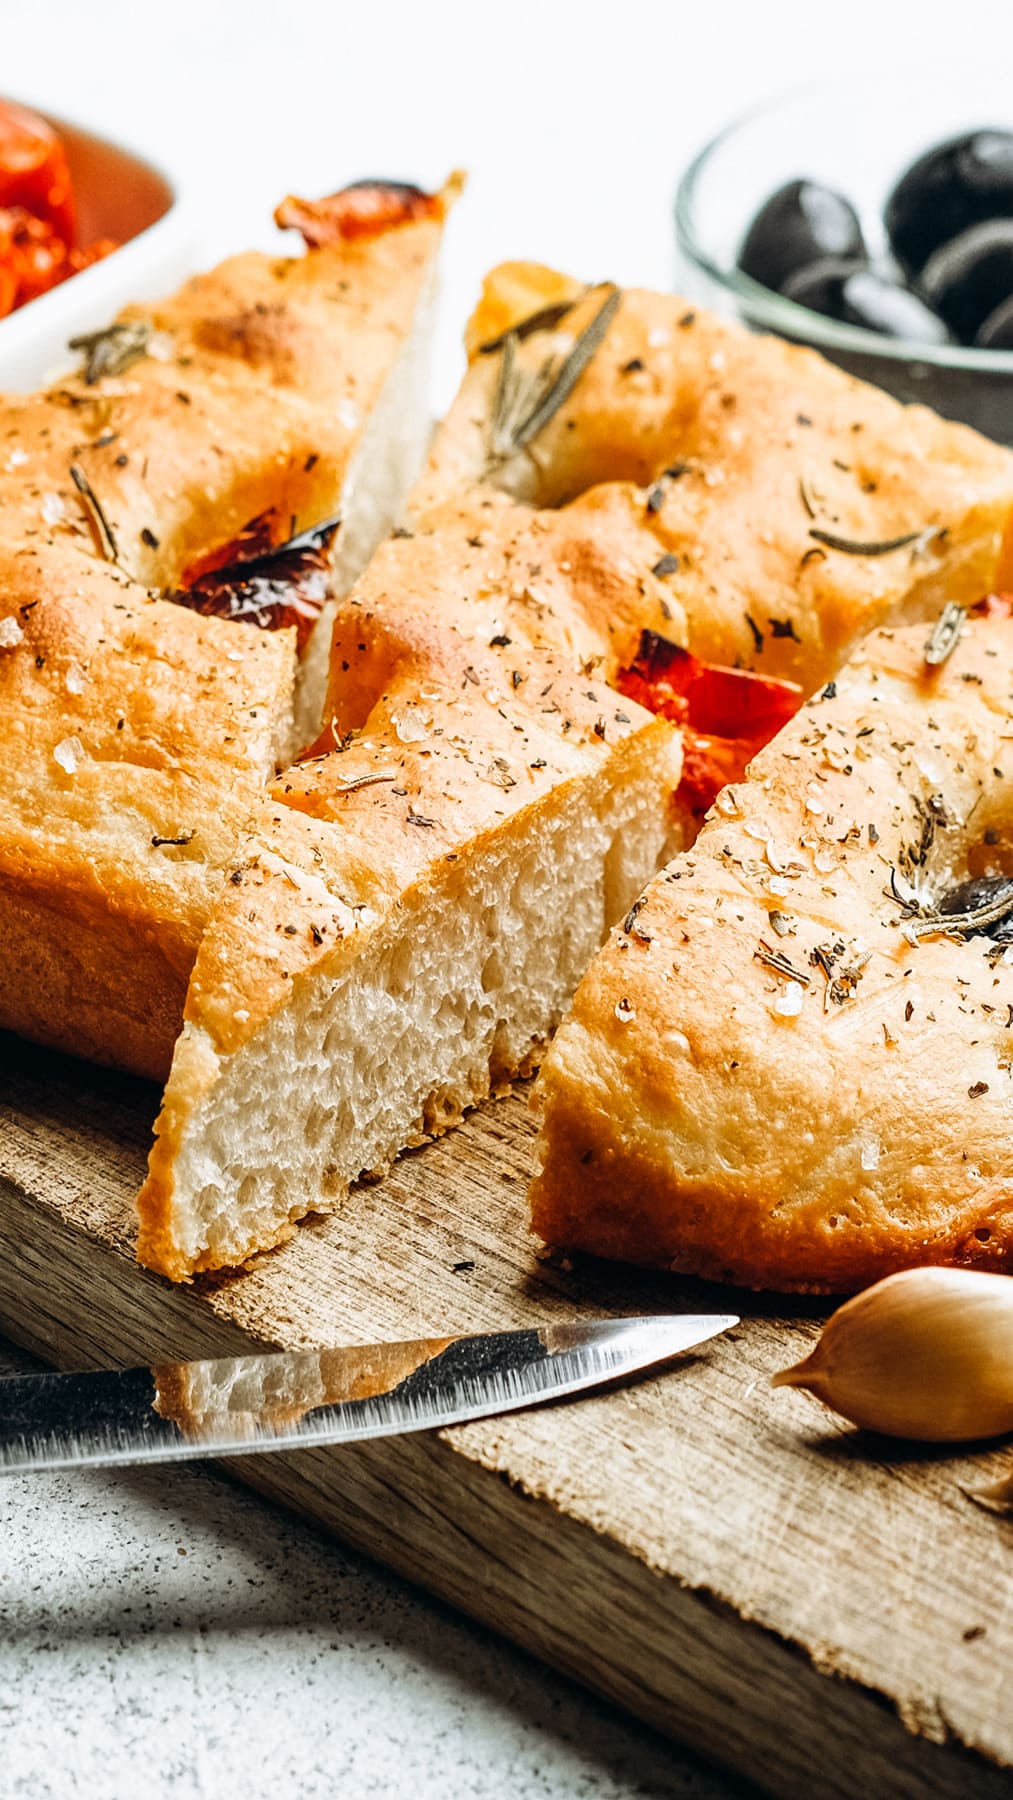
Focaccia
Ingredients
Method
- Preheat oven to 400°F.
- Proof the yeast in warm water with sugar; let stand until foam appears, about 3 minutes.
- Using a dough hook, turn on low and slowly add flour to the mixer bowl.
- Dissolve salt in 2 tablespoons of water and add while mixer is running.
- Pour in 1/4 cup olive oil.
- Increase speed to medium and mix until dough is smooth and elastic, about 10 minutes.
- Turn out dough onto surface and fold a few times.
- Form dough into a ball and place in oiled bowl; turn to coat with oil.
- Cover with damp towel and let rise until doubled in size, about 45 minutes.
- Grease a jelly roll pan with olive oil and sprinkle with cornmeal.
- Turn out and stretch dough to about 1/2-inch thickness, place on prepared pan.
- Cover with plastic wrap and let rest for 15 minutes.
- Uncover, dimple with fingertips, brush with olive oil.
- Add toppings like sun-dried tomatoes, olives, caramelized onions, garlic, parmesan, and herbs.
- Bake for 15-20 minutes until golden brown.
- Remove from oven and cool slightly before serving.