Easy Banana Nut Muffins Recipe
You know those recipes that just feel like a warm hug? The ones you pull out when you need something comforting, or when you have unexpected guests and want to impress without breaking a sweat? Well, this zucchini bread is *that* recipe for me. It’s the one I’ve been making for years, tweaking just a little bit here and there until it became absolutely perfect. Honestly, it’s better than any fancy cake or pastry I’ve tried. The smell alone when it’s baking fills the entire house with this incredible, sweet, slightly spiced aroma that just makes everything feel right. My family devours it within hours, and I’m pretty sure my neighbors secretly know when I’m baking it because they start appearing at my door, drawn by the scent! It’s the perfect treat for any time of day, and it’s surprisingly simple to whip up. Forget those dry, bland zucchini breads you might have tried before; this one is unbelievably moist, tender, and bursting with flavor. It’s my go-to, my crowd-pleaser, my little piece of baking heaven.
What is Zucchini bread?
So, what exactly *is* zucchini bread, you ask? In my book, it’s a culinary masterpiece disguised as a simple quick bread. It’s essentially a cake-like batter where grated zucchini is the secret ingredient, adding incredible moisture and a tender crumb without any overpowering veggie flavor. Think of it as a delicious way to sneak in a little extra goodness without anyone even noticing! The name itself is pretty straightforward, but the magic happens in the transformation. We take humble zucchini, which can be a bit…well, bland on its own, and turn it into something truly spectacular. It’s not a savory bread, nor is it a super-sweet dessert bread, though it can certainly lean that way depending on your additions. It lives in that perfect middle ground, making it incredibly versatile and universally loved. It’s the kind of thing that makes people say, “Wow, what’s in this?” and then be totally surprised when you tell them!
Why you’ll love this recipe?
Honestly, there are so many reasons why this zucchini bread has earned a permanent spot in my recipe binder, and I just know you’re going to fall in love with it too. First off, the FLAVOR. Oh my goodness, the flavor! It’s got this delightful balance of sweetness from the sugar and brown sugar, a hint of warm spice from the cinnamon and nutmeg, and that subtle richness that comes from good quality vanilla. The zucchini doesn’t add a “vegetable” taste; instead, it contributes to this wonderfully tender and moist texture that’s just *chef’s kiss*. What I love most is how surprisingly SIMPLE it is. Seriously, you can have this mixed up and in the oven in under 15 minutes. It’s a lifesaver on busy weeknights when a craving strikes, or when you need a quick breakfast on the go. And let’s talk about COST-EFFICIENCY. Zucchini is usually pretty affordable, especially when it’s in season, and the other ingredients are pantry staples. You don’t need any fancy, expensive items to make this spectacular. Plus, it’s incredibly VERSATILE. I’ll get to that more later, but you can add nuts, chocolate chips, different spices – the possibilities are endless! Compared to some other quick breads or even muffins I’ve tried, this one has a unique, almost melt-in-your-mouth quality that I just haven’t found elsewhere. It’s my secret weapon for happy taste buds!
How do I make Zucchini bread?
Quick Overview
The process for this zucchini bread is incredibly straightforward, designed for maximum flavor with minimal fuss. We’ll start by prepping our wet and dry ingredients separately, then bring them together just enough to create a luscious batter. The grated zucchini, our moisture MVP, gets stirred in along with any delicious add-ins. Then, it’s just a matter of pouring it into your prepared pan and letting the oven do its magic. What makes this method special is how it ensures a perfectly moist and tender crumb every single time. It’s foolproof, even if you’re new to baking!
Ingredients
For the Main Batter:
2 cups all-purpose flour: I always use unbleached, as I find it gives a slightly better texture, but all-purpose works perfectly fine. Don’t pack it into the cup; spoon it in and level it off!
1 teaspoon baking soda: This is our primary leavening agent, giving it that lovely rise.
1/2 teaspoon salt: Just a touch to enhance all the other flavors.
1 teaspoon ground cinnamon: For that warm, cozy spice note. I love a good, fragrant cinnamon.
1/4 teaspoon ground nutmeg: Just a whisper adds a lovely depth of flavor without being overpowering.
1 1/2 cups granulated sugar: This ensures sweetness and helps with moisture.
1/2 cup unsalted butter, softened: Make sure it’s truly softened, not melted. This makes it easier to cream and gives a better texture.
2 large eggs: Room temperature is best for emulsifying properly. Just take them out of the fridge about 30 minutes before you start.
1 teaspoon vanilla extract: Use good quality vanilla; it really makes a difference!
1 1/2 cups grated zucchini: This is the star! About 2 medium zucchini. Squeeze out as much excess moisture as you can, but don’t go overboard – you want that moisture!
For the Filling (Optional but Highly Recommended!):
1/2 cup chopped walnuts or pecans: For a lovely crunch. Toast them lightly beforehand if you have time – it really boosts their flavor!
1/2 cup chocolate chips: Semi-sweet or dark chocolate chips are my favorite. Milk chocolate works too if that’s what you have!
1 tablespoon cinnamon: For dusting over the batter before swirling.
2 tablespoons granulated sugar: To mix with the cinnamon for the swirl.
For the Glaze:
1 cup powdered sugar: Sifted, if you want to be extra fancy, but it’s usually fine without.
2-3 tablespoons milk (any kind, or even water): Start with 2, and add more until you get your desired drizzling consistency.
1/2 teaspoon vanilla extract: For a little extra flavor boost.
Step-by-Step Instructions
Step 1: Preheat & Prep Pan
First things first, get your oven preheating to 350°F (175°C). This is crucial for an even bake. While the oven heats up, grease and flour a 9×5 inch loaf pan. You can also line it with parchment paper, leaving some overhang on the sides, which makes lifting the bread out a breeze. I usually do a combination of greasing and then a light dusting of flour for that extra non-stick insurance. Trust me, you don’t want your beautiful bread sticking!
Step 2: Mix Dry Ingredients
In a medium bowl, whisk together the flour, baking soda, salt, cinnamon, and nutmeg. Give it a good whisk to make sure everything is evenly distributed. This simple step helps ensure your leavening agents are spread out properly, leading to a nice, even rise. Nobody wants a bread with a giant bubble on top and a dense bottom!
Step 3: Mix Wet Ingredients
In a large bowl, cream together the softened butter and granulated sugar until light and fluffy. This usually takes a few minutes with an electric mixer, or a bit more elbow grease by hand. Beat in the eggs, one at a time, making sure each one is incorporated before adding the next. Then, stir in the vanilla extract. The mixture should look smooth and emulsified.
Step 4: Combine
Now, it’s time to bring those wet and dry ingredients together. Add about half of the dry ingredients to the wet ingredients and mix on low speed (or gently by hand) until just combined. Then, add the grated zucchini and mix again until it’s just starting to incorporate. Finally, add the remaining dry ingredients and mix until you no longer see streaks of flour. The key here is NOT to overmix. Overmixing develops the gluten too much, which can result in a tough bread. Just mix until it all comes together. A few lumps are perfectly fine!
Step 5: Prepare Filling
If you’re adding the optional filling, this is the time to prepare it. In a small bowl, mix together the chopped nuts (if using), chocolate chips (if using), 1 tablespoon of cinnamon, and 2 tablespoons of sugar. This will create those lovely pockets of flavor and texture throughout your bread. It’s an extra step, but it really elevates this zucchini bread from good to absolutely unforgettable.
Step 6: Layer & Swirl
Pour about half of the batter into your prepared loaf pan and spread it evenly. Sprinkle about half of your filling mixture over the batter. Then, pour the remaining batter on top and gently spread it out. Sprinkle the rest of the filling mixture over the top. If you want that beautiful swirled look (which I highly recommend!), take a knife or a skewer and gently swirl it through the batter a few times. Don’t go too deep or mix too vigorously; you just want to create some lovely patterns. It’s like edible art!
Step 7: Bake
Bake for 50-60 minutes, or until a wooden skewer or toothpick inserted into the center comes out clean. Ovens can be so finicky, so I always start checking around the 50-minute mark. If the top is browning too quickly before the inside is cooked, you can loosely tent it with aluminum foil. The aroma that fills your kitchen during this time is pure bliss!
Step 8: Cool & Glaze
Once it’s baked, let the zucchini bread cool in the pan for about 10-15 minutes. This allows it to set up a bit. Then, carefully invert it onto a wire rack to cool completely. It’s *very* important that it cools completely before glazing. If you try to glaze a warm bread, the glaze will just melt and slide right off. For the glaze, whisk together the powdered sugar, 2 tablespoons of milk, and vanilla extract until smooth. Add more milk, a teaspoon at a time, until you reach a pourable, but not too thin, consistency. Drizzle it over the cooled loaf. It looks so pretty and adds a lovely sweet finish!
Step 9: Slice & Serve
Once the glaze has set a bit, slice it up and enjoy! I usually wait until the glaze is mostly firm, but if you’re impatient (like me!), a slightly soft glaze is still delicious. Use a serrated knife for clean slices. This bread is fantastic served at room temperature, and it’s perfect for slicing thick or thin, depending on your mood!
What to Serve It With
This zucchini bread is so versatile, it can honestly fit into almost any meal or occasion. For a simple BREAKFAST, I love it with a hot cup of coffee. It’s substantial enough to keep you going without feeling heavy. A light dusting of powdered sugar or a thin swipe of butter is all it needs in the morning. For BRUNCH, it feels a bit more elegant. I’ll arrange slices on a nice platter, maybe with some fresh berries on the side. A glass of sparkling cider or a light mimosa pairs beautifully with it. When I’m serving it as DESSERT, I like to make the glaze a little thicker and more generous, maybe even add a sprinkle of chopped nuts on top of the glaze before it sets. It’s a perfect end to a meal when you want something sweet but not overly decadent. And for those COZY SNACKS in the afternoon, it’s just divine. A tall glass of cold milk or a cup of herbal tea is all you need. My kids especially love it with a dollop of Greek yogurt for a little extra tang. It’s the ultimate comfort food!
Top Tips for Perfecting Your Zucchini Bread
Over the years, I’ve learned a few little tricks that make this zucchini bread absolutely sing. Here are my top tips to help you achieve zucchini bread perfection:
Zucchini Prep: Grating the zucchini is key. Use the medium-sized holes on your grater. After grating, I always give it a gentle squeeze in my hands or in a clean kitchen towel to remove some of the excess moisture. You don’t want it bone dry, but too much water will make your bread soggy. Fresh zucchini is always best; it has the best texture and flavor.
Mixing Advice: I cannot stress this enough: DO NOT overmix! Once the wet and dry ingredients are combined, stop mixing. A few little lumps in the batter are a sign of a well-made quick bread. Overmixing develops the gluten, leading to a tough, chewy texture, and we definitely don’t want that. Gently fold in the zucchini and any add-ins.
Swirl Customization: The cinnamon-sugar swirl is totally optional but adds such a lovely dimension. For the best visual effect, don’t over-swirl. Just a few gentle passes with a knife or skewer through the layers will create beautiful marble patterns. You can experiment with different spice blends in your swirl, too – maybe a pinch of cardamom or ginger!
Ingredient Swaps: This recipe is pretty forgiving! For a gluten-free version, I’ve had success using a good quality 1-to-1 gluten-free baking blend. The texture might be slightly different, but it still works wonderfully. You can also swap out some of the granulated sugar for brown sugar for a deeper, caramel-like flavor. I’ve even tested this with almond milk instead of regular milk in the glaze, and it was surprisingly creamy!
Baking Tips: Always use the correct pan size (9×5 inch loaf pan). Baking in a smaller pan will cause overflow, and a larger pan might result in a flatter loaf. If your oven tends to run hot, start checking for doneness a bit earlier. A clean toothpick test is your best friend here. Sometimes, the center can look done but still be a bit gooey, so that skewer test is crucial.
Glaze Variations: The basic glaze is fantastic, but you can totally customize it. Add a splash of lemon juice for a bit of tang, or a tiny bit of orange zest for a citrusy note. If you prefer no glaze, a simple dusting of powdered sugar or a sprinkle of chopped nuts on top of the plain cooled bread is also lovely. Some people even like a cream cheese frosting on this, which is decadent!
Storing and Reheating Tips
One of the best things about this zucchini bread is how well it keeps. It stays wonderfully moist for days, which is fantastic for snacking or meal prep. Here’s how I store it:
Room Temperature: Once it’s completely cooled, I usually store it in an airtight container on the counter for up to 3 days. If the weather is particularly warm, or if you’ve added a glaze that’s still a little soft, you might want to pop it in the fridge. The moisture from the zucchini helps keep it perfectly tender.
Refrigerator Storage: For longer storage, up to a week, the refrigerator is your best bet. Wrap the cooled loaf tightly in plastic wrap, and then place it in an airtight container. This prevents it from drying out. It’s still delicious cold, but you might want to give it a quick warm-up.
Freezer Instructions: This zucchini bread freezes beautifully! It’s perfect for making ahead for holidays or just to have on hand. Once completely cooled and glazed (if you plan to glaze it before freezing, make sure the glaze is fully set), wrap it tightly in a layer of plastic wrap, then a layer of aluminum foil. You can freeze it whole or in individual slices. It will stay good in the freezer for up to 3 months. To thaw, unwrap it and let it come to room temperature on the counter. If it’s still a little cool or you want it fresh, you can warm it gently in a low oven (around 300°F/150°C) for about 10-15 minutes.
Glaze Timing Advice: If you plan to freeze the bread, I recommend waiting to add the glaze until *after* it has thawed. This prevents the glaze from becoming sticky or watery during the thawing process. Just thaw the bread completely, then make a fresh batch of glaze and apply it.
Frequently Asked Questions
Final Thoughts
Honestly, this zucchini bread is more than just a recipe to me; it’s a little bit of baking joy that I’m so happy to share. It’s the kind of recipe that makes you feel like a baking pro, even if you’re just starting out. The way it transforms simple ingredients into something so utterly delicious and comforting is what makes me love it so much. It’s moist, flavorful, and always a hit, whether it’s for breakfast, dessert, or just because. If you’re looking for a reliable, crowd-pleasing baked good that’s easy to make and uses up some of that garden zucchini, you absolutely have to give this one a try. It’s a true gem! For those who enjoy this kind of quick bread, you might also love my Banana Bread or my Pumpkin Bread recipes – they’re just as cozy and delicious. I can’t wait to hear how yours turns out! Please leave a comment below and let me know your favorite add-ins or any variations you try. Happy baking!
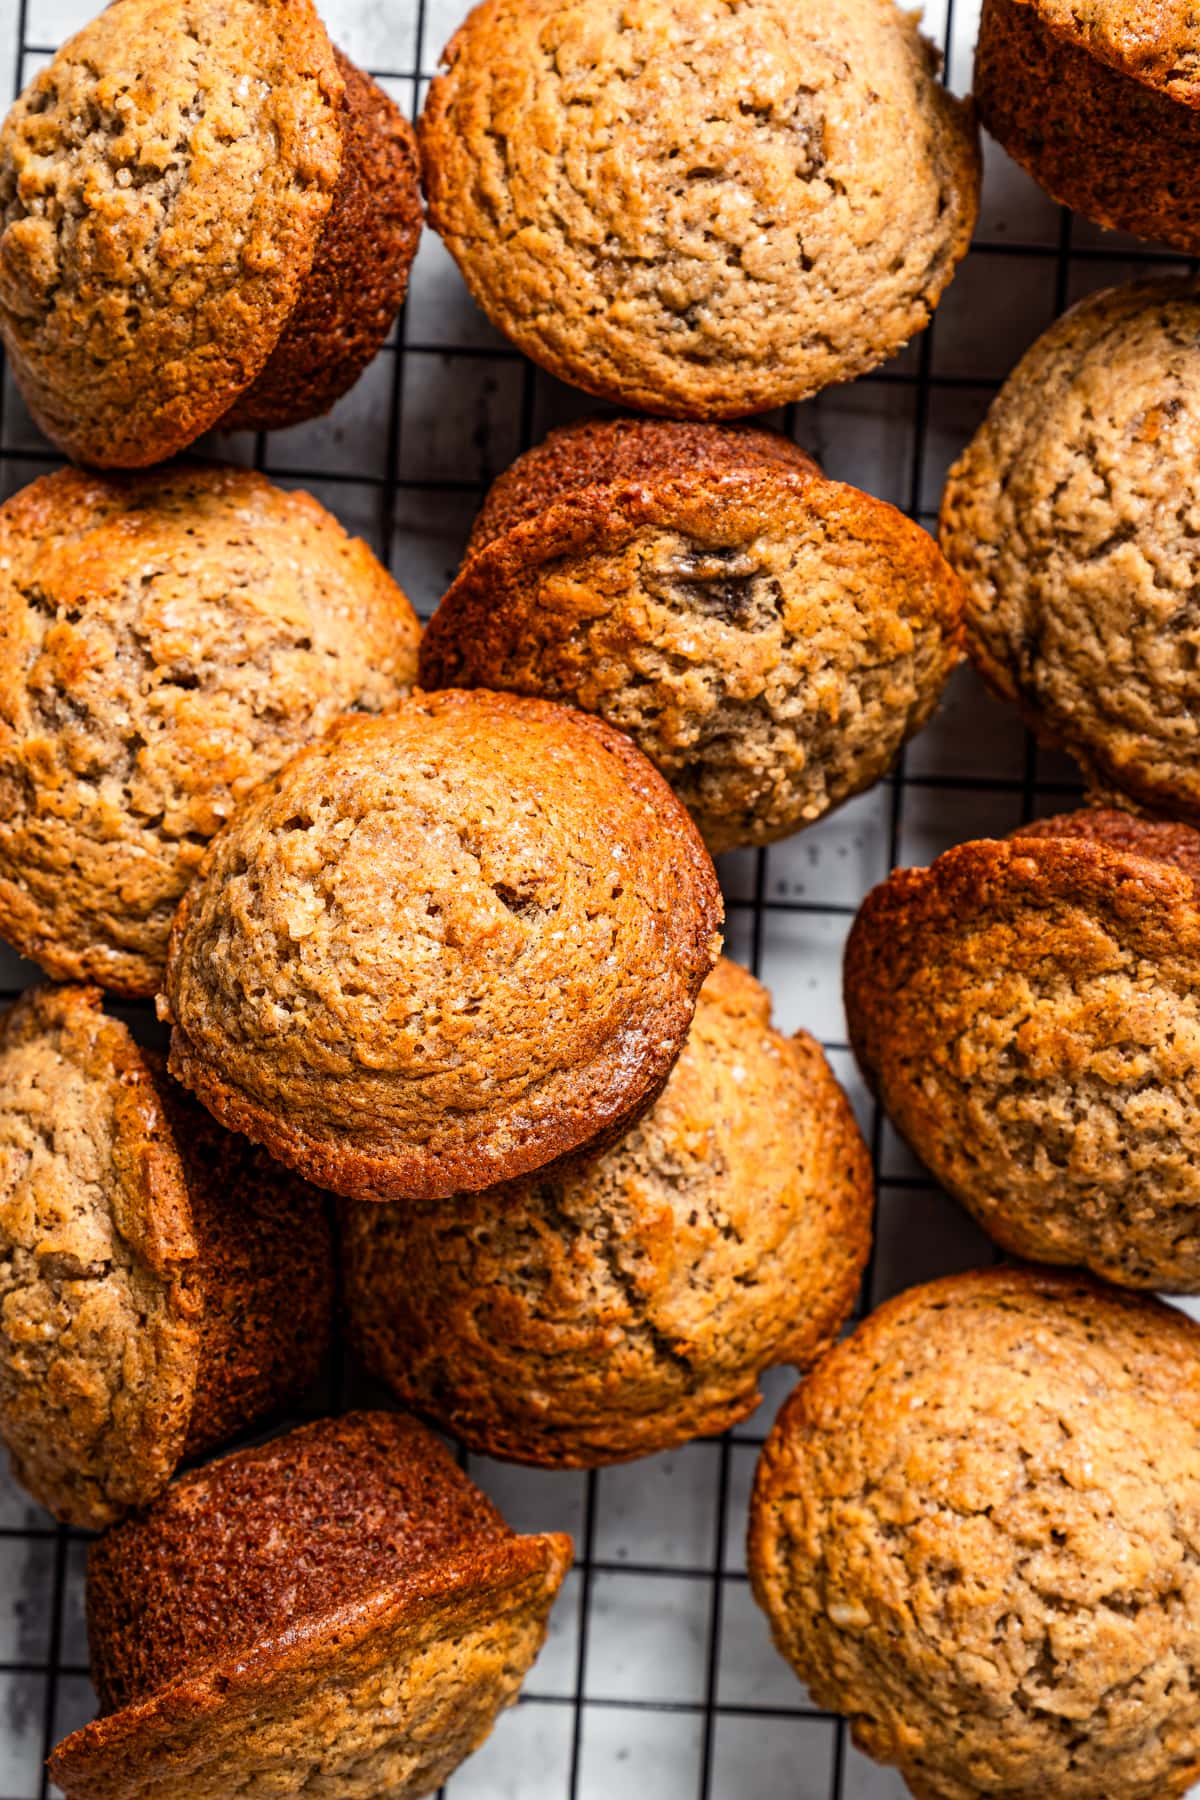
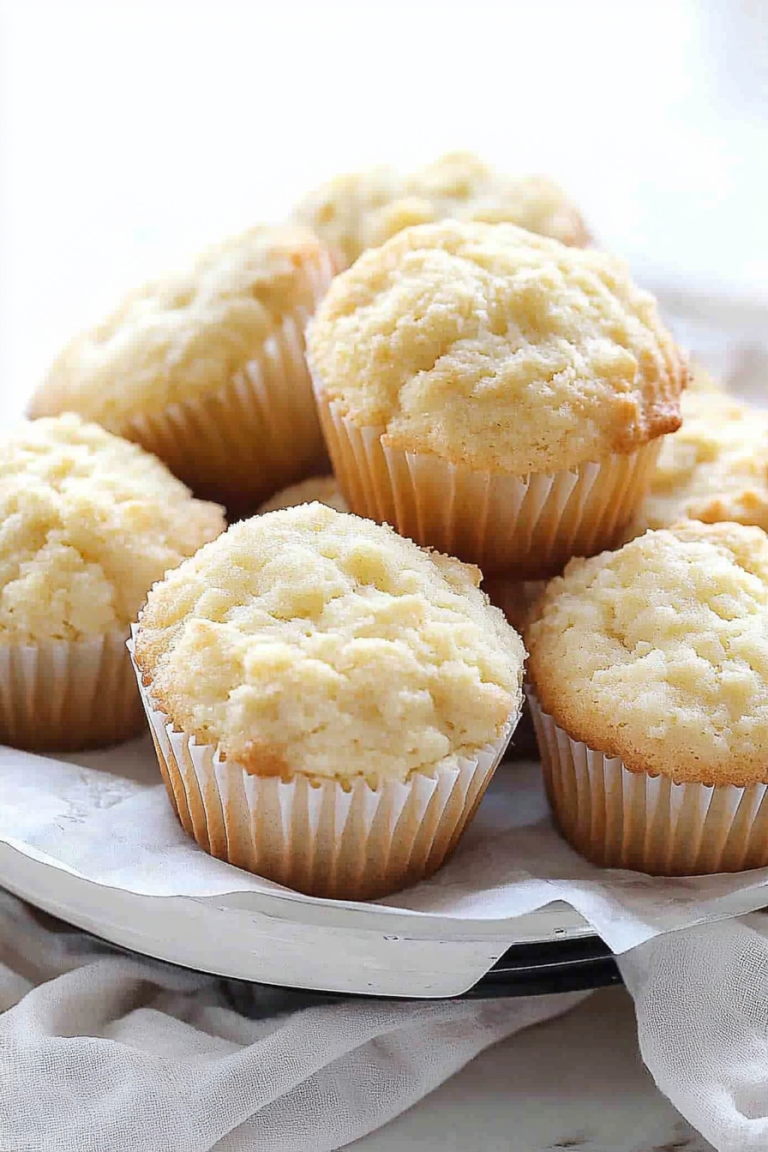
banana muffins
Ingredients
Method
- Preheat your oven to 350°F (175°C) and liberally grease a 12-cup muffin tin with butter.
- In a medium mixing bowl, whisk together the flour, baking soda, salt, and cinnamon. Set aside.
- In a separate large mixing bowl, using an electric mixer at medium speed, cream together the brown sugar and butter until fluffy and significantly lighter in color.
- Beat the eggs into the creamed butter, one egg at a time, scraping down the batter as needed. Then, mix in the vanilla extract and sour cream. Set aside.
- In a small bowl, mash the bananas with a fork until they are pretty smooth but still have some small chunks.
- Beat the mashed bananas into the creamed butter and sugar mixture. Then, with the mixer on low, gradually add the flour mixture to the creamed mixture and mix until just combined; don't overmix. Finally, using a rubber spatula, fold in the walnuts. The batter will be thick.
- Spoon the batter into the prepared muffin tin, filling each cup almost to the brim. Brush the tops of the muffins with melted butter and sprinkle a liberal pinch of raw cane sugar over each.
- Bake for 22-26 minutes or until a toothpick inserted into the center of a muffin comes out clean.
- Remove from the oven and let the muffins cool in the tin for a few minutes before transferring them to a wire rack to cool completely.