Easy Butterfinger Pie Recipe Delight
Sometimes, the best recipes are born out of what you’ve got floating around in the fridge late at night. I remember the first time I whipped up this zucchini and cream cheese swirl cake — I was craving something sweet but wanted to sneak in a veggie or two without anyone noticing. The smell alone when it’s baking? Pure magic. It’s comforting, moist, and just the right touch of indulgent. Honestly, I’ve made this recipe more times than I can count, especially when I need a quick dessert that’s a little out of the ordinary. My kids ask for it all the time, and I love that I can say, “Yes, it’s got zucchini, but you’d never know — it’s just delicious!” The best part? It’s super simple to throw together, and you can even prep it in advance. Stir it up in the morning, bake it in the evening, and surprise everyone with this cozy, beautiful cake. Trust me, once you try it, it’ll become a go-to for family gatherings or whenever you’re craving something sweet with a little extra love mixed in.
What is Zucchini & Cream Cheese Swirl Cake?
Think of this cake as the lovechild of a classic coffee cake and a quick bread, but with a clever twist—zucchini hidden inside and a luscious cream cheese swirl spiraled throughout. It’s essentially a moist, tender cake that gets its delicious, slightly tangy richness from the cream cheese, perfectly balanced by the vegetable’s subtle sweetness and moisture. The name might sound fancy, but it’s just a clever way to use up those summer zucchinis while still feeling like you’re indulging in something special. The swirl pattern makes it look fancy enough for guests, but really, it’s a family-friendly recipe that’s as much fun to make as it is to eat. Think of it as the kind of cake that’s perfect for breakfast, lunchbox treats, or dessert — really, anytime you want a little cozy comfort with a twist.
Why you’ll love this recipe?
What I love most about this zucchini & cream cheese swirl cake is that it’s an all-in-one treat — sweet yet wholesome, beautiful but fuss-free. The flavor profile is out of this world; the tender crumb carries just the right amount of sweetness, with that surprise cream cheese core giving it a luxurious, velvety feel. Plus, the zucchini keeps everything moist and tender, so you don’t need to worry about overbaking or dryness. This one’s a lifesaver on busy nights when I want something homemade but don’t have hours to fuss in the kitchen. And it’s sort of magical how versatile it is — serve it warm with a drizzle of honey, or cooled with a dusting of powdered sugar, or even with a dollop of whipped cream for extra indulgence. I’ve tested this with different flours, with or without nuts, and even added a little lemon zest — it always turns out beautifully. The best part? It’s budget-friendly, with ingredients I usually have on hand, so I don’t need to run to the store. And my favorite part? It’s a crowd-pleaser. Everyone from picky kids to grown-up friends loves it. Honestly, once you make this, it’s hard to go back to plain old banana bread or plain vanilla cake — this has that little extra zing that keeps everyone coming back for seconds.
How do you make Zucchini & Cream Cheese Swirl Cake?
Quick Overview
This cake is one of those recipes where you mix everything in a few bowls, swirl the cream cheese mixture throughout the batter, and then bake until it’s perfectly golden and moist. What makes it special is the swirl — creating a beautiful marbled look that’s as pleasing to the eye as it is to the palate. The process is straightforward but gives the impression of a fancy bakery treat. I always do this when I want to impress friends without spending hours in the kitchen. Plus, the batter comes together in just minutes, making it ideal for spontaneous get-togethers or last-minute cravings. The key here is not overmixing once you combine the wet and dry ingredients — that keeps the crumb tender and fluffy. Once baked, you get this irresistible aroma that fills your kitchen, calling everyone in for a slice.
Ingredients
For the Main Batter:
– 2 cups all-purpose flour (or a gluten-free blend, see tips below)
– 1 ½ teaspoons baking powder
– ½ teaspoon baking soda
– ½ teaspoon salt
– 1 cup granulated sugar
– ½ cup vegetable oil (can swap for applesauce for a healthier twist)
– 2 large eggs
– 1 teaspoon vanilla extract
– 1 cup grated zucchini (squeeze out excess moisture, trust me on this!)
– ½ cup milk (dairy or almond, whatever you prefer)
For the Filling:
– 8 oz cream cheese, softened
– ½ cup powdered sugar
– 1 teaspoon vanilla extract
For the Glaze (optional but recommended):
– ½ cup powdered sugar
– 1-2 teaspoons milk or lemon juice
– A splash of vanilla or lemon zest for flavor
Step-by-Step Instructions
Step 1: Preheat & Prep Pan
Set your oven to 350°F (175°C) and lightly grease a loaf or bundt pan. I honestly love lining it with parchment paper — makes removing the cake so much easier and less messy. While it’s preheating, grate your zucchini and give it a good squeeze to get rid of excess moisture. Wet zucchini is great for moisture, but too much can make your batter runny. Trust me, I learned this the hard way! A little salt sprinkled on the grated zucchini after squeezing also helps keep everything balanced.
Step 2: Mix Dry Ingredients
In a big bowl, whisk together the flour, baking powder, baking soda, and salt. This ensures all the leavening agents are evenly distributed. I always do this first—keeps the batter uniform and helps prevent clumps later. Plus, it’s satisfying to see all those powders blend into a fine, uniform mixture.
Step 3: Mix Wet Ingredients
In another bowl, combine sugar, oil, eggs, and vanilla. Whisk until smooth — it’ll look a little glossy and smell fantastic. Then, stir in the grated zucchini and milk. The batter will be a bit thick but pourable. If it seems too stiff, a splash more milk usually does the trick. I’ve even tested this with almond milk, and it made the cake even creamier!
Step 4: Combine
Pour the wet mixture into the dry ingredients and gently fold until just combined. Don’t overmix — that’s how you get a tough crumb. A few streaks of flour are okay; I promise it’ll turn out tender. This is also when you can fold in extras like chopped nuts or a teaspoon of lemon zest if you’re feeling fancy.
Step 5: Prepare Filling
In a small bowl, beat the softened cream cheese, powdered sugar, and vanilla until smooth. It should be soft and spreadable. If it’s too runny, pop it in the fridge for a few minutes. I like to add a pinch of lemon zest here — just for a fresh pop of flavor.
Step 6: Layer & Swirl
Pour about half of the batter into your prepared pan. Spread the cream cheese mixture over the top, then cover with the remaining batter. Use a skewer or a knife to swirl through the batter, creating beautiful marbled patterns. I love doing figure eights or circles — it’s kind of like artwork in the oven.
Step 7: Bake
Pop it into your preheated oven and bake for about 45-55 minutes. Test for doneness by inserting a toothpick in the center—if it comes out clean, you’re good. Don’t worry if the top cracks a little — that’s normal and even charming! The cake should be golden and smell like heaven.
Step 8: Cool & Glaze
Let the cake cool in the pan for about 15 minutes, then transfer to a wire rack. Once cooled, you can drizzle with a simple glaze made from powdered sugar and milk or lemon juice. I just whisk until it’s pourable but not runny. It’s totally optional but adds that finishing touch.
Step 9: Slice & Serve
Cut into thick slices with a sharp serrated knife. Serve warm or cooled — I won’t judge. A dollop of whipped cream or a scattering of fresh berries makes it even fancier, but honestly, it’s amazing all on its own. This cake disappears quickly at my house — I always make a double batch!
What to Serve It With
This cake is such a versatile sweetheart. For breakfast, I love pairing it with a strong cup of coffee — the slightly tangy cream cheese offset by the bitter richness of a good brew is sublime. It also makes a stunning brunch centerpiece, especially when served with a side of fresh fruit and a drizzle of honey or maple syrup. When I serve it as dessert, I like to add a scoop of vanilla ice cream or a handful of toasted nuts for crunch. And during lazy weekend afternoons, a simple dusting of powdered sugar and a cup of herbal tea turn it into the perfect cozy snack. Sometimes I even freeze slices for later — just wrap them tightly in plastic wrap and foil, and they’ll last for a month. My family loves having this on hand for those sweet cravings that strike unexpectedly. It’s the kind of dessert that feels special but is so easy that I don’t hesitate to make it often. Plus, it’s a sneaky way to get some veggies in without anyone noticing — talk about a win-win!
Top Tips for Perfecting Your Zucchini & Cream Cheese Swirl Cake
Over the years, I’ve picked up a few tricks to make this cake even better. First, always squeeze out as much moisture from the zucchini as possible — too much dampness can make the batter runny. Grate, sprinkle with a tiny bit of salt, then squeeze with a clean kitchen towel or paper towels—trust me, it makes a big difference. When mixing, don’t overdo it. Overmixing can lead to a dense crumb, and nobody wants a heavy cake. Just gently fold until the ingredients are combined. For the swirl, take your time layering and swirling gently; a sloppy swirl looks less pretty and can turn into a big mess. Want to customize? Try adding lemon zest or swapping the cream cheese for ricotta — both work beautifully. If you prefer a less sweet cake, cut down on the sugar or add a splash of vanilla extract for depth. When baking, keep an eye on the time. Oven temps can vary, so start checking at around 45 minutes. The toothpick test is your best friend here. Lastly, the glaze is optional but so worth it. I like to keep it simple with powdered sugar and lemon juice, but you could also add a splash of balsamic for a grown-up twist. Just don’t forget — let it cool completely before glazing so it doesn’t melt into the warmth.
From my kitchen to yours, I hope you love making this as much as I do. It’s become a little tradition in my home, and I can’t wait to hear how it turns out at yours!
Storing and Reheating Tips
This cake keeps surprisingly well. Wrap leftovers tightly with plastic wrap or store in an airtight container. At room temperature, it’s best eaten within 2 days — beyond that, it might get a little drier. For longer storage, pop it into the fridge in an airtight container for up to 4 days. The coolness actually enhances the flavor, and you can warm slices slightly in the microwave for a minute or two for a fresh-baked feel. Planning to make it ahead? I recommend refrigerating or freezing it unglazed, then adding the glaze just before serving to keep that glossy finish fresh. Wrap the whole cake tightly in foil or plastic, and it should last up to a month in the freezer. Thaw overnight in the fridge, then warm just a little, and you’re good to go. A note on glaze — it’s best added after reheating, so the appearance stays shiny and tempting.
Frequently Asked Questions
Final Thoughts
If there’s one recipe I hope you try and love, it’s this zucchini & cream cheese swirl cake. It’s a surprise hit in my household — moist, flavorful, with that lovely swirl that makes it look like it’s come straight out of a bakery. No fuss, just honest ingredients and a little bit of love. I honestly believe food is about those little moments in the kitchen — mixing, smelling, tasting, and sharing. The warmth from this cake is more than just oven heat; it’s a reminder that sometimes, the simplest ingredients can create something truly special. I’d love to hear how it turns out at your place — comment below, share your twists, or just tell me if you jakie your slices as much as I do! Happy baking, and don’t forget to enjoy every crumb of this cozy, sweet, vegetable-hidden delight.
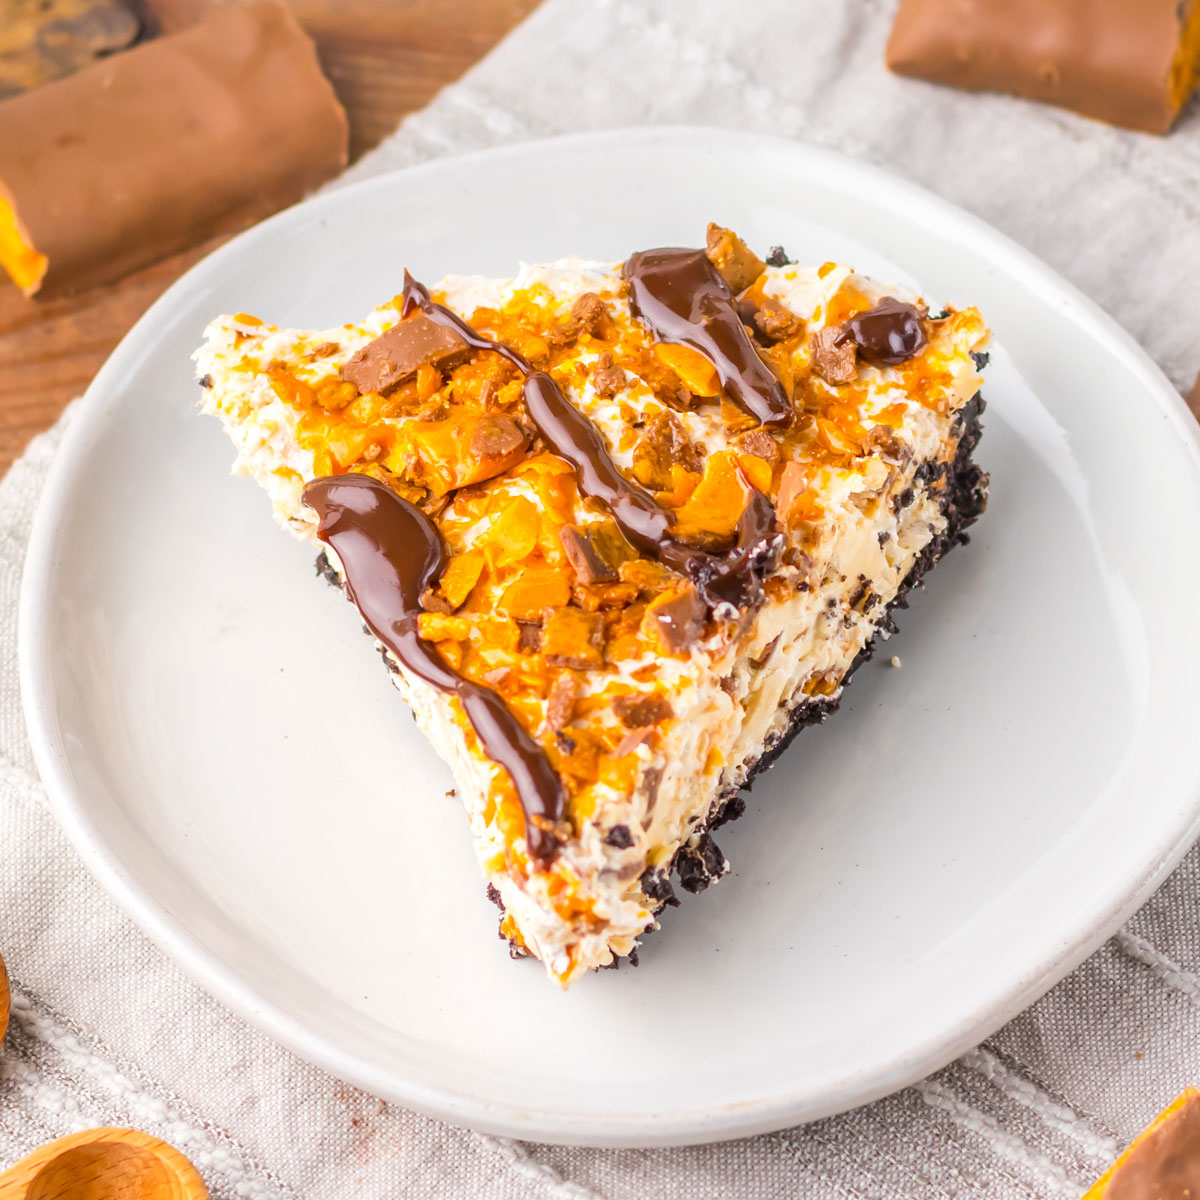
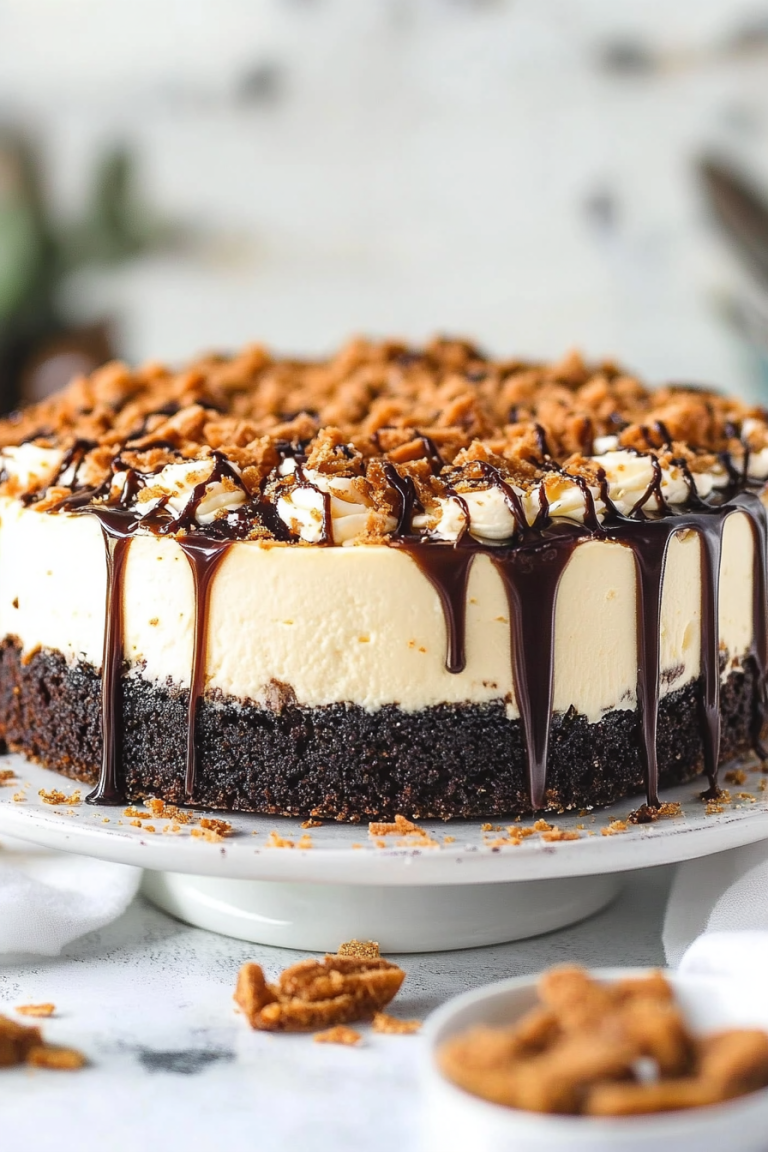
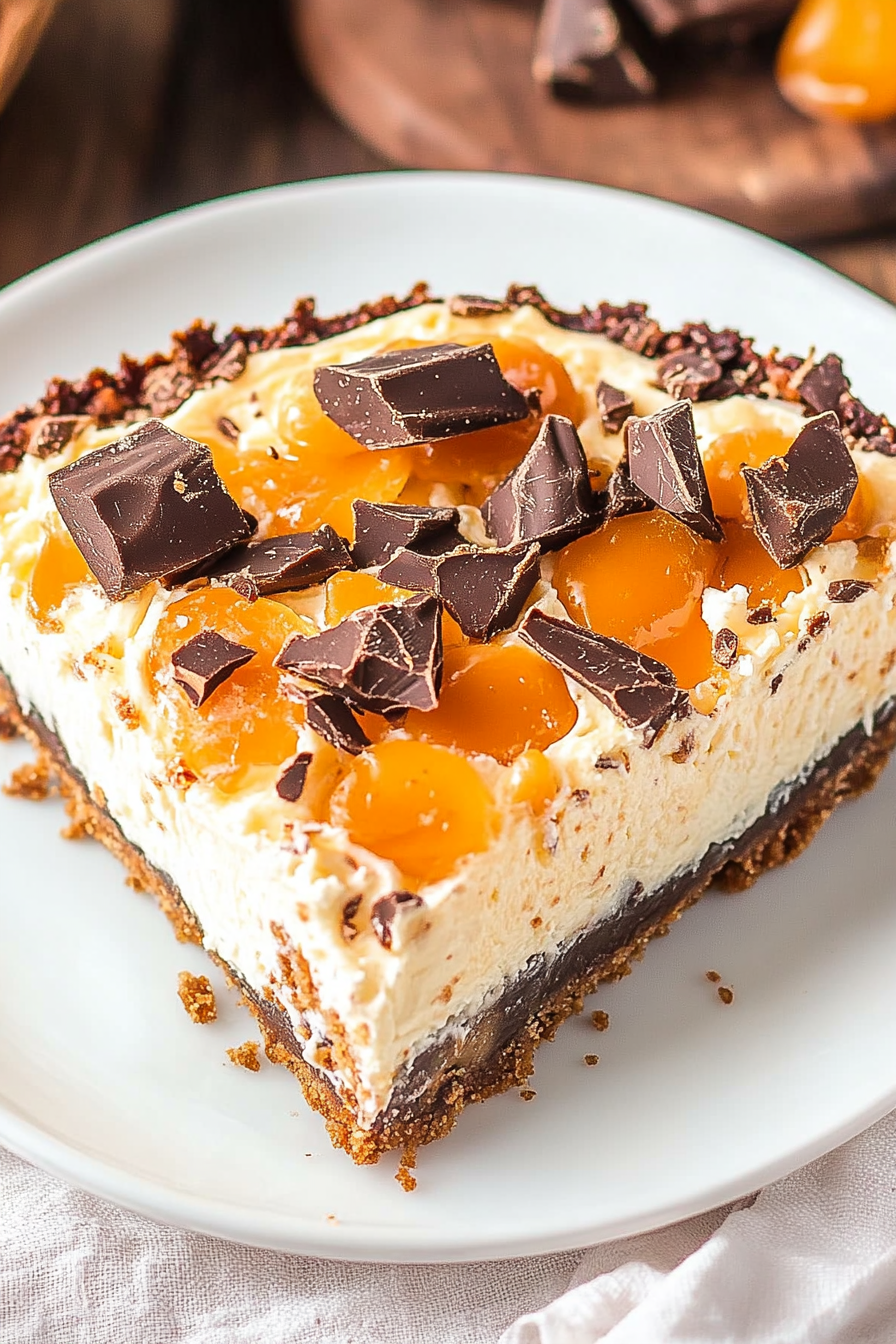
Butterfinger pie
Ingredients
Method
- In a food processor, crush the Oreo cookies until they are fine crumbs.
- Transfer the cookie crumbs to a medium bowl, add sugar and melted butter, and mix until combined.
- Press the mixture into a 9-inch pie dish to form the crust and set aside.
- In a large bowl, beat together peanut butter, softened cream cheese, vanilla, and powdered sugar until smooth.
- Fold in the thawed Cool Whip and chopped Butterfingers. Mix well.
- Pour the filling into the prepared crust, top with remaining Butterfingers, and drizzle with warm hot fudge.
- Cover and freeze the pie for at least 2 hours before serving.