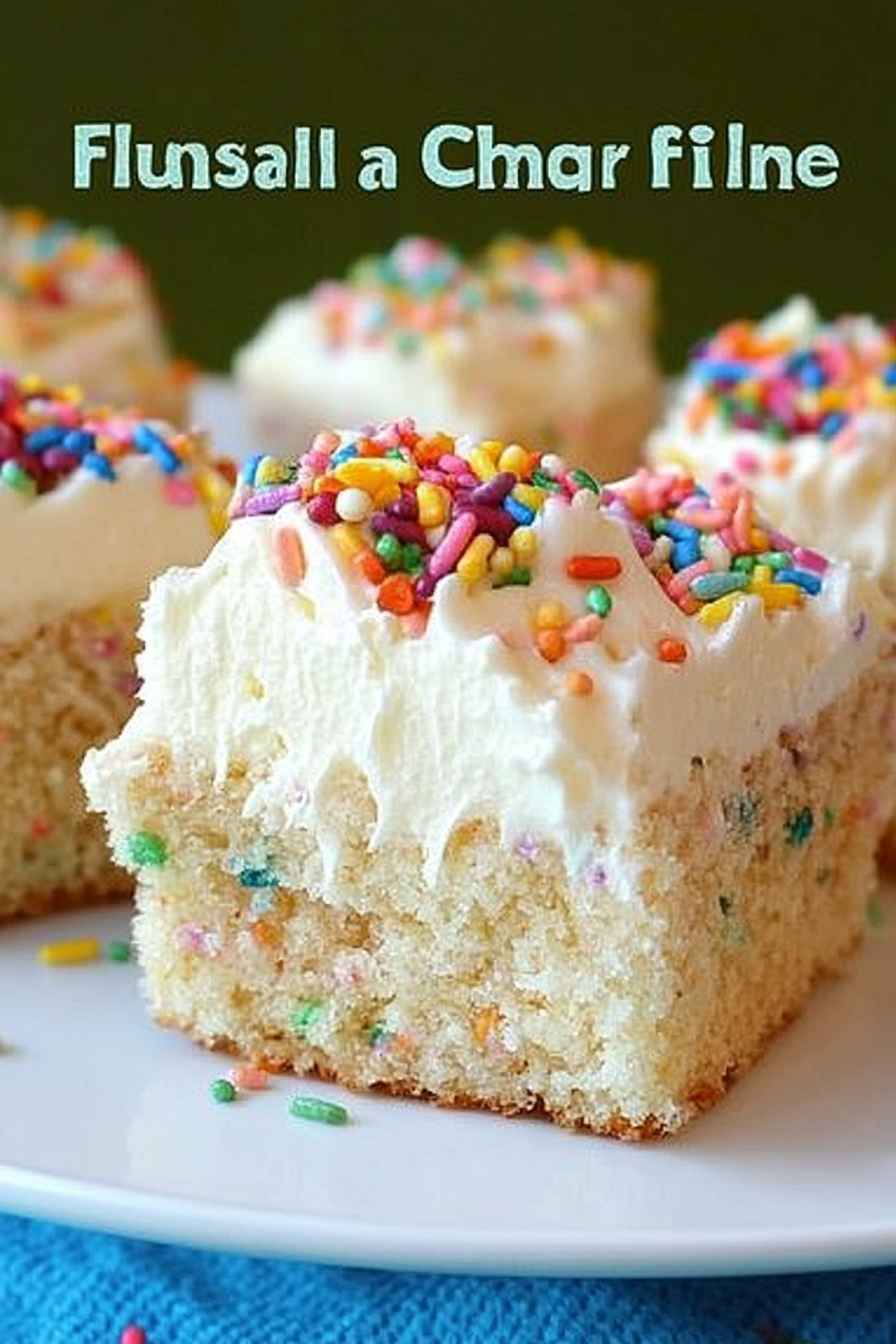
Easy Celebration Treats with Rainbow Chip Icing
If you ask my kids what they want for breakfast, more often than not, they’re shouting, “Mom, can I have that chocolate zucchini bread again?” And honestly, I don’t blame them. This bread’s got that perfect, just-sweet-enough flavor, a tender crumb, and a sneaky vegetable boost that I love to sneak into their mornings. It’s one of those recipes I’ve made maybe a hundred times — each time tweaking it just a little, trying to get the texture extra moist or the chocolate bits a little gooier. Trust me, it’s the kind of loaf that disappears in minutes at my house, and I always do this when I need a dessert-like breakfast that’s actually healthy. It’s essentially like having cake for breakfast, but without the guilt. Plus, it’s so versatile — great as a snack, with coffee, or even as a quick dessert. I’ve tested this recipe with almond milk, and I swear it made the loaf even creamier. It’s become a staple because, honestly, my kids ask for it all the time, and that’s the best compliment of all!
What is chocolate Zucchini bread?
Think of it as a moist, chocolatey bread that just happens to have zucchini hiding inside — kind of like a veggie-friendly cake that everyone in the family will love. The name might sound a little funny, but it’s truly one of those recipes that balances indulgence and nutrition perfectly. It’s essentially a quicker, easier alternative to making a layered cake or brownies, but with the added bonus of sneaking in some greens without anybody noticing. The idea originated from that classic baking need: How do I get my kids (and myself!) to eat more vegetables? Well, this chocolate zucchini bread became our answer. It’s super simple, practically foolproof, and makes your kitchen smell like a chocolate paradise. Think of it as a comfort food wrapped in a stealth vegetable disguise — totally kid-approved and perfect for anytime you want a little sweet treat that feels a little better.
Why you’ll love this recipe?
There’s so much to love about this chocolate zucchini bread. First off, **the flavor** — oh my gosh, it’s rich, chocolaty, but not overly sweet. You get a hint of that deep cocoa paired with the fresh, slightly earthy flavor of zucchini. It’s a delightful combo. What I love most about this is how easy it is to make; you basically throw everything together, and it bakes itself while you sip your coffee. This recipe is budget-friendly, too — most ingredients are pantry staples, and I almost always have what I need on hand, so it’s a lifesaver on busy nights or impromptu visits from friends. Plus, it’s super versatile. Want to add walnuts? Go for it. Prefer dairy-free? Just swap in almond or oat milk. I’ve even tried a version with honey instead of sugar, and it turned out delicious — the natural sweetness just made it even better. Honestly, this loaf is my go-to comfort food, especially when I need a little pick-me-up, and I promise, once you make it, you’ll keep coming back for more.
How do I make Zucchini bread?
Quick Overview
This recipe is a breeze. You start by grating the zucchini and squeezing out some excess moisture — this step is crucial to keep your bread from turning into a soggy mess. Then, you mix the dry ingredients in one bowl and the wet ingredients in another until smooth. Combine the two just until they’re integrated — no overmixing! Pour a good chunk of the batter into your prepared loaf pan, sprinkle with chocolate chips, add the grated zucchini and a few more chips on top, then swirl everything together with a knife. Bake until the center is just set and a toothpick comes out clean. That’s it! The smell alone will make everyone in your house walk into the kitchen the moment it starts baking.
Ingredients
For the Main Batter:
– 1 ½ cups all-purpose flour (or a mix of whole wheat if you want to add some fiber)
– ⅓ cup unsweetened cocoa powder (the good stuff, sifted to avoid clumps)
– 1 teaspoon baking soda
– ½ teaspoon salt
– ½ cup granulated sugar (feel free to reduce if you want less sweetness)
– ½ cup packed light brown sugar
– ½ cup vegetable oil (or melted coconut oil for extra flavor)
– 2 large eggs
– ½ cup milk (dairy or plant-based like almond or oat)
– 1 teaspoon vanilla extract
For the Filling:
– 2 small zucchinis, grated (about 1 cup)
– ½ cup semi-sweet chocolate chips (plus extra for sprinkling)
For the Glaze (Optional):
– ½ cup powdered sugar
– 1-2 teaspoons milk
– A dash of vanilla or cocoa powder for extra chocolaty drizzle
Step-by-Step Instructions
Step 1: Preheat & Prep Pan
Start by preheating your oven to 350°F (175°C). Grease your loaf pan with butter or non-stick spray, then line it with parchment paper if you like — it makes removing the bread so much easier. Set aside.
Step 2: Mix Dry Ingredients
In a big mixing bowl, whisk together the flour, cocoa powder, baking soda, salt, and sugars. This ensures everything mixes evenly and your bread will be perfectly tender.
Step 3: Mix Wet Ingredients
In another bowl, beat the eggs, then add the milk, vanilla, and oil. Whisk until smooth. I always test the temperature — make sure the milk isn’t too cold if you’re using dairy, or else the eggs might seize up a bit.
Step 4: Combine
Pour the wet mixture into the dry ingredients and stir gently just until combined. Resist the urge to overmix — a few lumps are fine. Overmixing is the quickest way to make tough bread, and nobody wants that!
Step 5: Prepare Filling
In a small bowl, toss the grated zucchini with a teaspoon of flour to prevent it from sinking or sticking oddly. Fold the zucchini into your batter along with half the chocolate chips. Save the rest for sprinkling on top.
Step 6: Layer & Swirl
Pour the batter into your prepared pan, smoothing the top with a spatula. Add a few more chocolate chips on top for the melty look, then use a knife to swirl the batter slightly for that marbled effect. It’s like seeing art in your batter!
Step 7: Bake
Bake for about 50-60 minutes, or until a toothpick inserted into the center comes out clean. I always set a timer for 50 minutes, then check; sometimes, it’s ready sooner or needs a little extra time. Just don’t open the oven too often to keep the heat steady. My trick is to listen for the lovely crackle on top — that’s a good sign it’s done.
Step 8: Cool & Glaze
Let the bread cool in the pan for about 15 minutes before transferring it to a wire rack. If you want a glaze, mix powdered sugar with a splash of milk and vanilla, then drizzle it over the cooled loaf. The glaze adds that extra touch of sweetness and makes it look pretty, too.
Step 9: Slice & Serve
Use a sharp serrated knife for clean slices. Trust me, warm slices with a pat of butter are divine, but this bread’s delicious at any temperature. Serve as is, or with a dollop of whipped cream or a side of berries for a fancy breakfast. Honestly, I love it just plain, maybe with a hot cup of coffee — perfection in every bite.
What to Serve It With
This chocolate zucchini bread is incredibly versatile. For breakfast, it pairs perfectly with a steaming mug of coffee or a glass of milk. My kids love a slice with a little smear of almond butter or cream cheese — I swear, it’s like a breakfast dessert. On weekends, I love serving it alongside fresh berries and a dollop of Greek yogurt for a brunch treat. It also makes a memorable dessert when warmed slightly and topped with more chocolate chips or a dusting of powdered sugar. When I’m craving comfort late at night, this bread hits the spot without the need for baking a whole cake. Sometimes, I just cut thick slices, toast them lightly, and enjoy with a drizzle of honey or nut butter. Honestly, it’s become one of those recipes that makes me feel like a kitchen hero, and I can’t count how many times friends have asked me for the recipe — that’s a compliment I cherish.
Top Tips for Perfecting Your Chocolate Zucchini Bread
Over the years, I’ve learned a few tricks to make sure this bread always turns out perfectly. First, when grating the zucchini, I always use a box grater and immediately squeeze out excess moisture — wet zucchini is the sneaky culprit behind dense, soggy bread. Trust me, that step makes a huge difference. I’ve tested the batter with different flours, like whole wheat or gluten-free blends, and while the texture changes slightly, the flavor remains incredible. When mixing, be gentle — overmixing will make it dense and tough. The swirl pattern is what gives it that rustic, homemade look, so don’t stress if it’s not perfect; a gentle zigzag with your knife does the trick. Ingredient swaps? I’ve swapped the oil for applesauce in a pinch, and it still stayed moist and delicious. Baking tips worth trying: use an oven thermometer — I’ve realized my oven runs hot, and that means constantly adjusting. And don’t forget to do the toothpick test — if it comes out with just moist crumbs, you’re good to go. For the glaze, I’ve experimented with adding a teaspoon of espresso powder or a splash of liqueur for an adult twist — trust me, the flavor combo is divine. The key is to taste, adjust, and keep it simple — that’s how I’ve perfected this recipe over years of baking.
Storing and Reheating Tips
This bread is best enjoyed within the first 2-3 days, but with a few smart tricks, it stays fresh longer. At room temperature, store it in an airtight container or wrapped tightly with plastic wrap — just don’t leave it out overnight, especially on a warm day, or it might get a little stale. If you want to keep it for longer, refrigeration is your friend; just pop it in an airtight container and it’ll stay moist for up to a week. To freeze, wrap the loaf tightly in plastic wrap and foil, then pop it in a zip-top freezer bag. It keeps beautifully for up to 3 months, and I like to thaw slices overnight in the fridge. Reheat slices briefly in the microwave or toaster oven — just a quick 15-20 seconds does the trick. As for the glaze, I suggest adding it just before serving, especially if you plan to store leftovers. Some people prefer to skip the glaze altogether and just dust with powdered sugar, which keeps it simple and light. Either way, this bread tends to stay moist and flavorful, as long as you store it properly and don’t forget to keep it sealed. It’s the kind of recipe I never tire of — every slice is like a warm hug from the kitchen.
Frequently Asked Questions
Final Thoughts
This chocolate zucchini bread isn’t just a recipe — it’s a little slice of comfort that I’ve shared hundreds of times, and it never disappoints. Every time I bake it, it reminds me of lazy weekend mornings, freshly baked treats wafting through the house, and happy kids gathering around the kitchen counter. If you’re looking for a way to sneak some veggies into your family’s diet without them even noticing, this bread is your new best friend. It’s moist, full of rich chocolate flavor, and just sweet enough to satisfy that craving for something indulgent. Plus, it’s incredibly forgiving — I’ve left out an ingredient or two and still got a great loaf. So go ahead, give it a try, and I’d love to hear how it turns out! Once you’ve baked this once, I promise it’ll become a regular in your rotation. Happy baking!

Funfetti
Ingredients
Method
- Melt butter in a large pot over low heat.
- Add marshmallows and stir constantly until fully melted.
- Stir in dry cake mix and vanilla. Remove from heat.
- Add rice krispies cereal and stir until coated.
- Press mixture into a sprayed baking pan and cool.
- Spread rainbow chip icing over the cooled treats.
- Melt white chocolate and spread evenly over the icing.
- Sprinkle with colorful sprinkles on top.