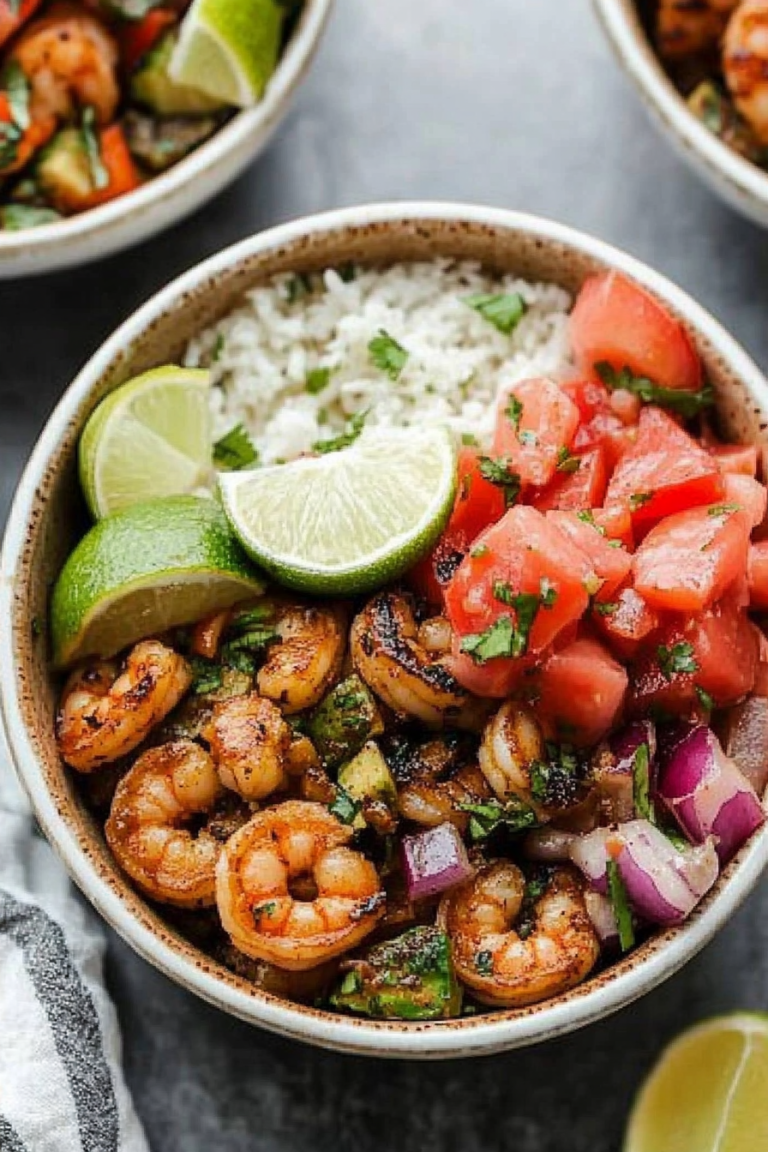
Easy Grilled Shrimp Vegetable Bowls
You know those recipes that just, well, *work*? The ones you can whip up without even really looking at the instructions anymore because they’re etched into your memory? This zucchini bread is one of those for me. It’s not just any zucchini bread, mind you. This is the one that makes my kitchen smell like pure comfort, the one my kids devour without a single complaint about the “green stuff” (because they can’t even taste it!), and the one I reach for when I need a little something sweet but don’t want to commit to a whole cake. It’s like a warm hug in slice form, and honestly, it’s way better than a basic banana bread, if you ask me. This is the recipe I’ve tweaked and perfected over years, and I’m so excited to share it with you!
What is Moist Zucchini Bread?
So, what makes this zucchini bread so special? It’s all about that incredibly tender, moist crumb that’s bursting with subtle sweetness and warmth from the spices. Think of it as a cake that happens to be in bread form, but somehow still totally acceptable to eat at 8 AM with your coffee. The “zucchini” part is the secret weapon here. It sounds a little wild, I know, but trust me on this! Grated zucchini adds this incredible moisture and tenderness without adding any discernible flavor. It’s like magic. This isn’t your dry, crumbly loaf that you have to slather in butter to make palatable. This is the real deal, the kind that makes you want to curl up on the couch with a good book and a huge slice.
Why you’ll love this recipe?
Honestly, there are so many reasons why this zucchini bread has become a staple in my kitchen. First off, the flavor is just out of this world. It’s perfectly spiced – not too much, not too little – with hints of cinnamon and nutmeg that just scream cozy. And that texture! It’s impossibly moist and tender, thanks to the secret ingredient (you guessed it, zucchini!). What I really love, though, is how surprisingly simple it is. Even if you’re not a seasoned baker, you can nail this. It comes together in one bowl for the wet ingredients and another for the dry, and then it’s just a matter of combining and baking. It’s a lifesaver on busy weeknights when you need a quick dessert or a special treat for the weekend. And speaking of value, it’s incredibly budget-friendly. Zucchini is usually pretty affordable, and the rest of the ingredients are pantry staples. You can totally serve this as a breakfast treat, a mid-afternoon pick-me-up, or even a light dessert. It’s so versatile. I’ve even had friends tell me they use this recipe as a base for mini muffins, which is a fantastic idea for lunchboxes! It’s just one of those recipes that keeps on giving.
How do I make Zucchini bread?
Quick Overview
This recipe is all about simplicity and fantastic results. You’ll whisk together your wet ingredients, then your dry, combine them gently, fold in that magical grated zucchini, and bake until a toothpick comes out clean. The result? A perfectly moist, flavorful loaf that smells amazing while it bakes. It’s honestly that straightforward, which is why it’s my go-to when I’m short on time but still want something truly delicious.
Ingredients
For the Main Batter:
You’ll need about 3 cups of all-purpose flour. I always opt for a good quality, unbleached flour for the best texture. Make sure it’s spooned and leveled, not scooped directly from the bag, otherwise, you might end up with a denser loaf.
2 teaspoons of baking soda. This is crucial for that lift and tender crumb. Make sure yours isn’t old!
1/2 teaspoon of salt. It balances out the sweetness.
1 teaspoon of ground cinnamon. This is my favorite warm spice for this bread.
1/4 teaspoon of ground nutmeg. Just a touch adds a lovely depth.
1.5 cups of granulated sugar. You can reduce this slightly if you prefer it less sweet, but it does contribute to moisture.
3 large eggs. Room temperature eggs incorporate better.
1 cup of vegetable oil. I use a neutral oil like vegetable or canola. Some people swear by melted butter, but I find oil gives it that extra moistness that lasts for days.
For the Filling:
2 cups of finely grated zucchini (about 2 medium zucchinis). This is the star! Make sure to squeeze out as much liquid as you can after grating. It makes a world of difference in preventing a soggy bottom. I usually use a fine grater and then wrap the shreds in a clean kitchen towel or paper towels and give it a good squeeze.
For the Glaze:
1 cup of powdered sugar. Sifted, if you want it super smooth.
2-3 tablespoons of milk or lemon juice. Milk makes it a classic sweet glaze, while lemon juice adds a lovely tang that cuts through the richness. You can also use buttermilk for a slight tang.
1/2 teaspoon of vanilla extract. For that classic sweet aroma.
Step-by-Step Instructions
Step 1: Preheat & Prep Pan
First things first, get your oven preheating to 350 degrees Fahrenheit (175 degrees Celsius). This is a pretty standard temperature for most quick breads, and it ensures even baking. While the oven is doing its thing, grab a standard 9×5 inch loaf pan. I like to grease it really well with butter or cooking spray, and then dust it with a little flour. You can also line it with parchment paper, leaving some overhang on the sides – this makes lifting the finished loaf out a breeze!
Step 2: Mix Dry Ingredients
In a large mixing bowl, whisk together the flour, baking soda, salt, cinnamon, and nutmeg. Giving these dry ingredients a good whisk ensures that the leavening agents (baking soda) and spices are evenly distributed throughout the batter. This is important to avoid pockets of raw baking soda or uneven spice flavor. I usually just give it a good 30 seconds of vigorous whisking.
Step 3: Mix Wet Ingredients
In a separate medium bowl, whisk together the granulated sugar and the eggs until well combined. Then, gradually whisk in the vegetable oil until everything is smooth and emulsified. You want it to look like a nice, uniform liquid. If your eggs are cold, you might notice it looks a little separated at first, but just keep whisking, and it should come together.
Step 4: Combine
Now, pour the wet ingredients into the bowl with the dry ingredients. Here’s the key: mix until *just* combined. Overmixing develops the gluten in the flour, which can lead to a tough, rubbery bread. I use a spatula for this, gently folding the ingredients together. It’s okay if there are a few little streaks of flour still visible – they’ll disappear during baking. Stop as soon as you don’t see large pockets of dry flour anymore.
Step 5: Prepare Filling
If you haven’t already, grate your zucchini using the fine side of a box grater. Once grated, place the shreds in a clean kitchen towel or a few layers of paper towels and squeeze out as much excess moisture as humanly possible. Seriously, get it as dry as you can! Then, gently fold this prepared zucchini into the batter. I like to do this with my spatula, just folding it in until it’s evenly distributed. This is where the magic happens for that super moist texture.
Step 6: Layer & Swirl
Spoon the batter evenly into your prepared loaf pan. Now, here’s a little trick that many people skip but I find makes a difference for even baking: gently spread the top of the batter so it’s relatively level. This helps prevent the center from doming too much while the edges bake, which can lead to an uneven bake and a cracked top.
Step 7: Bake
Pop that loaf pan into your preheated oven. Bake for about 50-60 minutes. Now, ovens can be a little finicky, so start checking around the 50-minute mark. The best way to tell if it’s done is to insert a toothpick or a thin knife into the center of the loaf. If it comes out clean or with just a few moist crumbs attached, it’s ready! If it comes out with wet batter, give it another 5-10 minutes and check again. You don’t want it to be dry, but you definitely don’t want it to be undercooked.
Step 8: Cool & Glaze
Once it’s baked to perfection, carefully remove the loaf pan from the oven. Let the bread cool in the pan for about 10-15 minutes. This allows it to set up a bit and makes it easier to remove without breaking. After that initial cooling, invert the loaf onto a wire rack to cool completely. I know it’s tempting to dive in right away, but it’s important to let it cool fully, especially if you plan to glaze it. Once it’s completely cool, you can make the glaze. Whisk together the powdered sugar, milk (or lemon juice), and vanilla extract until you have a smooth, pourable consistency. Drizzle it over the top of the cooled bread and let it set. It’s so pretty!
Step 9: Slice & Serve
Once the glaze has set (or if you skipped the glaze, as soon as the bread is cool enough to handle), it’s time to slice and serve! I like to use a serrated knife for clean cuts. The smell is heavenly at this point, and the aroma will fill your house. Serve it up warm or at room temperature. It’s delicious on its own, but a little smear of butter is never a bad idea!
What to Serve It With
This zucchini bread is incredibly versatile and can be enjoyed in so many ways, making it a favorite for any time of day or occasion. For a simple and satisfying breakfast, I love serving a thick slice alongside a steaming mug of my favorite dark roast coffee. It’s warm, comforting, and just the right amount of sweet to start the day without being heavy. If you’re planning a leisurely weekend brunch, this bread is an absolute winner. I’ll often serve it with some fresh fruit salad, perhaps some scrambled eggs, and maybe a side of crispy bacon. The bread provides a lovely sweet counterpoint to the savory dishes. For dessert, it’s fantastic on its own, but if you’re feeling a bit decadent, a small scoop of vanilla bean ice cream melting into a warm slice is pure bliss. It’s also amazing with a dollop of whipped cream or a drizzle of caramel sauce. And for those cozy evenings when you just need a comforting snack, a slice of this bread is perfect. I like pairing it with a glass of cold milk or even a cup of herbal tea. My family often requests this for “after-school treats” and it’s gone in minutes. It’s just one of those universally loved treats!
Top Tips for Perfecting Your Moist Zucchini Bread
I’ve made this zucchini bread more times than I can count, and through all those bakes, I’ve picked up a few little tricks that I think make a big difference. First off, regarding the zucchini prep: squeezing out that liquid is non-negotiable. If you skip this step, you’ll end up with a gummy, overly wet loaf that might not bake through properly. I’ve tested it with different grating sizes, and I find the fine grater gives you the most seamless integration into the batter, almost disappearing. For mixing, remember my advice about not overmixing. Seriously, just combine until you don’t see dry flour streaks. A few lumps are better than a tough loaf! When it comes to swirling, if you decide to add anything extra, like chocolate chips or nuts, fold them in gently at the very end. For swirling, I haven’t found a need to do much with this recipe because the zucchini itself creates such a lovely texture, but if you’re adding something like a cinnamon-sugar swirl for an extra layer of flavor, make sure it’s not too wet, or it can affect the bake. I’ve experimented with ingredient swaps quite a bit. For instance, I tested this with almond milk instead of regular milk in the glaze, and it actually made it even creamier! You can also swap out some of the granulated sugar for brown sugar (about half and half) for a richer, caramel-like flavor. For baking, always know your oven. If you find your loaves tend to brown too quickly on top, you can loosely tent a piece of aluminum foil over it during the last 15-20 minutes of baking. And for the glaze, consistency is key. If it’s too thick, add milk a teaspoon at a time. If it’s too thin, add more powdered sugar. I’ve found that a slightly thicker glaze holds up better for storage, while a thinner one drips down the sides beautifully.
Storing and Reheating Tips
One of the best things about this zucchini bread is how well it keeps! I’ve tested pretty much every storage method, and here’s what I’ve found works best to maintain that amazing moisture. If you plan to eat it within a day or two, simply wrapping the cooled loaf tightly in plastic wrap or foil and leaving it on the counter at room temperature is perfect. It stays wonderfully moist. If you need it to last longer, say up to 4-5 days, storing it in an airtight container in the refrigerator is the way to go. The cold can sometimes make baked goods a little firmer, but this bread holds up remarkably well. To reheat a slice from the fridge, I like to pop it in the toaster oven for a few minutes at a low temperature (around 300°F or 150°C) until it’s warmed through and tastes fresh again. For longer storage, this bread freezes beautifully! Let it cool completely, then wrap it tightly in plastic wrap, followed by a layer of aluminum foil or a freezer-safe bag. It should stay delicious in the freezer for up to 2-3 months. To thaw, simply unwrap it and let it come to room temperature on the counter, or gently reheat it as I mentioned. If you’ve glazed your bread, I recommend adding the glaze *after* thawing if you plan to freeze it. Otherwise, the glaze might crack or become sticky during the freezing and thawing process.
Frequently Asked Questions
Final Thoughts
This moist zucchini bread truly is a gem. It’s that perfect balance of easy, delicious, and comforting that makes a recipe a keeper. Whether you’re looking for a way to use up that summer zucchini haul or just craving a slice of pure homemade goodness, this recipe delivers every single time. It’s the kind of treat that makes your home smell amazing and brings smiles to everyone’s faces. If you love this recipe, you might also enjoy my incredibly moist banana bread or my tangy lemon blueberry loaf. Give this zucchini bread a try, and I have a feeling it will become a beloved favorite in your kitchen too. I can’t wait to hear what you think! Let me know in the comments below how yours turns out, or if you’ve added any special twists!
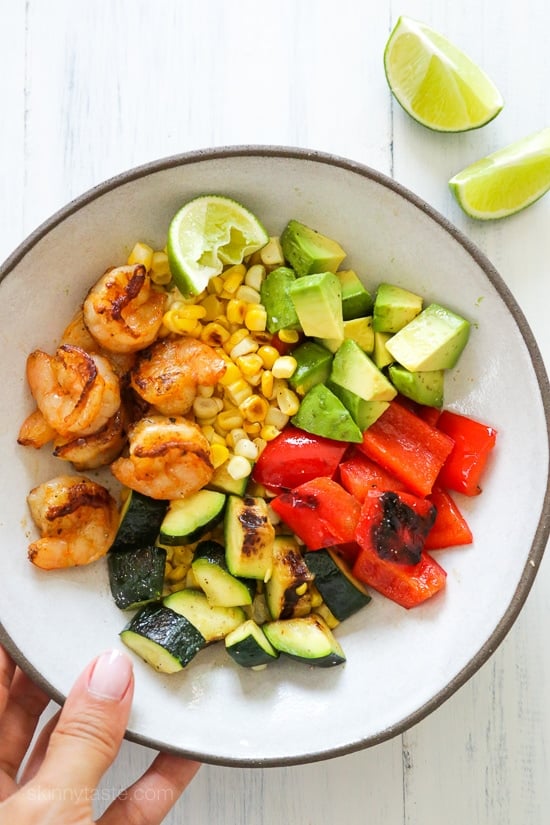
Grilled Shrimp and Vegetable Bowl
Ingredients
Method
- Gently pat shrimp dry with a paper towel and place them in a medium bowl. Add the olive oil and toss to evenly coat. Add the onion powder, garlic powder, smoked paprika, brown sugar, 0.5 teaspoon salt, pepper and cayenne. Toss again and carefully skewer shrimp onto pre-soaked wood or metal skewers. Set aside.
- Lightly spray the bell pepper, zucchini and corn with olive oil spray and use your hands to evenly coat. Season with 0.25 tsp salt and pepper.
- Over medium-high heat, grill the corn cobs, bell pepper halves and zucchini for 4 minutes. Using long metal tongs, carefully turn the corn cobs, peppers and zucchini then place the shrimp on the grill. Cook for an additional 4 minutes, flipping the shrimp after 2 minutes. Remove everything from the grill at the same time.
- Place corn cobs on a cutting board and carefully cut off the kernels from the cob. Dice the peppers and zucchini. Place the kernels in a medium bowl with the peppers, zucchini, avocado and lime juice. Add 0.25 teaspoon salt and pepper, to taste. Toss to evenly coat. Divide shrimp and salad among 4 plates and serve.