Easy Italian Burger Recipe
If you’re like me, you probably have a soft spot for those gooey, cinnamon-scented mornings that just feel like a little celebration. I remember sneaking bites of my grandma’s coffee cake as a kid, the whole house smelling like sugar and spice, and thinking it was a secret recipe just for fun. Fast forward a few years, I’ve tried dozens of recipes—some good, some okay—and I finally nailed one that’s become a family favorite. It’s super moist, packed with tender zucchini (yes, zucchini!), and the crumb topping is basically my weakness. Honestly, this one’s a lifesaver on busy nights when I want to whip up something special but don’t have time to fuss. And the best part? It tastes like dessert but feels like breakfast—how could you go wrong? Plus, I always do this when I want to surprise my friends or just indulge myself with a treat. Trust me on this one, this zucchini coffee cake is going to become a repeat in your house too. Just wait until you smell it baking—it’s pure comfort in every bite.
What is Zucchini Coffee Cake?
Think of zucchini coffee cake as your next cozy morning buddy with a fun twist. It’s essentially a soft, tender cake made with grated zucchini—kind of like sneaking in a veggie as a secret ingredient! The zucchini adds moisture without overpowering the flavor—just the right balance of sweetness, spice, and that crunchy crumble topping. The name “coffee cake” usually hints at whether you’re serving this with your morning coffee or for a relaxed afternoon tea, but I swear it’s good anytime. It’s a bit like a sweet breakfast loaf or a dessert that’s perfect when you’re craving something comforting but don’t want to feel guilty afterward. Think of it as a cross between a moist quick bread and a cinnamon-spiced cake—wholesome, cozy, and totally addictive. My kids ask for this all the time, especially when zucchini’s in season, because they swear it tastes like a treat but secretly, I love that it sneaks in some hidden veggies.
Why you’ll love this recipe?
What I love most about this zucchini coffee cake is how it hits all those cozy, warm-fuzzy spots. First: the flavor. It’s got the perfect combo of cinnamon, brown sugar, and a hint of nutmeg that makes it smell like a dream—think about that smell filling your kitchen and everyone wanting a piece. Second: it’s so easy to make. I always do this when I’m short on time but need something homemade—mix the batter, prepare the topping, and bake. No complicated techniques or fancy ingredients here. Plus, it’s budget-friendly; I usually keep everything in my pantry. And the versatility—ah! I’ve taken this cake on picnics, served it at brunch, or just kept slices on hand for those late-night sweet cravings. What’s even better? It stays moist for days, and I’ve happily frozen leftovers—though, honestly, it disappears from my house in minutes. My favorite part? The crumble top—crisp and buttery, with just enough cinnamon to make every bite feel like a warm hug. Whether it’s for breakfast, brunch, or dessert, this is one recipe I’ll keep coming back to.
How do I make Zucchini Coffee Cake?
Quick Overview
This zucchini coffee cake is as straightforward as it sounds. You start by grating the zucchini and squeezing out the excess moisture—trust me, this step makes all the difference in keeping the cake tender. Then, you whisk together your dry ingredients—flour, baking powder, spices—while separately mixing your wet ingredients—eggs, yogurt, oil, vanilla. Combine everything gently, fold in the zucchini, pour into a prepared pan, sprinkle that irresistible crumble on top, and bake. It’s almost too simple, and yet, the smell alone is worth every minute. The secret to perfection? Don’t overmix the batter—light and gentle is best. And the crumble—oh, that buttery, cinnamon-spiked topping—takes this from good to unforgettable. This method ensures a moist, fluffy cake with a beautiful crackly top. By the time it comes out of the oven, your kitchen will be filled with that sweet, spicy aroma that just makes everyone come running.
Ingredients
For the Main Batter:
– 2 cups all-purpose flour (I like to use unbleached for more flavor)
– 1 teaspoon baking powder
– ½ teaspoon baking soda
– 1 teaspoon ground cinnamon
– ½ teaspoon ground nutmeg
– ¼ teaspoon salt
– ½ cup sugar (white or coconut sugar works well)
– ½ cup brown sugar for extra richness
– ⅓ cup vegetable oil or melted butter
– 2 large eggs
– 1 teaspoon vanilla extract
– 1 cup plain yogurt (whole milk or Greek yogurt for creaminess)
– 1-2 zucchinis, grated (about 1 cup after squeezing out moisture)
For the Filling:
– Optional: Cream cheese or a bit of lemon zest for variation—trust me, it’s a game changer! If you like it sweeter, add a handful of chocolate chips or chopped nuts.
For the Glaze:
– ½ cup powdered sugar
– 1-2 teaspoons milk or lemon juice
– A tiny splash of vanilla (if you like a slight vanilla drizzle)
– Plus, extra cinnamon or zest for flavor tweaks
Step-by-Step Instructions
Step 1: Preheat & Prep Pan
First, set your oven to 350°F (175°C). Grease a 9-inch square pan or round cake pan with butter or non-stick spray. I like lining mine with parchment for easy removal. This cake is pretty forgiving, so don’t stress. Just make sure your pan is ready before it goes in the oven—that way, the batter won’t sit out too long.
Step 2: Mix Dry Ingredients
In a large bowl, whisk together your flour, baking powder, baking soda, spices, and salt. This step keeps everything evenly distributed so the batter rises uniformly. I always do this first; it’s like laying the foundation of a good cake. Plus, it prevents clumps and uneven spots.
Step 3: Mix Wet Ingredients
In another bowl, whisk your eggs, add the oil—gradually mixing as you go—and then stir in vanilla and yogurt. I always do this by hand to really incorporate everything, and I make sure the eggs are at room temperature—it helps everything blend smoothly. Then, fold in the grated zucchini—it adds moisture and sweetness without making it soggy, so don’t skip this step or skip squeezing out the excess moisture.
Step 4: Combine
Pour the wet mixture into the dry ingredients and gently fold together. Do just enough to combine; overmixing can make the cake dense. You want a lumpy but combined batter, kind of like muffin batter. If you see streaks of flour, it’s perfect—don’t beat out all the air. A few lumps are totally fine!
Step 5: Prepare Filling
If you’re adding extras like cream cheese or chocolate chips, now’s the time. Drop spoonfuls onto the batter, or mix in gently. For the classic version, keep it simple—just the batter. This is where you can really customize, depending on your mood or what’s in your fridge.
Step 6: Layer & Swirl
Pour batter into your pan, then sprinkle or dollop your filling on top if using. Use a skewer or knife to swirl it around gently—kind of like painting a marbled effect. This gives each slice that gorgeous ripple of flavor. Don’t overdo it; a light swirl ensures bits of filling peek through beautifully.
Step 7: Bake
Pop it into the oven and bake for about 40-45 minutes. Check doneness with a toothpick—it should come out clean, maybe with a few moist crumbs. Every oven is different—mine sometimes takes an extra 5 minutes, so keep an eye out. I avoid opening the oven too early—trust me, patience pays off for a tall, fluffy cake.
Step 8: Cool & Glaze
Let the cake cool in the pan for about 15 minutes, then transfer to a wire rack. Pour your glaze over while it’s still a bit warm—if it’s cooled completely, just warm it up a little. The glaze trickles into all those nooks and crannies, making each bite a little more decadent. Wait at least 30 minutes for the glaze to set before slicing—otherwise, it may slide off.
Step 9: Slice & Serve
Use a sharp serrated knife to get clean slices. I like serving it slightly warm, with a dollop of whipped cream or a drizzle of honey. It’s beautiful on a plate with a few fresh berries or a sprig of mint, but honestly, I’ve grabbed a piece straight from the pan—calculated chaos, as I call it. This cake is also fantastic at room temperature if you prefer slice-and-go mornings.
What to Serve It With
This zucchini coffee cake is pretty versatile—here’s what I usually reach for:
- For breakfast: Pair it with your favorite roasted coffee or a gentle latte. I like serving it with a side of fresh fruit—sliced strawberries or blueberries add a nice tang.
- For brunch: Make it the star of a spread with scrambled eggs, formation of a miniature buffet, and maybe some freshly squeezed orange juice or mimosa. It’s easy to slice up large batches and let everyone help themselves.
- As dessert: Warm slices with vanilla ice cream or mascarpone cheese—they complement the cinnamon and zucchini really well. And if you’re feeling fancy, a dusting of powdered sugar makes it extra special.
- For cozy snacks: Cut smaller squares and serve with coffee or tea in the late afternoon—perfect for when you need a little pick-me-up or a sweet moment during busy days. My family loves having these on hand—either warmed up or at room temp.
Nothing beats sitting around the table, sharing a slice, and feeling that homely, loving vibe. I’ve tested this recipe with nut milk, almond extract, even swapping out the cinnamon—each variation adds a little twist. You can add walnuts, chopped dates, or even vegan chocolate chunks. It’s flexible and forgiving, like all great family recipes should be.
Top Tips for Perfecting Your Zucchini Coffee Cake
Every time I make this, I learn something new. Here are some tips that help me get perfect slices:
- Zucchini prep: Always squeeze out as much moisture as possible after grating. I use a clean kitchen towel and give it a good twist—this keeps the cake moist but not soggy.
- Mixing advice: Gentle is the way to go. Overmixing makes the cake dense. Fold just until combined—it’s okay if there are small lumps.
- Swirling the filling: Use a toothpick or skewer to create swirling designs—start from the center and drag outward. It’s almost meditative but really makes the cake look professional.
- Ingredient swaps: I tested this gluten-free with a blend of almond and oat flour—worked pretty well, but it’s a tad denser. For sweetness, coconut sugar makes it more caramel-like, but regular sugar is just fine too.
- Baking tips: My oven runs hot, so I often reduce the temperature to 340°F and cook a little longer. Always test with a toothpick near the end—better to underbake than over!
- Glaze variations: For a tangy twist, add a splash of lemon juice or zest. If you like it richer, mix in a tablespoon of cream cheese into your glaze. The possibilities are endless!
Honestly, I’ve messed up a few times early on—like forgetting to squeeze the zucchini or overmixing—and now I know those little tweaks make a big difference. Trust your nose and your instincts, and don’t rush the cooling stage. Patience makes for a glossy, crackly top and a moist crumb.
Storing and Reheating Tips
This cake keeps surprisingly well. If you’re lucky enough to have leftovers, here’s what I do:
- Room temperature: Wrap it tightly in plastic wrap for up to 2 days. It stays moist and delicious, just like fresh out of the oven.
- Refrigerator storage: Store slices in an airtight container—good for up to 4 days. To keep it from drying out, I like to microwave a slice for about 15 seconds or warm it gently in the oven for 10 minutes at 300°F.
- Freezing: Wrap individual slices in plastic wrap and then foil. They’ll keep for up to 3 months. Thaw in the fridge overnight or microwave gently. Just be careful not to overheat—no one wants a rubbery cake.
- Glaze tips: If you’re freezing, hold off on the glaze and add it fresh when serving. It’s amazing how just a drizzle of glaze can transform a slice.
This cake is forgiving, hearty, and perfect for make-ahead plans. I often bake a double batch on Sunday and enjoy it through the week—morning, noon, or night.
Frequently Asked Questions
Final Thoughts
Honestly, this zucchini coffee cake has become my go-to recipe when I want something homey and sweet but still wholesome. It’s perfect for breakfast, brunch, or a sneaky dessert after dinner. I love how flexible it is—tweaking the fillings, adding nuts or chocolate, or just keeping it simple. Every time I bake this, my house fills with that irresistible cinnamon-spiced aroma that makes everyone come running. And yes, I’ve made mistakes—overmixing once made it dense, and skipping squeezing the zucchini made it a little soggy. But those little lessons only helped me get closer to perfect. So, give it a try, tweak it your way, and watch it disappear in no time. Happy baking, and I can’t wait to hear how yours turns out! Remember to comment below with your favorite variations or questions. I love getting to share these moments in the kitchen with friends like you.
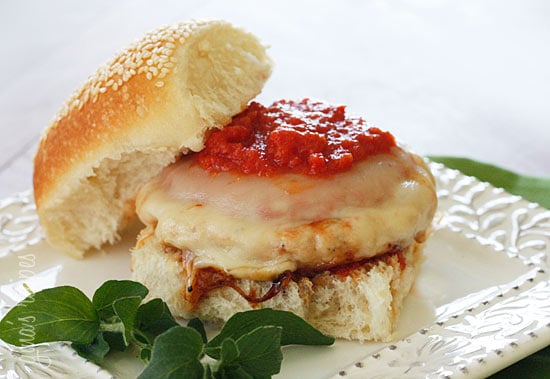
Chicken Parmigiana
Ingredients
Method
- Preheat oven to 375°F. Pound the chicken breasts to even thickness. Dredge each chicken piece in flour, then dip in beaten eggs, and coat with breadcrumbs.
- Heat olive oil in a skillet over medium heat. Cook chicken until golden brown on both sides, about 4 minutes per side.
- Transfer the cooked chicken to a baking dish. Spoon marinara sauce over each piece, then sprinkle with mozzarella and parmesan cheese.
- Bake in the preheated oven for 20-25 minutes, until cheese is bubbly and slightly browned.