Easy Tuna Pasta Salad Recipe
If you’ve ever walked into my kitchen on a lazy Sunday morning, you’ve probably caught a whiff of something sweet baking away, filling the whole house with comfort. One of my all-time favorites is this zucchini marble cake—yes, zucchini!—because it’s just the right mix of wholesome and indulgent. Honestly, I used to think zucchini belonged only in savory dishes until I stumbled on this recipe. It’s incredible how the squash adds moisture and a subtle sweetness, almost like magic. This cake always disappears in minutes at my house; my kids ask for seconds, and even the pickiest eaters are won over. Trust me, this one’s a lifesaver on busy nights or when you need a no-fuss treat that’s as delightful as it is sneaky healthy. The marble swirl makes it look fancy, but I promise, it’s super easy to pull off. Plus, I love how it pairs perfectly with a cup of coffee or tea. So, grab a zucchini (or two), and let’s bring some homemade warmth into your home!
What is Zucchini Marble Cake?
Think of zucchini marble cake as a cozy, slightly indulgent spin on your regular loaf, but with a gorgeous swirl of chocolate or cinnamon running through it. It’s essentially a moist, tender cake made with grated zucchini mixed into a fluffy batter. The name says it all—marble cake because of the beautiful swirl pattern you create by blending two different flavors or colors. It’s one of those recipes that’s both comforting and a little bit fancy, perfect when you want something different but still want to keep it simple. The zucchini doesn’t overpower the cake at all; instead, it makes each bite tender, moist, and just a touch healthier. My grandma used to make similar cakes, and over the years, I’ve adapted it into my own little secret weapon. Whether you’re baking for family, friends, or just yourself, this cake feels like a warm hug, and I guarantee you’ll keep coming back for more.
Why you’ll love this recipe?
What I love most about this zucchini marble cake is how it strikes that perfect balance between comfort and elegance. The first thing that hits you is the smell—the rich, sweet aroma of vanilla and chocolate swirling together, instantly warming your heart and making your kitchen feel like a sanctuary. It’s deceptively easy to make, too; I’ve tested this countless times with busy schedules in mind. No fancy gadgets are needed—just a whisk, a bowl, and a handful of ingredients. And get this: it’s budget-friendly. I almost always have all the ingredients hanging around, including that lonely zucchini that’s past its prime but still perfect for baking. Plus, it’s super versatile—switch out the flavors or add nuts or berries if you want to shake things up. This cake also works beautifully as a breakfast treat, afternoon snack, or after-dinner dessert. Honestly, it’s become my go-to when I need a little bit of homemade magic—what I love most about this is how everyone in my house pauses their busy day just to savor a slice. It’s wholesome, indulgent, and just plain good.
How do you make Zucchini Marble Cake?
Quick Overview
This cake comes together in a flash—the batter is simple and forgiving, which is a relief for anyone who’s ever been nervous about baking. You start by mixing grated zucchini into a basic vanilla batter, then swirl in a cocoa or cinnamon mixture for the marbled effect. You pour everything into a loaf or bundt pan, bake until golden and a toothpick comes out clean, then glaze it lightly or just dust with powdered sugar. The best part? It’s totally customizable—change up the swirl flavor or add extras like chocolate chips or nuts. I always do this when I want something sweet but don’t want to spend hours in the kitchen. It’s perfect whether you’re baking for family on a Sunday or craving a cozy treat for yourself with a cup of coffee.
Ingredients
For the Main Batter:
– 2 cups grated zucchini (about 2 small zucchinis)
– 2 ½ cups all-purpose flour
– 1 ½ teaspoons baking powder
– ½ teaspoon baking soda
– ½ teaspoon salt
– 1 teaspoon vanilla extract
– 1 cup granulated sugar
– ½ cup vegetable or canola oil
– 3 large eggs
– ½ cup milk (I tested with almond milk, and it made it even creamier!)
For the Filling:
– ½ cup unsweetened cocoa powder + 2 tablespoons sugar for the swirl
– Or 2 teaspoons cinnamon + 2 tablespoons sugar for a warmer twist
– Optional: chocolate chips or chopped walnuts for added texture
For the Glaze:
– 1 cup powdered sugar
– 2-3 teaspoons milk or lemon juice
– A splash of vanilla if you like
Step-by-Step Instructions
Step 1: Preheat & Prep Pan
Preheat your oven to 350°F (175°C). Grease your loaf or bundt pan well—trust me, this saves you from a sticky situation later—and lightly dust with flour if needed. Set aside, and get ready for some mixing fun!
Step 2: Mix Dry Ingredients
In a large bowl, whisk together the flour, baking powder, baking soda, salt, and cocoa powder if you’re doing the chocolate swirl. This step helps distribute everything evenly—no lumps, no worries. Set the dry mix aside for now.
Step 3: Mix Wet Ingredients
In another bowl, combine sugar, eggs, oil, vanilla, and milk. Whisk until everything looks smooth, slightly frothy, and fragrant. I always do this for about 2 minutes—it’s kind of soothing, honestly. I’ve learned that room-temperature eggs and milk help everything blend better, so I usually take them out earlier.
Step 4: Combine
Pour the wet mixture into the dry ingredients. Gently fold together using a spatula—don’t overmix, or your cake might turn dense. Mix until just combined, and the batter is smooth but still a little lumpy—perfect texture!
Step 5: Prepare Filling
Mix the cocoa powder and sugar for the swirl in a small bowl—same for cinnamon if you prefer a warm twist. This creates the beautiful marbling, so don’t skip it! Some folks add mini chocolate chips here; I love it because it adds little pockets of melt-in-your-mouth goodness.
Step 6: Layer & Swirl
Pour half the batter into the pan, then sprinkle half the cocoa mixture or cinnamon on top. Pour the remaining batter and then sprinkle the rest of the filling. Use a skewer or butter knife to swirl gently—don’t overdo it! You’re aiming for that beautiful marbled look, not a muddy mess.
Step 7: Bake
Pop it in the oven and bake for 50-60 minutes. The house will smell incredible—that’s *my* cue that it’s almost ready. Use a toothpick inserted into the center; if it comes out clean, you’re golden. Ovens vary, so it’s good to check around that 50-minute mark.
Step 8: Cool & Glaze
Allow the cake to cool in the pan for about 10 minutes, then transfer to a wire rack. Mix your glaze ingredients (powdered sugar with a splash of milk or lemon), drizzle over the cooled cake, and let it set for about 15 minutes. This step keeps it looking beautiful and adds just a touch of extra sweetness.
Step 9: Slice & Serve
Use a sharp serrated knife to get clean slices—this cake’s crumb is tender, so take your time. Serve with a dollop of whipped cream, a drizzle of extra glaze, or just as is with a steaming cup of coffee. Honestly, I love it at room temp or slightly warmed for that cozy, melt-in-your-mouth texture. It’s perfect for sharing, but if it’s just for you, I won’t judge if you hide a slice or two!
What to Serve It With
This cake is such a versatile little number! For breakfast, I love pairing it with a strong cup of coffee or a creamy latte—trust me, it feels like a special treat when you start your day with something homemade. When entertaining friends for brunch, plate slices with fresh berries and a dusting of powdered sugar, or serve alongside yogurt and a caramelized banana. As a dessert, a scoop of vanilla ice cream or a drizzle of caramel elevates it instantly. My family enjoys it as a cozy snack on Sunday afternoons—pair it with a warm mug of tea or hot cider, especially if the weather’s turning chilly. Sometimes, I even slice leftovers and toast them slightly because the crispy edges are addictive. I find it’s just as good warm or at room temp, so you can prep ahead and enjoy at your leisure. Honestly, this cake brings everyone together—a simple, sweet reminder of how comforting homemade food can be.
Top Tips for Perfecting Your Zucchini Marble Cake
From my experience, a few small tweaks make a big difference. Here are some tried-and-true tips:
- Zucchini Prep: Grate your zucchini and then squeeze out excess moisture with a clean kitchen towel. I learned this trick after a few too-moist cakes—moisture is good, but too much can weigh down the crumb.
- Mixing Advice: Gently fold your ingredients—overmixing leads to dense cakes. When the batter just comes together, stop. It’s about that tender, crumbly texture you’re aiming for.
- Swirl Customization: Use a skewer or a butter knife to make zigzags; don’t swirl too much or the pattern gets muddy. Take your time—it’s almost like painting a tiny picture inside your batter.
- Ingredient Swaps: Want a richer flavor? Add a splash of coffee or espresso powder to your batter. No chocolate? Cinnamon or nutmeg works beautifully. I tested it with coconut oil, and it added a lovely tropical note.
- Baking Tips: Keep your oven racks in the center; hot spots can cause uneven baking. Start checking at about 50 minutes—sometimes, it’s done early. I always insert a toothpick into the center; if it doesn’t have wet batter sticking to it, it’s ready.
- Glaze Variations: For a citrusy zing, swap in lemon juice—brightens the flavor. If you prefer less sweetness, dust with powdered sugar instead of glazing. Adding a teaspoon of vanilla or almond extract to the glaze can give it extra depth.
- Room Temperature: Wrap the cake tightly with plastic wrap or store in an airtight container. It’s best eaten within 2 days, lest it starts to lose moisture, but it still tastes good even then.
- Refrigerator Storage: Keep it in an airtight container for up to 4 days. The coolness makes the flavors settle—and if it’s glazed, the glaze stays firm and shiny.
- Freezer Instructions: Wrap slices individually with plastic wrap and then foil. They’ll keep for up to 2 months. To serve, thaw at room temperature for about 30 minutes, then warm slightly in the microwave if you like that freshly baked feel.
- Glaze Timing: If you plan to freeze the cake, hold off on glazing until just before serving. The glaze softens on storage, and fresh-looking glaze always tastes better.
Over the years, I’ve learned that patience, good ingredients, and a gentle touch make all the difference. This cake is forgiving and cooperative—once you get the hang of swirling, it’s smooth sailing. And honestly, each time I make it, I discover new little tricks or flavor tweaks that make it even better. The secret is to enjoy every step—it’s not just baking, it’s these small moments of joy and connection.
Storing and Reheating Tips
This zucchini marble cake keeps surprisingly well. If you’re planning to enjoy it over a couple of days, here’s what I do:
I find that a well-stored cake still tastes delightful, especially when warmed up a tad. A quick zap in the microwave makes the crumb soft and tender again—just like fresh from the oven!
Frequently Asked Questions
Final Thoughts
This zucchini marble cake isn’t just a recipe; it’s a little piece of joy I love to share. It’s simple enough for a beginner, but the swirl of flavor and the moist crumb make it feel special. Every time I bake it, I think about the Sunday mornings of my childhood—family gathered, laughter echoing, and the smell of something sweet and comforting wafting through the house. I hope you give this a try and find it as heartwarming as I do. Whether it’s for a cozy weekend treat, a makes-you-feel-good breakfast, or just because you need a little homemade happiness, this cake never disappoints. Let me know how yours turns out, and don’t forget to add your own twist—maybe some orange zest, chopped nuts, or a splash of liqueur. Happy baking—and remember, the best part is sharing it with someone you love!
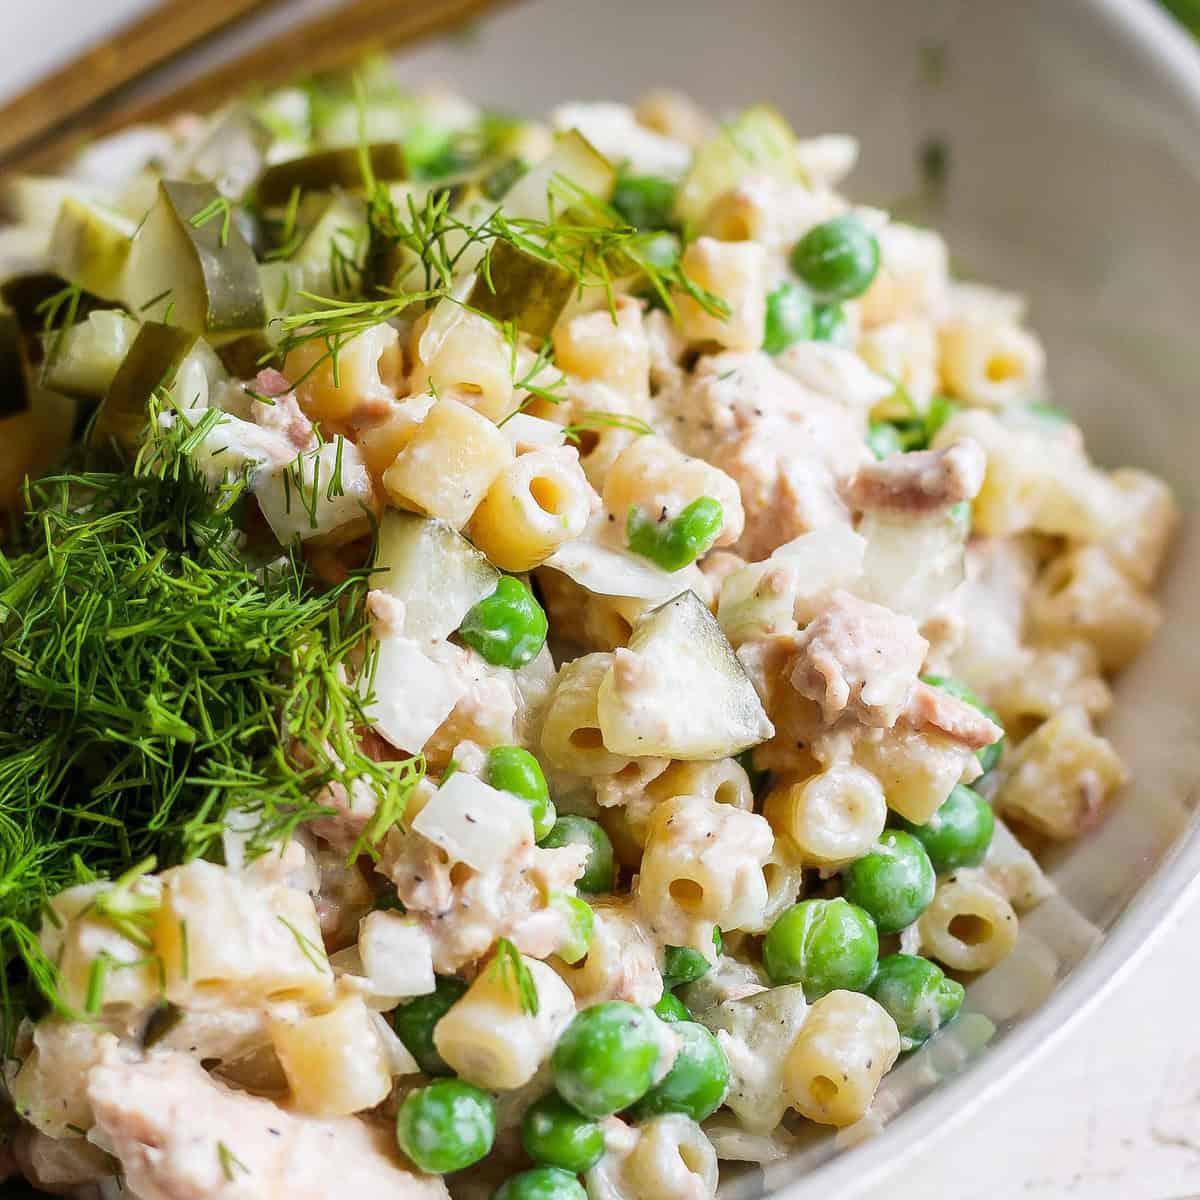
tuna pasta salad
Ingredients
Method
- Bring a large pot of salted water to a boil. Add the pasta and cook until al dente, about 5-7 minutes. Drain and set aside to cool.
- In a bowl, whisk together Greek yogurt, mayonnaise, pickle juice, lemon juice, lemon zest, Dijon mustard, salt, and black pepper to make the dressing.
- In a large bowl, combine cooked pasta, thawed peas, tuna, diced white onion, chopped dill pickles, and chopped dill.
- Pour the dressing over the pasta mixture and toss gently to combine, breaking the tuna into small pieces as needed.
- Garnish with additional dill if desired. Serve immediately or chill in the refrigerator before serving.