Halloween Brownie Magic Easy Swirls
You know, there are some recipes that just feel like a warm hug. They’re the ones that instantly transport you back to your favorite childhood memories, the ones your family begs for, the ones that make your kitchen smell like pure magic. For me, that recipe is my Grandma Elsie’s Zucchini Bread. It’s not just *any* zucchini bread; it’s the kind of zucchini bread that makes you forget all about those bland, dry loaves you might have tried before. This one is impossibly moist, perfectly spiced, and has this incredible, subtle sweetness that’s just divine. Honestly, it’s my go-to when I’m craving something truly special but don’t have hours to spend baking. It’s like the effortless cousin to a fancy layer cake, but with all the cozy charm. I’ve tinkered with it over the years, adding a little of this, a pinch of that, but the heart of Grandma Elsie’s recipe always stays the same. This is the one that makes my kids’ eyes light up, the one that disappears from the counter in mere minutes. It’s more than just a recipe; it’s a little piece of my history, and I’m so excited to share it with you.
What is Grandma Elsie’s secret Zucchini Bread?
So, what exactly makes this zucchini bread so special? Think of it as the ultimate crowd-pleaser, a perfect marriage of humble ingredients coming together to create something truly spectacular. At its core, it’s a quick bread, meaning you don’t need any fancy techniques or yeast involved. It’s essentially a moist, tender cake studded with grated zucchini, infused with warm spices like cinnamon and nutmeg, and usually finished with a simple, sweet glaze that just seals the deal. Grandma Elsie always called it her “secret” because she swore the zucchini was undetectable, and honestly, she was right! It adds an incredible amount of moisture and tenderness without any hint of “vegetable” flavor. It’s that magic trick in baking where you add something unexpected, and it just makes everything better. It’s the kind of treat that feels both comforting and a little bit indulgent, perfect for any time of day.
Why you’ll love this recipe?
I love zucchini bread, and I know you will too. I love it. I love it. I love it. I love it. I love itflavor is just out of this world. It’s not overly sweet, which I really appreciate. The cinnamon and nutmeg create this wonderfully warm aroma as it bakes, and when you take a bite, you get this delightful sweetness with a hint of spice that’s just perfectly balanced. It’s the kind of flavor that just makes you want another slice. Then there’s the simplicity. Seriously, if you can stir ingredients together, you can make this! There’s no creaming butter and sugar for ages, no complicated folding. It comes together so quickly, which is an absolute lifesaver on busy weeknights when I suddenly realize we need a treat for school lunches or a little something for an impromptu coffee date. And let’s talk about Cost-efficiency: What is the best way to measure cost-efficiency?. Zucchini is usually pretty affordable, and the rest of the ingredients are pantry staples. You get a massive amount of deliciousness for a very small price, which is always a win in my book. What I love most, though, is its versatility. While it’s amazing on its own, I’ve found so many ways to enjoy it. I’ll often add a handful of chocolate chips or some chopped walnuts for an extra layer of flavor and texture. It’s fantastic warmed up with a smear of butter, or even toasted and served with a dollop of cream cheese. If you’re looking for something similar but maybe a bit more cake-like, you might also enjoy my recipe for Lemon Blueberry Loaf; it’s equally bright and delicious, but this zucchini bread has that extra layer of cozy comfort. This recipe truly stands out because it delivers on all fronts: incredible taste, ease of preparation, budget-friendliness, and the sheer joy of sharing a homemade treat that feels both familiar and special.
How to Make Grandma Elsie’s Secret Zucchini Bread
Quick Overview
This zucchini bread is all about simple steps and delicious results. You’ll start by whisking your dry ingredients, then mixing your wet ingredients separately before bringing them all together. The star, of course, is the grated zucchini, which gets folded in to add that signature moisture. We’ll then pour this lovely batter into a prepared pan and bake until it’s golden brown and fragrant. A simple glaze drizzled over the top is the perfect finishing touch, though it’s amazing even without it! It really is that straightforward, and you’ll be amazed at how quickly you can have a warm, comforting loaf ready to enjoy.
Ingredients
For the Main Batter:
This is where the magic starts! The key is to use fresh, firm zucchini. I find that medium-sized ones are usually the best – not too watery. You’ll need about 2 cups of grated zucchini. Make sure to grate it on the large holes of your grater; it helps distribute the moisture evenly without making the bread soggy. Oh, and definitely don’t peel it! The skin has nutrients and adds a lovely color. You’ll also need 2 and 1/2 cups of all-purpose flour, 1 teaspoon of baking soda, 1/2 teaspoon of baking powder, 1 teaspoon of ground cinnamon, 1/2 teaspoon of ground nutmeg, and a pinch of ground cloves (Grandma Elsie always added a tiny pinch of cloves, and it makes such a difference!). For sweetness, we’ll use 1 and 1/2 cups of granulated sugar. Some people use brown sugar, but I find the classic granulated sugar gives the best texture here.
For the Filling:
The “filling” in this recipe is really just the zucchini itself, but if you want to add something extra, now’s the time! My favorite additions are about 1 cup of semi-sweet chocolate chips, or for a bit of crunch, about 1/2 cup of chopped walnuts or pecans. You could even do a combination! Just make sure they’re not too big, so they distribute nicely throughout the bread.
For the Glaze:
This is optional but highly recommended! It’s just 1 cup of powdered sugar whisked with about 2-3 tablespoons of milk (or even lemon juice for a tangier flavor). You want it thick enough to drizzle but thin enough to spread easily. Sometimes, I’ll add a tiny splash of vanilla extract to the glaze for an extra hint of flavor.
Step-by-Step Instructions
Step 1: Preheat & Prep Pan
First things first, get your oven preheating to 350 degrees Fahrenheit (175 degrees Celsius). While that’s happening, grab a standard 9×5 inch loaf pan. Grease it really well with butter or cooking spray, and then give it a light dusting of flour. This ensures your beautiful loaf doesn’t stick. You can also line it with parchment paper, leaving some overhang on the sides – that makes lifting it out a breeze!
Step 2: Mix Dry Ingredients
In a large mixing bowl, whisk together your flour, baking soda, baking powder, cinnamon, nutmeg, and the optional pinch of cloves. Give it a good whisk until everything is well combined. This step is important because it helps distribute the leavening agents evenly, ensuring your bread rises beautifully. If you’re adding nuts or chocolate chips, you can toss them in with the dry ingredients at this stage; it helps prevent them from sinking to the bottom.
Step 3: Mix Wet Ingredients
In a separate medium bowl, crack in 2 large eggs. Add your granulated sugar, 1/2 cup of vegetable oil (or melted, unsalted butter for a richer flavor), and 1 teaspoon of vanilla extract. Whisk these together until they’re well combined and look smooth and slightly lighter in color. Don’t over-whisk; just get them nicely incorporated.
Step 4: Combine
Now, it’s time to bring it all together! Pour the wet ingredients into the bowl with the dry ingredients. Gently fold them together using a spatula or wooden spoon. You don’t want to overmix here! Mix *just* until you no longer see streaks of dry flour. A few lumps are totally okay. Overmixing can lead to a tough loaf, and nobody wants that. Finally, gently fold in your grated zucchini (and any chocolate chips or nuts if you’re using them).
Step 5: Prepare Filling
As mentioned before, the zucchini is the “filling” here! If you’re adding chocolate chips or nuts, ensure they are roughly chopped and ready to be mixed into the batter in the previous step. If you’re feeling adventurous, you could even swirl in some thick caramel sauce or a layer of cream cheese mixed with a little sugar before baking, but honestly, the classic version is perfection on its own.
Step 6: Layer & Swirl
Spoon the batter evenly into your prepared loaf pan. It will be quite thick, that’s normal! Smooth the top a little with your spatula. If you are doing a swirl, like caramel or cream cheese, dollop spoonfuls on top of the batter and then gently swirl them through with a knife or skewer. Don’t overdo the swirling, or the layers will just blend together too much. A few nice ribbons of contrast are what you’re aiming for.
Step 7: Bake
Pop that pan into your preheated oven. Bake for about 50-65 minutes. The exact time can vary depending on your oven, so keep an eye on it. You’ll know it’s done when a wooden skewer or toothpick inserted into the center comes out clean, or with just a few moist crumbs attached (no wet batter!). If the top starts to brown too quickly, you can loosely tent it with aluminum foil for the last 10-15 minutes of baking.
Step 8: Cool & Glaze
Once it’s baked, carefully remove the loaf pan from the oven. Let it cool in the pan for about 10-15 minutes. This allows it to set up properly. Then, carefully invert the pan onto a wire rack to release the loaf. Let it cool completely on the wire rack before you even think about glazing it. If you try to glaze a warm loaf, the glaze will just melt right off! Once it’s completely cool, whisk together your powdered sugar and milk (or lemon juice) for the glaze. Drizzle it over the top, letting it drip down the sides. It’s so pretty!
Step 9: Slice & Serve
Once the glaze has set a bit, it’s time to slice and enjoy! I like to use a serrated knife for the cleanest cuts. Serve it at room temperature, or if you’re feeling extra decadent, a little warm. It’s perfect on its own, but a smear of butter or even some cream cheese is divine. Enjoy that incredible aroma and flavor!
What to Serve It With
This zucchini bread is so versatile, it can be enjoyed practically anytime! For breakfast, it’s fantastic alongside a steaming mug of coffee or a glass of cold milk. I like to slice it fairly thin in the morning, and it’s just the perfect light start to the day. It’s not too heavy, but it’s incredibly satisfying. For brunch, it feels a little more elegant. I’ll often serve it on a pretty platter, perhaps with some fresh berries on the side. If you’re feeling fancy, a dollop of Greek yogurt or crème fraîche on top is wonderful. It pairs beautifully with a mimosa or a sparkling rosé. As dessert, it’s a dream. Imagine serving a warm slice after dinner, maybe with a scoop of vanilla bean ice cream or a drizzle of warm chocolate sauce. The spices in the bread really complement richer dessert flavors. And for those cozy snacks, this is where it truly shines. I love having a slice with a cup of tea on a chilly afternoon, or even late at night when I’m craving something sweet but don’t want anything too heavy or complicated. It’s my ultimate comfort food companion.
Top Tips for Perfecting Your Grandma Elsie’s Zucchini Bread
Over the years, I’ve learned a few tricks that really help make this zucchini bread absolutely perfect every single time. When it comes to zucchini prep, the most crucial step is grating it. Use the large holes of your box grater. And whatever you do, don’t wring out all the liquid! A little bit of moisture is good; it’s what makes the bread so tender. Just give it a gentle squeeze if it seems excessively wet. For mixing advice, remember that less is more. Seriously, avoid overmixing the batter once the wet and dry ingredients are combined. A few lumps are perfectly fine; they’ll bake out. Overmixing develops the gluten too much, leading to a tough texture. Just mix until *barely* combined. When it comes to swirl customization, if you decide to add things like chocolate chips or nuts, tossing them with a tablespoon of the flour mixture before adding them to the batter helps them stay suspended and prevents them from sinking to the bottom. For ingredient swaps, I’ve experimented a lot! If you don’t have vegetable oil, melted butter works beautifully for a richer flavor. You can also try different spices – a little cardamom or ginger can be lovely. For baking tips, ovens can be tricky! If your oven tends to run hot, you might need to reduce the temperature slightly or shorten the baking time. Always do the toothpick test in the center. If the top is browning too fast but the inside isn’t done, loosely tent the loaf pan with foil. For glaze variations, I often play with this! A lemon juice base gives a lovely tang that cuts through the sweetness. You can also add a teaspoon of almond extract to the glaze for a different nutty flavor, or even a tiny bit of orange zest. Just adjust the liquid to get the right consistency – you want it thick enough to cling but thin enough to drizzle.
Storing and Reheating Tips
One of the best things about this zucchini bread is how well it keeps! For room temperature storage, once it’s completely cooled (and that glaze is set!), you can wrap it tightly in plastic wrap or store it in an airtight container. It will stay wonderfully fresh and moist for about 3-4 days. I’ve found it often tastes even better on the second day! If you need to store it for longer, refrigerator storage is your best bet. Wrap it well in plastic wrap, then place it in an airtight container. It should keep well in the fridge for up to a week. When you want to enjoy a slice, you can eat it cold, or for that just-baked warmth, pop it in the microwave for about 10-15 seconds. For freezer instructions, this bread freezes like a dream. Let it cool completely, then wrap it very tightly in plastic wrap, followed by a layer of aluminum foil or a freezer bag. It can be stored in the freezer for up to 3 months. To thaw, unwrap it and let it come to room temperature on the counter for a few hours. For that fresh-baked feel, you can warm it gently in a low oven (around 300°F or 150°C) for about 10-15 minutes. Regarding glaze timing, it’s best to glaze the bread *after* it has cooled completely and *before* storing it, especially if you plan to eat it within a few days. If you’re freezing it, I often recommend glazing it *after* thawing and reheating, as the glaze can sometimes get a little sticky in the freezer. But honestly, it’s delicious glazed or unglazed!
Frequently Asked Questions
Final Thoughts
There you have it – my Grandma Elsie’s Secret Zucchini Bread! It’s more than just a recipe; it’s a testament to how simple, wholesome ingredients can create something truly magical. The moisture, the tender crumb, the warm spice notes… it all just comes together so perfectly. This is the kind of bake that makes you feel like a baking wizard, even if you’re a total beginner. It’s perfect for busy mornings, afternoon pick-me-ups, or a comforting dessert. If you love this recipe, you might also want to check out my Apple Cinnamon Muffins for another cozy, spiced delight, or my Simple Lemon Olive Oil Cake for a brighter, more citrusy treat. I really hope you give this zucchini bread a try. It’s a recipe that’s brought so much joy to my family, and I can’t wait for it to bring joy to yours too. I’d absolutely love to hear how yours turns out in the comments below, and if you add any special twists of your own, do tell! Happy baking!
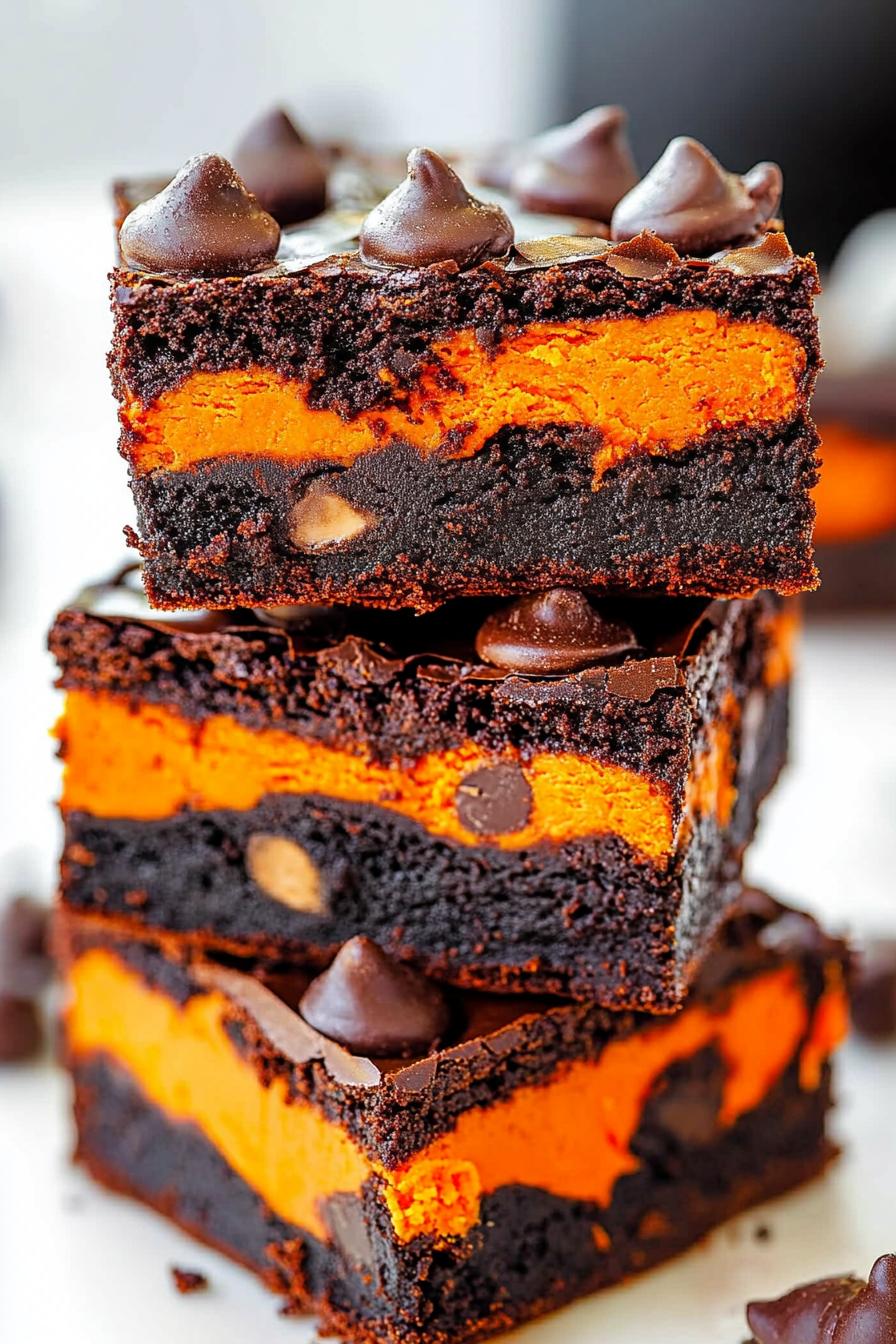
halloween cream cheese brownies
Ingredients
Method
- Preheat oven to 350°F (175°C). Line an 8-inch square pan with aluminum foil, leaving an overhang, and spray with cooking spray, or grease and flour the pan; set aside.
- To a large microwave-safe bowl, add the butter and chocolate. Heat on high power to melt, about 2 minutes, stopping to check and stir after 1 minute. Continue heating in 15-second increments until chocolate has melted and mixture can be stirred smooth. Allow mixture to cool momentarily before adding the eggs so they don’t scramble.
- Add the eggs, sugar, vanilla, optional coffee, and optional espresso granules (neither make brownies taste like coffee and both enhance and round out the chocolate flavor). Whisk vigorously to combine.
- Add the flour and salt, and stir until smooth and combined without overmixing.
- Turn batter out into the prepared pan, smoothing the top lightly with a spatula as necessary; set aside.
- To a medium bowl, add the softened cream cheese, egg, and sugar. Beat with a handheld electric mixer on high speed for about 2 minutes, or until the mixture is smooth. Stop to scrape down the sides of the bowl as necessary.
- Add the Yellow Food Color and Red Food Color, and mix to incorporate. As needed, add additional drops of food color to achieve the desired shade of orange. Remember to add slowly, as you cannot undo it once added.
- Turn the cream cheese mixture out over the brownie layer in heaping tablespoon-sized dollops, leaving a bare 0.5-inch perimeter around the edges (the cream cheese is prone to burning if added too close to the edge). Take your time and evenly smooth the dollops together to form a solid layer.
- Evenly sprinkle the chopped sandwich cookies and chocolate chips over the cream cheese layer. Bake for about 43 to 45 minutes, or until brownies are done. The toothpick test can be tricky due to melted chocolate chips and soft cream cheese, but when inserting the toothpick into the deepest brownie layer, it should feel ‘thick’ and set, not runny.
- Allow brownies to cool uncovered on a wire rack for about 2 hours.
- Cover with foil and refrigerate for at least 3 to 4 hours (overnight is preferred) before slicing and serving. The cream cheese needs to be chilled and set before slicing.