How to Bake Delicious Apple Pie Bars
Okay, so you know how some recipes just *feel* like home? Like the kind that waft through the house, making everyone gather in the kitchen with hopeful eyes? This zucchini bread is *that* recipe for me. It’s not just a quick bake; it’s a hug in loaf form. I’ve made countless versions of zucchini bread over the years, searching for that perfect balance of moistness, sweetness, and just a hint of spice. Some turn out dry, some are too dense, and some are just… meh. But this one? This one’s a game-changer. It’s the kind of treat that disappears in minutes at my house, and my kids actually ask for seconds (and thirds!). If you’re anything like me, you’re probably looking for a reliable, incredibly delicious zucchini bread that’s also surprisingly simple. Well, my friend, you’ve found it. It’s honestly my go-to when I have a couple of zucchinis staring at me from the fridge and a craving for something comforting.
What is Zucchini bread?
So, what exactly *is* this magical zucchini bread we’re talking about? At its heart, it’s a sweet quick bread, meaning it uses baking soda or powder as a leavening agent instead of yeast, so you don’t have to wait around for dough to rise. The “zucchini” part might sound a little strange, right? I mean, it’s a vegetable! But trust me, it’s the secret weapon. When grated, zucchini adds an incredible amount of moisture to the batter without imparting any strong veggie flavor. It’s essentially a delicious, subtly spiced cake studded with something that makes it extra tender and good for you (or so I tell myself!). Think of it as a delicious way to sneak in a vegetable, all disguised as a decadent treat. It’s not a cake, and it’s not quite a muffin, but it hits that sweet spot perfectly. It’s one of those recipes that feels a bit old-fashioned, a nod to simpler times, but it’s timelessly delicious.
Why you’ll love this recipe?
Honestly, there are so many reasons why this zucchini bread has earned a permanent spot in my recipe binder. First off, the FLAVOR. It’s got this warm, comforting spice blend that just sings – think cinnamon, nutmeg, maybe a pinch of cloves if you’re feeling adventurous. It’s sweet enough to satisfy that dessert craving, but not so sweet that it feels cloying. And the TEXTURE! This is where the zucchini really shines. It’s unbelievably moist and tender, almost melt-in-your-mouth. I’ve tested this with different types of flour, and while they all work, using a good quality all-purpose flour really brings out that perfect crumb. What I love most about this recipe, though, is its SIMPLICITY. Seriously, you can whip up the batter in about 15 minutes. It’s a lifesaver on busy weeknights when you need a quick dessert or a delightful snack. Plus, it’s incredibly COST-EFFECTIVE. Zucchinis are usually pretty affordable, and the other ingredients are pantry staples. It’s a way to bake something truly special without breaking the bank. And the VERSATILITY! You can add nuts, chocolate chips, or even a swirl of cream cheese if you’re feeling fancy. This recipe is also incredibly forgiving. If you slightly overmix, it’s usually still fine, which is a relief when you’re juggling a million things in the kitchen. Compared to other baked goods, like a complex cake or fussy cookies, this zucchini bread is a breath of fresh air. It’s the kind of recipe you can whip up on a whim and be guaranteed delicious results every single time.
How do you make Zucchini bread?
Quick Overview
The process is wonderfully straightforward. You’ll essentially whisk together your dry ingredients, then combine your wet ingredients, and finally, bring them all together before folding in the star of the show – grated zucchini! It’s a no-fuss method that delivers maximum flavor and that coveted moist texture. I’ve streamlined it over the years to make it as easy as humanly possible. You don’t need any fancy equipment, just a couple of bowls, a whisk, and a spatula. This recipe is designed to get you from start to finish with minimal stress and maximum deliciousness. It’s the kind of thing you can make while your kids are doing homework or while you’re catching up on your favorite podcast.
Ingredients
For the Main Batter:
This is where we build the base of our delicious bread. I always use unpeeled zucchini because the skin has nutrients and doesn’t affect the texture at all, plus it saves you a step! Make sure your eggs are at room temperature; it helps them emulsify better. For the flour, a good quality all-purpose flour works wonders. If you’re feeling a bit more health-conscious, I’ve had success using a 1:1 gluten-free blend, though the texture might be slightly different. The sugar here provides sweetness, but also contributes to the moistness and tender crumb. Don’t skimp on the spices; they truly make this bread sing. I usually buy whole cinnamon and nutmeg and grind them myself for the freshest flavor, but pre-ground works perfectly fine too! Make sure your baking soda is fresh – it’s key for that perfect rise.
- 2 cups grated zucchini (about 2 medium zucchinis, loosely packed)
- 3 large eggs, at room temperature
- 1 cup granulated sugar
- 1/2 cup vegetable oil (or melted unsalted butter for extra richness)
- 1/4 cup milk (any kind works, dairy or non-dairy)
- 1 teaspoon vanilla extract
For the Filling:
This is optional but highly recommended for that extra layer of flavor and texture. It’s what takes this from good to *wow*. I love adding chopped walnuts or pecans for a nutty crunch, but chocolate chips are always a crowd-pleaser, especially with the kids. You can even do a combination! If you’re using nuts, toasting them lightly beforehand really amplifies their flavor, though it’s not strictly necessary if you’re short on time. When I’m feeling decadent, I’ll even toss in some dried cranberries for a little tartness. The cinnamon here complements the spices in the batter beautifully.
- 1/2 cup chopped walnuts or pecans (optional)
- 1/2 cup chocolate chips (optional)
- 1 teaspoon ground cinnamon
For the Glaze:
This glaze is super simple and adds a lovely sweet finish. It’s not overly sweet, just enough to complement the bread. I often adjust the amount of powdered sugar to get the perfect drizzling consistency – you want it pourable but not too thin. A tiny splash of milk or lemon juice can brighten the flavor if you like. I’ve even used a little orange juice for a citrusy twist! The key is to let the bread cool down a bit before glazing, otherwise, it’ll just soak in too much and become messy.
- 1 cup powdered sugar
- 2-3 tablespoons milk
- 1/2 teaspoon vanilla extract
Step-by-Step Instructions
Step 1: Preheat & Prep Pan
First things first, get your oven preheating to 350°F (175°C). This is crucial because you want the oven to be at the right temperature the moment your batter is ready. While that’s happening, grab a standard 9×5 inch loaf pan. I like to grease it really well with butter or non-stick spray, and then I dust it with a little flour, tapping out any excess. Some people like to line it with parchment paper, leaving an overhang on the sides – that makes lifting the cooled loaf out a breeze! I’ve found that a well-greased and floured pan prevents sticking better than just parchment alone, but either works.
Step 2: Mix Dry Ingredients
In a large bowl, whisk together 2 cups of all-purpose flour, 1 teaspoon of baking soda, 1/2 teaspoon of ground cinnamon, and 1/4 teaspoon of ground nutmeg. If you’re adding salt, now’s the time to toss in about 1/2 teaspoon. Whisking these dry ingredients together thoroughly ensures that the leavening agents and spices are evenly distributed throughout the batter. This is a small step but it makes a big difference in the final texture and flavor. Nobody wants a bite that’s overwhelmingly cinnamon or a flat, dense spot from unmixed baking soda! I always give it a good swirl for at least 30 seconds.
Step 3: Mix Wet Ingredients
In a separate medium bowl, whisk together your 3 large eggs until they’re nicely blended. Then, stir in 1 cup of granulated sugar, 1/2 cup of vegetable oil (or melted butter), 1/4 cup of milk, and 1 teaspoon of vanilla extract. Whisk until everything is well combined and smooth. The oil keeps the bread incredibly moist, even after a few days, and I’ve found it’s more forgiving than butter if you accidentally overmix. Using room temperature eggs helps them incorporate more easily and creates a smoother, more stable emulsion.
Step 4: Combine
Now, it’s time to bring it all together. Pour the wet ingredients into the bowl with the dry ingredients. Using a spatula, gently fold them together just until *barely* combined. It’s really important not to overmix here! A few streaks of flour are perfectly fine. Overmixing develops the gluten in the flour too much, which can lead to a tough, dense bread. Once the dry and wet ingredients are just about incorporated, gently fold in your grated zucchini. You can use a box grater on the large holes, or a food processor with the grating attachment. I like to give my grated zucchini a gentle squeeze to remove some excess moisture, but not too much, as that moisture is what makes the bread so tender!
Step 5: Prepare Filling
If you’re adding nuts, chocolate chips, or any other mix-ins, gently fold them into the batter now. I like to reserve a little bit of the nuts or chocolate chips to sprinkle on top before baking, for extra visual appeal and crunch. If you’re adding cinnamon to the filling, mix that in with your chosen additions before folding them into the batter. It’s a simple addition but it really enhances the overall warmth of the bread.
Step 6: Layer & Swirl
Spoon the batter into your prepared loaf pan, spreading it evenly. If you’re feeling artsy, you can use a toothpick or the tip of a knife to gently swirl the batter a bit, creating pretty patterns. Some people like to do a full chocolate swirl here, or even a cream cheese swirl if you’re feeling adventurous! I usually just do a few simple swirls with the batter itself. Sprinkle any reserved nuts or chocolate chips over the top. This isn’t strictly necessary, but it makes the loaf look extra inviting.
Step 7: Bake
Place the loaf pan in the center of your preheated oven. Bake for 50-65 minutes. Now, oven temperatures can vary, so this is just a guideline. The best way to tell if it’s done is to insert a toothpick or a thin knife into the center of the loaf. If it comes out clean, or with just a few moist crumbs attached, it’s ready! If it comes out with wet batter, give it another 5-10 minutes and check again. If the top starts browning too quickly, you can loosely tent it with aluminum foil. I’ve learned this trick after burning the tops more times than I care to admit!
Step 8: Cool & Glaze
Once baked, remove the loaf pan from the oven and let it cool in the pan for about 10-15 minutes. This allows the bread to set up properly. Then, carefully invert the pan onto a wire rack to release the loaf. Let it cool completely on the rack before you even think about glazing. If you try to glaze a warm loaf, the glaze will just melt and become a watery mess. While it’s cooling, whisk together the powdered sugar, 2 tablespoons of milk, and the vanilla extract for the glaze. Add more milk, a teaspoon at a time, until you reach your desired drizzling consistency. Once the bread is totally cool, drizzle the glaze over the top, letting it drip down the sides. You can also just spread it on with a spatula. Let the glaze set for a few minutes before slicing.
Step 9: Slice & Serve
Once the glaze has set a bit, it’s time to slice and enjoy! I usually use a serrated knife for a clean cut. This bread is fantastic when it’s still slightly warm from cooling, or at room temperature. It’s perfect with a cup of coffee, tea, or a cold glass of milk. The aroma alone is enough to make your whole house feel cozy!
What to Serve It With
This zucchini bread is pretty darn versatile, which is another reason I love it so much. For a simple BREAKFAST treat, I love a thick slice with a hot cup of coffee. It’s not too sweet for the morning, and it’s surprisingly filling. It makes my weekday mornings feel a little more special. For BRUNCH, it feels a bit more elegant. I’ll serve it alongside fresh fruit salad and maybe some yogurt or cottage cheese. A mimosa or a nice herbal tea pairs perfectly. It’s also a fantastic addition to a larger brunch spread with eggs and bacon. When I’m serving it as DESSERT, it’s usually after a lighter meal. I’ll sometimes add a dollop of whipped cream or even a small scoop of vanilla ice cream on the side, though that’s definitely for when you’re feeling indulgent! It’s also lovely with a drizzle of caramel sauce. And for those COZY SNACKS, it’s simply perfection. Grab a slice (or two!) with a glass of cold milk while curled up with a good book or watching a movie. My personal family tradition is to have a slice after dinner on a cool evening, often with a steaming mug of herbal tea. It’s just so comforting and satisfying, without feeling heavy. I’ve also found it’s great to bring to potlucks because it’s a crowd-pleaser that everyone, from kids to grandparents, seems to enjoy.
Top Tips for Perfecting Your Zucchini Bread
I’ve made this so many times that I’ve picked up a few tricks along the way. These little tips have helped me ensure perfect results every single time.
Zucchini Prep: The most important thing is to get the moisture level right. Grate your zucchini, and then gently squeeze out *some* of the excess liquid. You don’t want it bone dry, but you also don’t want a watery mess. Using the large holes of a box grater usually works best for texture. Fresh zucchini is always best; if yours looks a bit wilted, it might have more water content. I’ve also learned that the size of the zucchini matters a little – younger, smaller ones tend to have less water and fewer seeds, but any zucchini will work in a pinch!
Mixing Advice: I cannot stress this enough: DO NOT OVERMIX. Once the wet and dry ingredients are just combined, stop. Seriously, stop mixing. It’s the golden rule for tender quick breads. If you can still see a few small streaks of flour, that’s okay. It will all come together in the oven. I sometimes even use a fork to do the final fold if I’m worried about overworking the batter. The goal is to develop as little gluten as possible.
Swirl Customization: If you’re adding things like chocolate chips or nuts, fold them in gently right at the end. If you want a marbled effect with chocolate, you can mix some cocoa powder into a portion of the batter separately and then swirl it into the main batter. For a truly professional look, you can dollop dollops of different batters (plain, chocolate, cream cheese) into the pan and then swirl them gently with a knife or skewer. Just be careful not to over-swirl, or you’ll lose the distinct patterns.
Ingredient Swaps: For a richer flavor, I often swap the vegetable oil for melted unsalted butter, though you’ll lose a tiny bit of that super-moist quality that oil provides. If you’re out of milk, a plain yogurt or even sour cream can be used (you might need to adjust the liquid slightly, but they add wonderful richness). For a dairy-free version, almond milk or oat milk works beautifully. I’ve also experimented with using a blend of whole wheat and all-purpose flour, but it can make the bread a bit denser. A 1:1 gluten-free flour blend is usually my go-to for a GF version.
Baking Tips: Always use the middle rack of your oven for even baking. If your oven tends to run hot, you might need to reduce the temperature by about 25°F (10°C) or cover the loaf with foil sooner. The toothpick test is your best friend here; don’t rely solely on the baking time. And remember, every oven is a little different, so get to know yours!
Glaze Variations: If you’re not a fan of the powdered sugar glaze, try a simple dusting of powdered sugar once the bread is cool. A drizzle of honey or maple syrup also works, though it will be stickier. For a tangier glaze, add a splash of lemon juice or even a bit of orange zest to the powdered sugar mix. You can also experiment with different extracts like almond or lemon for a flavor twist.
Storing and Reheating Tips
This zucchini bread is fantastic the day it’s made, but it actually gets even better after a day or two as the flavors meld and the moisture evens out.
Room Temperature: Once completely cooled, you can store the loaf (or slices) in an airtight container at room temperature for about 2-3 days. Make sure it’s fully cooled first, otherwise, condensation can form and make it soggy. If it’s very humid where you are, it might be best to refrigerate it sooner.
Refrigerator Storage: For longer storage, wrap the completely cooled loaf tightly in plastic wrap, then in a layer of aluminum foil, or place it in an airtight container. It will stay good in the refrigerator for up to a week. The texture might firm up a bit, but it’s still delicious.
Freezer Instructions: This bread freezes beautifully! Wrap the cooled loaf tightly in plastic wrap, then in a layer of foil, and finally place it in a freezer-safe bag or container. It can be stored in the freezer for up to 3 months. To thaw, simply remove it from the freezer and let it come to room temperature on the counter, or gently reheat it.
Glaze Timing Advice: If you plan to freeze the bread, I highly recommend glazing it *after* it has thawed. Glazing a frozen loaf can lead to a sticky, uneven mess. If you’re storing it at room temperature or in the fridge, glaze it just before serving or after it’s cooled completely. If you’ve already glazed it and need to freeze, that’s okay too, but be prepared that the glaze might soften slightly upon thawing.
Frequently Asked Questions
Final Thoughts
So there you have it – my absolute favorite zucchini bread recipe! It’s more than just a recipe to me; it’s a cherished memory, a reliable comfort, and a guaranteed hit every single time I bake it. The way it fills the house with that warm, spicy aroma is simply magical. It’s proof that sometimes, the simplest ingredients can create something truly extraordinary. If you’re a fan of moist, flavorful quick breads, or if you’re just looking for a delicious way to use up some extra zucchini, I genuinely hope you’ll give this a try. I think you’ll love how easy it is to make and how incredibly delicious it turns out. It’s the kind of recipe that makes you feel like a baking rockstar without having to be a professional chef. If you end up trying it, please, please let me know how it turns out in the comments below! I’d love to hear about your own variations or any family traditions you have with zucchini bread. Happy baking, my friend!
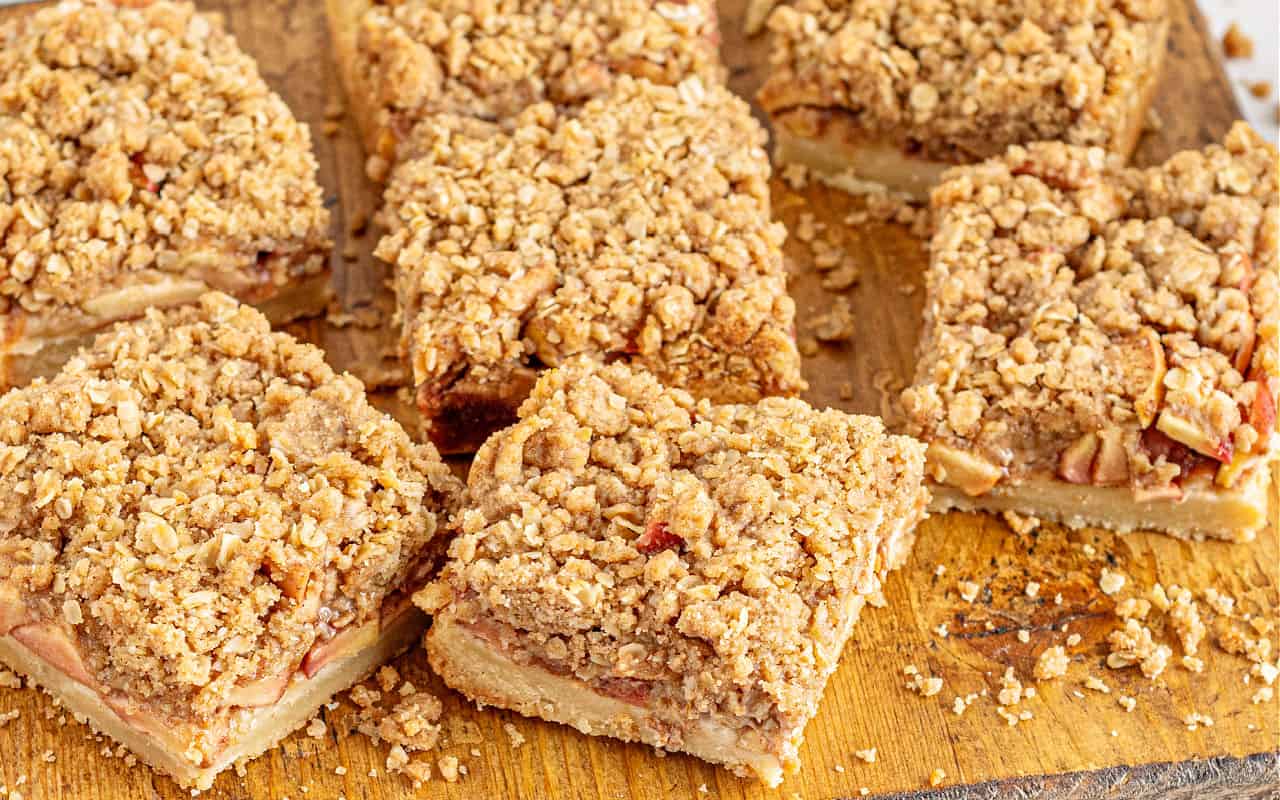
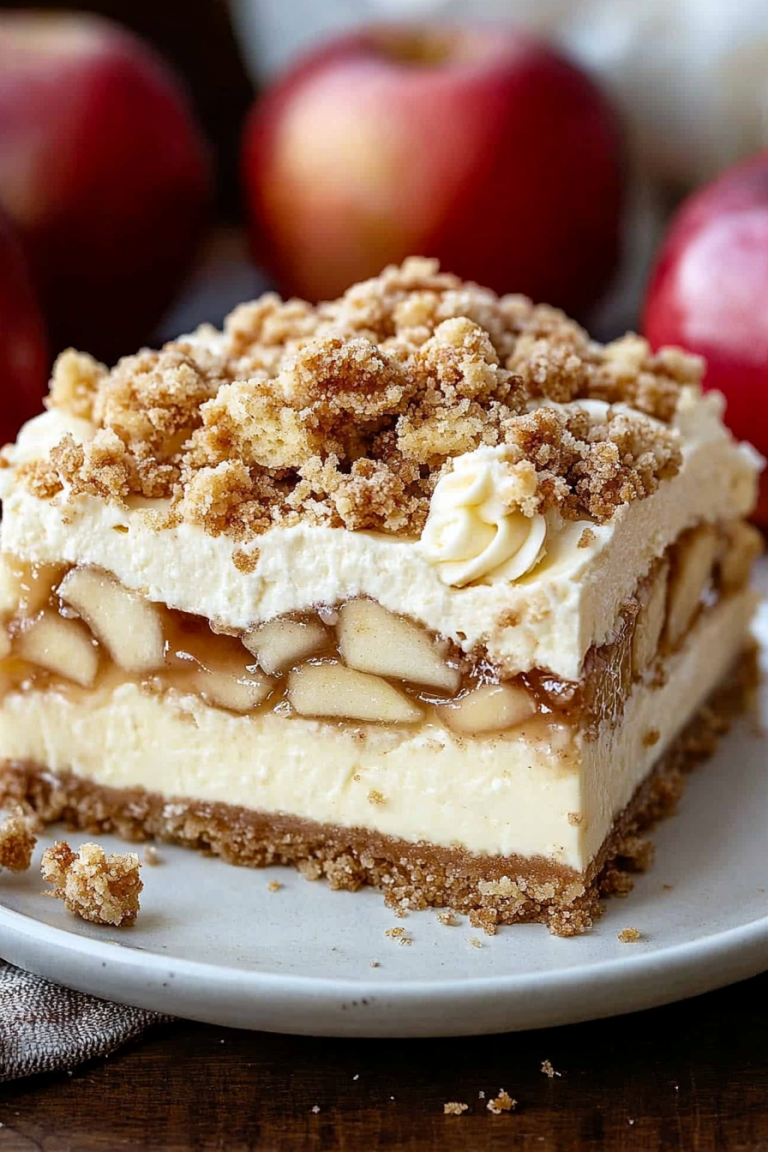
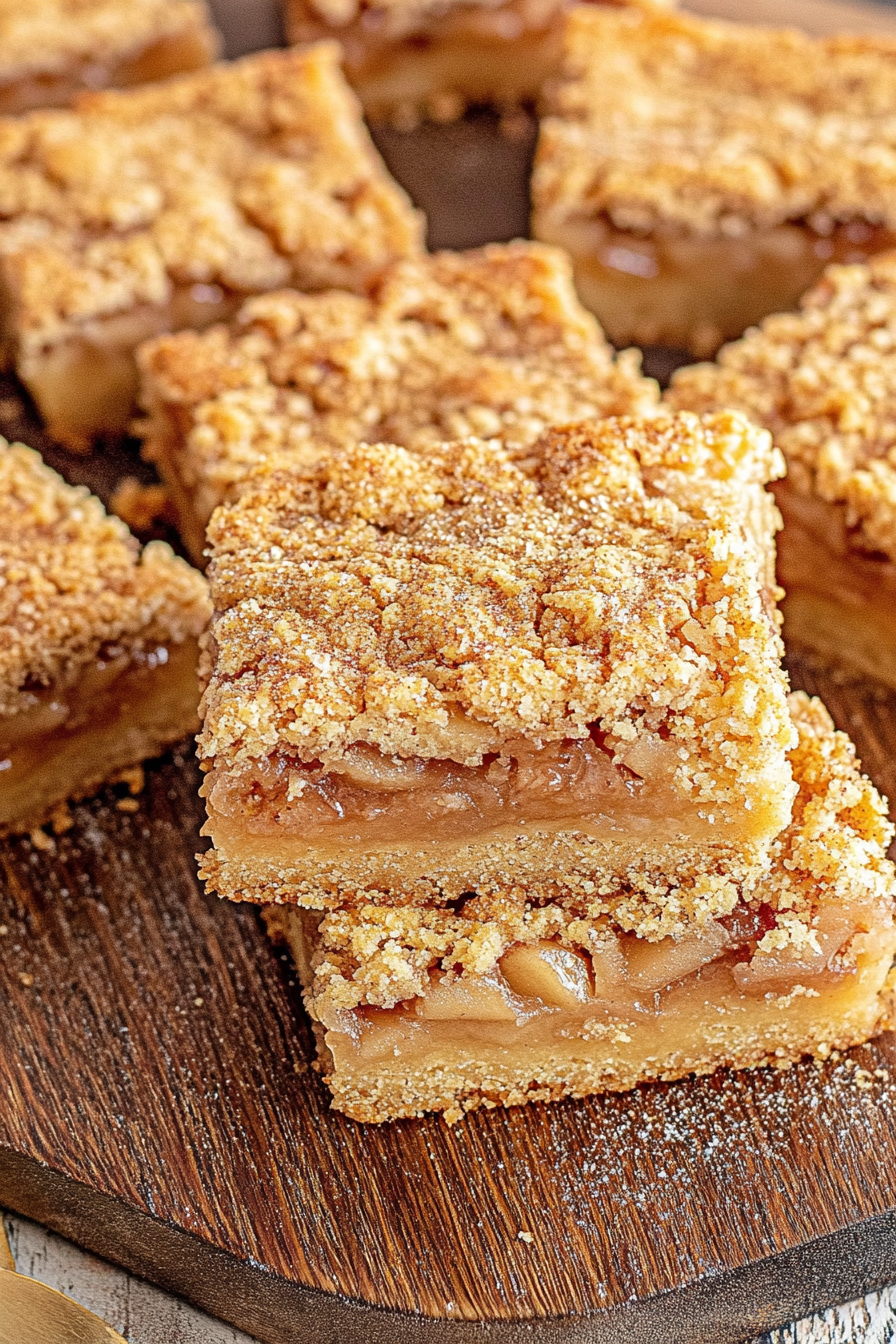
apple pie bars
Ingredients
Method
- Preheat the oven to 350°F. Line a 9x9-inch square baking dish with parchment paper and lightly spray with baking spray. Set aside.
- In the bowl of a stand mixer fitted with a paddle combine butter, sugar and brown sugar. Beat on a medium speed until smooth. Add vanilla and mix to combine. Add flour and salt and mix until incorporated.
- Press the dough evenly into the bottom of the prepared baking dish. Poke holes into the bottom of the crust, then place into the preheated oven on the center rack. Bake for 15 minutes, until lightly golden brown. Once baked, remove from the oven and place onto a wire cooling rack to cool.
- In a large mixing bowl combine sliced apples, sugar, cornstarch, brown sugar, cinnamon, nutmeg, salt and cloves. Mix until the apples are well coated.
- Add in lime juice and mix to combine. Pour the apple mixture onto the pre-baked crust (it can still be warm).
- In a medium sized mixing bowl combine oats, flour, brown sugar, cinnamon and salt. Add butter and mix in using a fork until crumbly in texture. (hands work well too)
- Spoon the topping mixture evenly over the apple filling. Place into the preheated oven on the center rack and bake for 55 minutes. Once baked, remove from the oven and place onto a wire cooling rack.
- Allow to cool about 10-15 minutes before serving. Or serve chilled for a delicious twist.