Savory Garlic Parmesan Cabbage Wedges Recipe
Honestly, there’s something almost magical about baking bread that combines simple ingredients and turns into this warm, irresistible treat. Every time I make this zucchini banana bread, I’m transported back to lazy Sunday mornings at my grandma’s house—her kitchen full of the smell of melting butter and ripe bananas. My kids ask for this all the time, especially when we have extra zucchini from the garden or overripe bananas that are too sweet to ignore. It’s the kind of recipe that’s perfect when you want something comforting but don’t want to spend hours fussing in the kitchen. I always do this when I need to use up a pile of zucchinis—trust me, this one’s a lifesaver on busy nights—and because it’s just so darn good. Plus, the hint of banana keeps it sweet naturally, so I cut back on sugar without sacrificing flavor. Honestly, the smell alone brings everyone to the kitchen. I hope you love this as much as I do—I’ve tested it with almond milk, and it actually made it even creamier! So grab your zucchinis and bananas—let’s make some magic happen.
What is Zucchini Banana Bread?
Think of zucchini banana bread as a cozy, wholesome twist on your regular banana bread—kind of like it’s giving you a little garden hug. It’s essentially a moist, tender loaf made with ripe bananas and grated zucchini, which adds moisture and a sneaky veggie boost. The name might sound a little unusual, but it’s a classic combination that’s been passed down through my family for ages. The idea is to pack a punch of flavor and texture—sweet, fruity, and just the right amount of richness—without any complicated steps. It’s like a nutritious dessert or a hearty breakfast all in one. Think of the zucchini as the secret ingredient that keeps it so moist and tender, while the bananas add that lovely natural sweetness. And the swirl of honey and cinnamon on top? Pure perfection. It’s a recipe that’s perfect for bread lovers, snackers, or really anyone craving something sweet but wholesome.
Why you’ll love this recipe?
Why do I keep coming back to this zucchini banana bread? Well, for starters, the flavor combo of ripe bananas and fresh zucchini is just divine. It’s like comfort food with a little garden freshness thrown in—plus, it’s subtly sweet, so you don’t need tons of sugar. The best part? It’s incredibly simple to make. I’ve made this countless times and it never fails to impress. Whether I’m entertaining friends or just craving a quick snack, this bread is my go-to. It’s also budget-friendly—most staples are stuff I always have in the pantry and fridge, which makes it a real lifesaver on busy mornings. And how versatile is it? You can serve it for breakfast, brunch, or even as a healthy dessert. My kids actually ask for seconds, especially when I drizzle a little honey glaze over the top. What I love most about this is how moist and flavorful it stays even days later—a true testament to its comforting nature. Plus, it’s a great way to sneak in some veggies without anyone noticing.
How do you make Zucchini Banana Bread?
Quick Overview
This zucchini banana bread couldn’t be simpler. You start by preheating your oven, greasing your loaf pan, then mixing together your dry ingredients. Meanwhile, you mash the bananas and grate the zucchini, which I do last to keep everything fresh. You combine the wet ingredients with the dry, fold everything together—careful not to overmix, or it might get dense. Then, you prepare a sweet cinnamon-honey filling to swirl into the batter for that little extra wow factor. Pour half the batter into your pan, spread the filling, then top with the remaining batter. A quick bake, cool, and glaze later, you’re diving into a slice of heaven. It’s honestly so straightforward; I love that I can whip this up in under an hour. The magic happens in the layering and swirling—trust me on this one—it makes the loaf look as pretty as it tastes.
Ingredients
For the Main Batter:
– 2 cups all-purpose flour (or gluten-free blend if needed)
– 1 teaspoon baking soda
– 1 teaspoon baking powder
– 1/2 teaspoon salt
– 1 teaspoon cinnamon
– 1/2 teaspoon nutmeg (optional but adds warmth)
– 1/2 cup brown sugar (feel free to adjust or cut back)
– 1/4 cup honey or maple syrup
– 1/3 cup melted butter or coconut oil
– 2 large eggs
– 3 ripe bananas, mashed
– 1 cup grated zucchini, squeezed dry
For the Filling:
– 3 tablespoons honey
– 1 teaspoon cinnamon
– 1/4 cup chopped walnuts or chocolate chips (optional but delicious)
For the Glaze:
– 1/2 cup powdered sugar
– 1-2 teaspoons milk or lemon juice
– A sprinkle of cinnamon or zest for flavor
Step-by-Step Instructions
Step 1: Preheat & Prep Pan
Set your oven to 350°F (175°C). Grease your loaf pan with butter or line it with parchment paper—I like to do this because it’s easier to lift. If you’re using a glass pan, keep an eye on the baking time; it might need a tiny adjustment. Also, I always do this first so I’m ready to go once the batter is mixed.
Step 2: Mix Dry Ingredients
In a large bowl, whisk together the flour, baking soda, baking powder, salt, cinnamon, and nutmeg. This step is key to ensuring the leavening is evenly distributed, so your bread bakes up fluffy—not heavy or uneven. I like to do this first because it’s quick, and then I don’t have to worry about lumps later.
Step 3: Mix Wet Ingredients
In another bowl, mash your bananas well—this feels so satisfying—and then add in the melted butter, honey, eggs, and vanilla extract if you like. I usually do this with a fork or a whisk. If your eggs are cold, give everything a quick stir to bring it to room temp; it mixes much better this way. The smell alone is heavenly at this stage!
Step 4: Combine
Pour the wet mixture into the dry ingredients and gently fold with a spatula until just combined. Do not overmix—I learned this the hard way after making a dense, rubbery loaf! Look for a batter that’s slightly lumpy but well combined. That’s when you know it’s perfect.
Step 5: Prepare Filling
Mix your honey and cinnamon for the swirl. If you’re adding nuts or chocolate chips, fold them in now. I love using chopped walnuts here for that buttery crunch. Keep the filling slightly runny so it spreads easily—it’s all about those little surprises in every slice.
Step 6: Layer & Swirl
Pour half of the batter into your prepared pan. Then, drizzle some of the honey-cinnamon mixture over it. Add the rest of the batter on top, then use a skewer or butter knife to swirl the filling gently into the batter—creating pretty ribbons. I try to do this in a figure-eight pattern for a nice marbled effect. This step makes it look bakery-worthy.
Step 7: Bake
Bake for about 50–60 minutes. I check for doneness by inserting a toothpick in the center—the bread should come out clean. Ovens vary, so keep an eye on it after 50 minutes. If the top gets too dark, tent it with foil. The smell that fills the house when this is baking? Pure happiness.
Step 8: Cool & Glaze
Take the bread out when a toothpick comes out clean and let it cool in the pan for 15 minutes. Then, transfer it to a wire rack to cool completely. Once cooled, whisk together your glaze ingredients and drizzle over—wait a few minutes so it sets lightly, then slice.
Step 9: Slice & Serve
Use a serrated knife for neat slices—this bread is moist, so a gentle sawing motion works best. Serve it warm or at room temperature. I love it with a cup of coffee in the morning or a glass of milk for the kids. It’s just perfect for sharing, and honestly, it disappears in minutes in my house.
What to Serve It With
This zucchini banana bread is endlessly versatile. For breakfast, try a schmear of almond butter or a dollop of Greek yogurt—I swear it’s like a mini nutritious cake. When I serve it for brunch, I love pairing it with fresh fruit and a side of sparkling water infused with lemon. As a dessert, it’s stunning on a cake stand, sprinkled with powdered sugar, and topped with a few fresh berries or a sprinkle of extra cinnamon. And on cozy nights, I’ll heat a slice slightly and spread it with butter and honey—trust me, it’s comfort food at its finest. My family loves to add a splash of whipped cream on top, making it feel extra special. No matter how you serve it, this bread always feels like a warm hug from the oven.
Top Tips for Perfecting Your Zucchini Banana Bread
My biggest tip? Squeeze out as much moisture from the grated zucchini as possible. I’ve learned that if the zucchini is too watery, the bread can turn out dense or gummy. I always use a clean kitchen towel to press the shredded zucchini and remove excess moisture—that little trick keeps everything light and fluffy. When it comes to mixing dry and wet, I never overdo it. Just fold until barely incorporated—be gentle! Overmixing is the enemy of tender bread. Swirling the filling takes a bit of practice; I like to make a few figure-eight shapes and then gently run my skewer through, creating those beautiful marbled swirls. Also, feel free to experiment with additions like chocolate chips or chopped nuts—they add texture and flavor variations. When baking, if your oven tends to run hot or cold, use a thermometer for the perfect bake timing. And if you want more spice, add a pinch of ginger or cardamom—whatever makes it feel like your own signature.
I’ve tested this recipe with different flours, and a gluten-free blend works beautifully if you keep the batter moist. Just note that baking times might slightly vary. As for the glaze, I love to keep it simple: powdered sugar, a splash of lemon juice—so refreshing—and a sprinkle of cinnamon. For a richer glaze, cream cheese frosting works wonderfully, especially if you want to serve it as a dessert.
One lesson I’ve learned is that patience in cooling is key—cut into it too early, and it might fall apart. But once cooled, it slices like a dream, and the flavor fully develops. Each time I take a bite, I think about how lucky I am to have this recipe as a kitchen favorite. Your house will smell incredible, and I promise, everyone who takes a bite will be delighted. It’s truly one of those recipes that gets better with time, so don’t be shy about making a double batch.
Storing and Reheating Tips
This bread stays so moist, I almost don’t want to cover it up. If you’re not eating it all within a day or two, I recommend storing it properly to keep that fresh-baked goodness. For short-term storage, keep it in an airtight container or wrap it tightly with plastic wrap. It’ll stay fresh on the counter for about 2 days, especially if it’s cool and dry, but I prefer refrigerating it if I want it to last a bit longer—up to 5 days. Just make sure to wrap it well so it doesn’t dry out. When reheating, a quick 10-second zap in the microwave or a gentle warm-up in the oven keeps it tender. If you’re stacking slices, I find placing a damp paper towel over the top helps maintain moisture. For freezing, wrap the loaf tightly in plastic wrap and then foil—this prevents freezer burn. It’s good for up to 3 months. To thaw, leave at room temperature or give it a quick warm-up in the oven for a few minutes. As for the glaze—if you plan to add it later, wait until just before serving to keep it bright and glossy.
Frequently Asked Questions
Final Thoughts
Honestly, this zucchini banana bread has become a staple in my little kitchen. It’s one of those recipes that you can whip up in no time, and it always feels special—whether it’s for a weekend breakfast, a quick snack, or an after-dinner delight. The combination of moist zucchini and sweet bananas makes each bite both comforting and a little sophisticated. Plus, it’s a sneaky way to get kids to enjoy vegetables without a fuss. Over the years, I’ve experimented with different add-ins, toppings, and tweaks, and each time, it turns out just as lovely. It’s a true testament to how simple ingredients can turn into something extraordinary with a little love and patience. I hope you give this recipe a try and make it your own—you’ll find it’s perfect for passing down, sharing with friends, or just treating yourself. Happy baking! And I’d love to hear how yours turns out—leave a comment or share your variations!

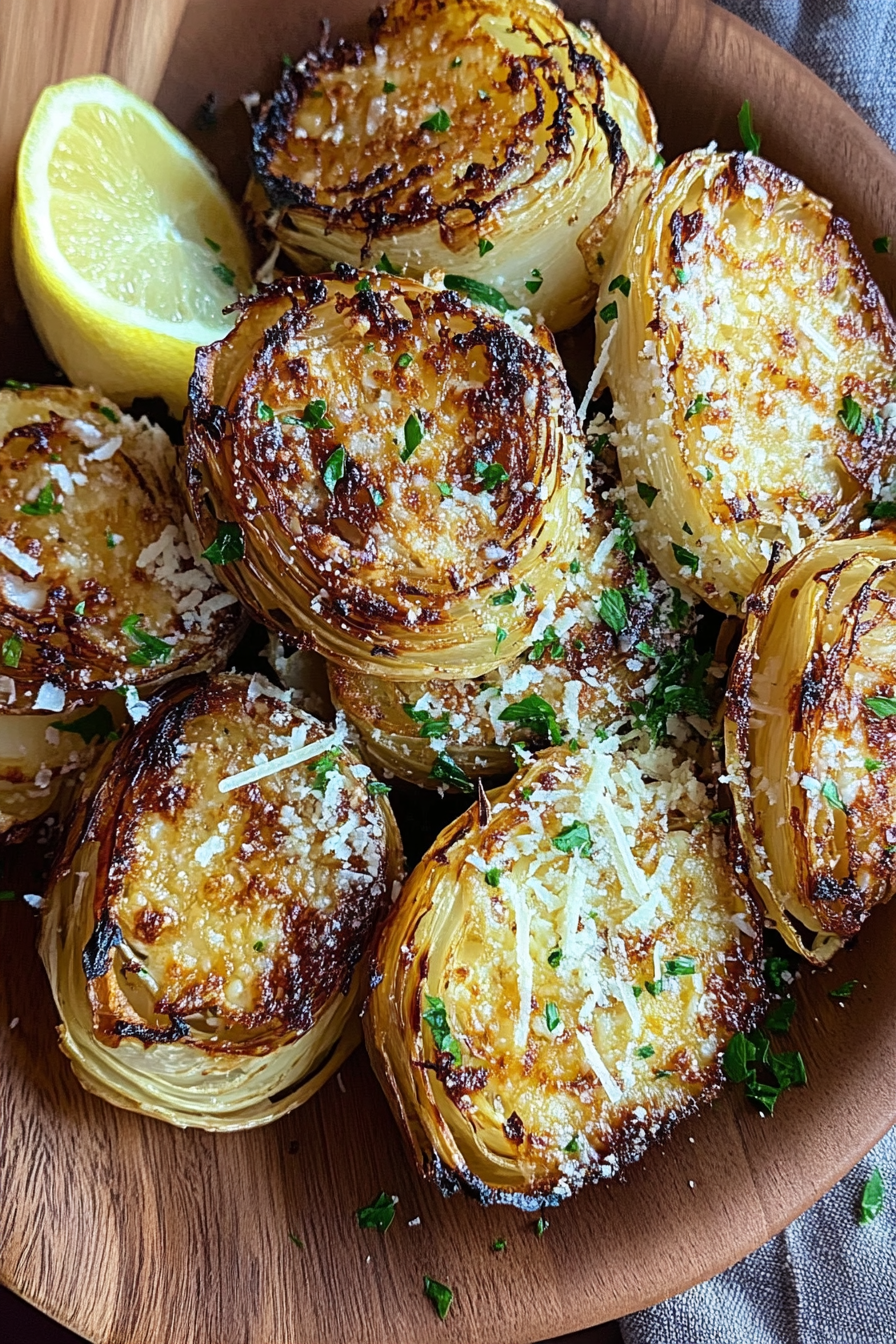
roasted garlic parmesan
Ingredients
Method
- Preheat your oven to 400°F. Line a baking sheet with parchment paper.
- Stem and slice your cabbage head into 8 wedges. Set aside.
- In a small bowl, whisk together the olive oil, minced garlic, paprika, onion powder, chili flakes, and salt. Brush this mixture on all sides of each cabbage wedge.
- Place the coated wedges on the prepared baking sheet. Roast for 20 minutes, then flip and roast for another 5 minutes or until edges are crispy and golden.
- Remove from oven and sprinkle with grated parmesan cheese. Serve immediately.