Savory Pancake with Eggs How to Make It
You know those recipes that just stick with you? The ones you find yourself making again and again, not just because they taste good, but because they bring back a feeling, a memory, or just make a chaotic day a little bit sweeter? This zucchini bread is exactly that for me. I swear, the moment the aroma starts wafting from the oven, my whole house perks up. It’s funny, because when I first started baking, zucchini bread felt a bit… humble. Like something you make because you have too many zucchinis from the garden. But oh, how wrong I was! This isn’t just *any* zucchini bread; it’s the kind that makes people ask for the recipe the moment they take their first bite. It’s incredibly moist, packed with warm spices, and has just the right amount of sweetness. It reminds me so much of my grandma’s baking, that cozy, comforting feeling of home. If you’ve ever tried a dense, dry zucchini bread before, forget it – this one is a game-changer. It’s what I’d call the “gold standard” of zucchini bread, and I’m so excited to share it with you!
What is your favorite Zucchini bread recipe?
So, what exactly makes this zucchini bread so special? Think of it as your ultimate comfort bake, elevated. At its heart, it’s a classic quick bread, meaning it doesn’t need yeast or complicated rising times, which is a lifesaver for busy weekends or even weeknights. The star ingredient, of course, is zucchini! But don’t worry, you won’t taste it directly. What it *does* do is add this incredible moisture and tenderness to the crumb, making it unbelievably soft and keeping it fresh for days. It’s essentially a vehicle for warm, cozy spices like cinnamon and nutmeg, a hint of sweetness, and if you’re like me, a generous handful of walnuts or chocolate chips. The name “favorite zucchini bread” isn’t just a placeholder; it truly is the one I reach for every single time I want something reliably delicious. It’s the perfect balance of healthy-ish (hello, veggies!) and pure indulgence. It’s the kind of treat that makes an ordinary Tuesday feel a little bit like a celebration.
Why you’ll love this recipe?
Honestly, if I had to pick just one recipe to have up my sleeve for any occasion, this would be it. There are so many reasons why this zucchini bread has become a staple in my kitchen, and I have a feeling it’ll become one in yours too. First off, the flavor is just out of this world. It’s perfectly spiced with cinnamon and nutmeg, and the brown sugar gives it this lovely caramel-like depth that’s just heavenly. The texture is where it really shines – it’s unbelievably moist and tender, thanks to the zucchini, of course. You’ll never find a dry, crumbly slice here! Secondly, the simplicity is a huge draw. It comes together so quickly, and most of the ingredients are probably already in your pantry. No fancy equipment needed, just a bowl, a whisk, and a loaf pan. It’s a fantastic recipe for beginner bakers, or for those days when you need a baking fix but don’t have hours to spare. I also find it to be incredibly cost-efficient. Zucchinis are usually pretty affordable, especially when they’re in season, and the other ingredients are standard pantry staples. It’s a budget-friendly way to create something truly special. And let’s talk about versatility! This isn’t just a one-trick pony. It’s fantastic on its own, but you can jazz it up with nuts, chocolate chips, or even a simple cream cheese frosting. It’s also surprisingly good slightly warm or at room temperature. What I love most about this recipe, though, is how forgiving it is. I’ve made it late at night when I’m craving something sweet, and it’s been ready in time for my morning coffee. It’s the kind of bake that feels like a warm hug.
How do I make Zucchini bread?
Quick Overview
This recipe is all about creating maximum flavor and moisture with minimal fuss. You’ll start by quickly grating your zucchini, then whisking together the wet and dry ingredients separately before bringing them together. The magic happens in the oven, where the zucchini transforms the batter into a wonderfully tender loaf. It’s a straightforward process that guarantees a delicious result every single time. The key is not to overmix, and to let that zucchini work its moisture-adding wonders!
Ingredients
For the Main Batter:
2 cups all-purpose flour (spooned and leveled)
1 teaspoon baking soda
1/2 teaspoon salt
1 teaspoon ground cinnamon
1/4 teaspoon ground nutmeg
3 large eggs, at room temperature
1 1/2 cups granulated sugar (or a mix of granulated and light brown sugar for extra depth)
3/4 cup vegetable oil (or melted unsalted butter for a richer flavor)
1 teaspoon vanilla extract
2 cups grated zucchini (about 2 medium zucchinis), moisture squeezed out
For Optional Add-ins (highly recommended!):
1 cup chopped walnuts or pecans
1 cup chocolate chips (semi-sweet or dark work best)
For the Simple Glaze (optional but lovely):
1 cup powdered sugar
2-3 tablespoons milk (or lemon juice for a bit of zing)
1/2 teaspoon vanilla extract
Step-by-Step Instructions
Step 1: Preheat & Prep Pan
First things first, get your oven preheating to 350°F (175°C). While that’s happening, generously grease and flour a 9×5 inch loaf pan. You can also line it with parchment paper, leaving some overhang on the sides. This makes it super easy to lift the cooled bread out. I always like to give the pan a good spray or brush of butter/oil, then a dusting of flour, tapping out any excess. It’s a little step, but it ensures your beautiful loaf doesn’t stick.
Step 2: Mix Dry Ingredients
In a medium bowl, whisk together the flour, baking soda, salt, cinnamon, and nutmeg. Give it a good stir to make sure everything is evenly distributed. This step is important because it ensures your leavening agents and spices are spread throughout the batter, preventing pockets of baking soda or concentrated spice flavor. I usually whisk for about 30 seconds until it all looks like one uniform mixture.
Step 3: Mix Wet Ingredients
In a large bowl, whisk the eggs until they’re well combined. Then, add the sugar (or sugars) and whisk until it’s nice and smooth, almost creamy. Now, drizzle in the oil (or melted butter) and vanilla extract. Whisk everything together until it’s fully incorporated. You want this mixture to look smooth and well-emulsified. If you’re using butter, make sure it’s cooled slightly so it doesn’t cook the eggs.
Step 4: Combine
Now for the exciting part! Add the dry ingredients to the wet ingredients. This is where you need to be gentle. Use a spatula or wooden spoon to mix until *just* combined. Seriously, stop as soon as you don’t see any more dry streaks of flour. A few small lumps are perfectly fine! Overmixing develops the gluten in the flour, which can lead to a tough, dense bread. So, resist the urge to over-stir! This is the stage where I’ll also gently fold in my chopped nuts or chocolate chips if I’m using them.
Step 5: Prepare Filling
Before we get to the batter, let’s talk about the zucchini. You want to grate your zucchini using the large holes of a box grater. Once grated, place the shredded zucchini in a clean kitchen towel or cheesecloth and squeeze out as much liquid as possible. This is a crucial step to avoid a soggy loaf! Trust me, I learned this the hard way. Once squeezed, you’ll have a nice pile of slightly drier zucchini shreds. These will go right into the batter.
Step 6: Layer & Swirl
Gently fold the squeezed, grated zucchini into the batter. Mix until it’s just evenly distributed. Pour about half of the batter into your prepared loaf pan and spread it evenly. If you’re adding chocolate chips or nuts, sprinkle about half of them over this layer. Then, pour the remaining batter on top and spread it out. Sprinkle the rest of your add-ins on top. I like to gently swirl the batter a little with a knife or skewer to create pretty patterns, especially if I’m adding chocolate chips – it distributes them nicely and looks lovely when sliced.
Step 7: Bake
Pop the loaf pan into your preheated oven. Bake for 50-65 minutes. The exact time will depend on your oven, but you’re looking for a few signs of doneness: the top should be golden brown and firm to the touch, and a wooden skewer or toothpick inserted into the center should come out clean or with just a few moist crumbs attached (but no wet batter). If the top is browning too quickly before the center is cooked, you can loosely tent it with aluminum foil for the last 15-20 minutes of baking.
Step 8: Cool & Glaze
Once it’s baked, take the loaf pan out of the oven and let it cool in the pan on a wire rack for about 10-15 minutes. This allows the bread to set up a bit before you try to remove it. Then, carefully invert the pan to release the loaf onto the wire rack to cool completely. This is important because if you try to glaze it while it’s hot, the glaze will just melt off! Once it’s completely cool, you can whip up the simple glaze. Whisk together the powdered sugar, milk (or lemon juice), and vanilla extract until smooth. If it’s too thick, add a tiny bit more liquid; if it’s too thin, add more powdered sugar. Drizzle it over the top of the cooled loaf. You can also skip the glaze and just dust it with a little powdered sugar or enjoy it plain!
Step 9: Slice & Serve
Once the glaze has set (if you used it), it’s time to slice and enjoy! I find a sharp serrated knife works best for a clean cut. Serve it at room temperature for the best flavor and texture. It’s perfect on its own, but a little butter never hurt anyone!
What to Serve It With
This zucchini bread is so versatile, it really fits into any meal or snack time. For breakfast, I love a thick slice with a steaming mug of coffee. It’s just hearty enough to get you going without feeling heavy. If you want to make it a little more special, a thin smear of cream cheese is divine. For brunch, it’s always a welcome addition to a spread of pastries and fruit. I like to slice it a bit thinner and arrange it on a pretty platter. A glass of sparkling cider or a mimosa pairs wonderfully. As dessert, it’s a delightful way to end a meal, especially if you’ve had something savory. It’s not overly sweet, so it satisfies a craving without being too rich. It’s also fantastic for those cozy snacks when you just need a little something comforting. My kids love it after school with a glass of cold milk, and I might sneak a piece with my afternoon tea. It’s just one of those things that makes everyday moments feel a little bit brighter.
Top Tips for Perfecting Your Zucchini Bread
I’ve made this recipe more times than I can count, and over the years, I’ve picked up a few tricks that I think really make a difference. First, when it comes to the zucchini prep, squeezing out the moisture is paramount. If you skip this, you’ll end up with a wet, dense loaf that just doesn’t bake up properly. I’ve found using a clean kitchen towel or cheesecloth works best. Just grab all four corners and twist, twist, twist! For mixing advice, I can’t stress enough the importance of not overmixing. Once the wet and dry ingredients meet, mix only until *just* combined. A few lumps in the batter are actually a good thing! It means you haven’t overdeveloped the gluten, and you’ll end up with a tender crumb. For swirl customization, if you’re adding chocolate chips or nuts, I like to divide them into two portions. Add the first half with about half the batter, then the second half on top before swirling. This ensures a nice distribution throughout the loaf. For ingredient swaps, I’ve tested this with both vegetable oil and melted butter, and while oil makes it incredibly moist, butter adds a richer, more decadent flavor. Feel free to experiment! If you don’t have buttermilk, regular milk with a teaspoon of lemon juice or vinegar left to sit for 5 minutes works just as well in many quick bread recipes, though this one doesn’t strictly require it. For baking tips, always trust the skewer test. Ovens can vary, so the baking time is a guideline. If the top starts browning too quickly, tenting with foil is a lifesaver. And for glaze variations, you can thin it out with a bit more milk or a squeeze of lemon juice for a brighter flavor. Or, skip the glaze entirely and just give it a dusting of powdered sugar or a sprinkle of cinnamon sugar right after it comes out of the oven. These little tweaks really make this recipe foolproof!
Storing and Reheating Tips
One of the best things about this zucchini bread is how well it keeps. If you want to store it at room temperature, just make sure it’s completely cooled first. Wrap it tightly in plastic wrap or place it in an airtight container. It will stay wonderfully moist for about 3-4 days. For refrigerator storage, wrap it even more securely or keep it in an airtight container. It can last up to a week this way, though I find the texture is best within the first 5 days. The coolness can sometimes slightly firm up the crumb, but it’s still delicious. If you want to make a big batch and freeze some, that’s absolutely an option! Let the loaf cool completely, then wrap it tightly in a double layer of plastic wrap, followed by a layer of aluminum foil or a freezer-safe bag. It will keep well in the freezer for up to 3 months. To thaw, simply remove the foil and plastic wrap and let it come to room temperature on the counter. For glaze timing advice, it’s always best to add the glaze *after* the bread has completely cooled and just before you plan to serve it or store it at room temperature. If you refrigerate a glazed loaf, the glaze can become a bit sticky or weep. If freezing, I recommend glazing the loaf *after* it has thawed.
Frequently Asked Questions
Final Thoughts
There you have it – my cherished zucchini bread recipe! It’s more than just a recipe; it’s a little piece of my kitchen heart, shared with you. It’s a reminder that sometimes, the simplest bakes can bring the most joy, and that you can sneak in a vegetable without anyone even noticing! The way it stays moist for days, the comforting aroma, the rave reviews from anyone who tries it… it truly is a winner. If you love this kind of comforting, spiced quick bread, you might also want to check out my Spiced Apple Crumble Bars or my Lemon Blueberry Muffins for more delicious baking inspiration. I truly hope you give this zucchini bread a try. It’s my go-to for a reason, and I have a feeling it might just become yours too. Please let me know in the comments how yours turns out – I can’t wait to hear your thoughts and any wonderful variations you come up with! Happy baking!

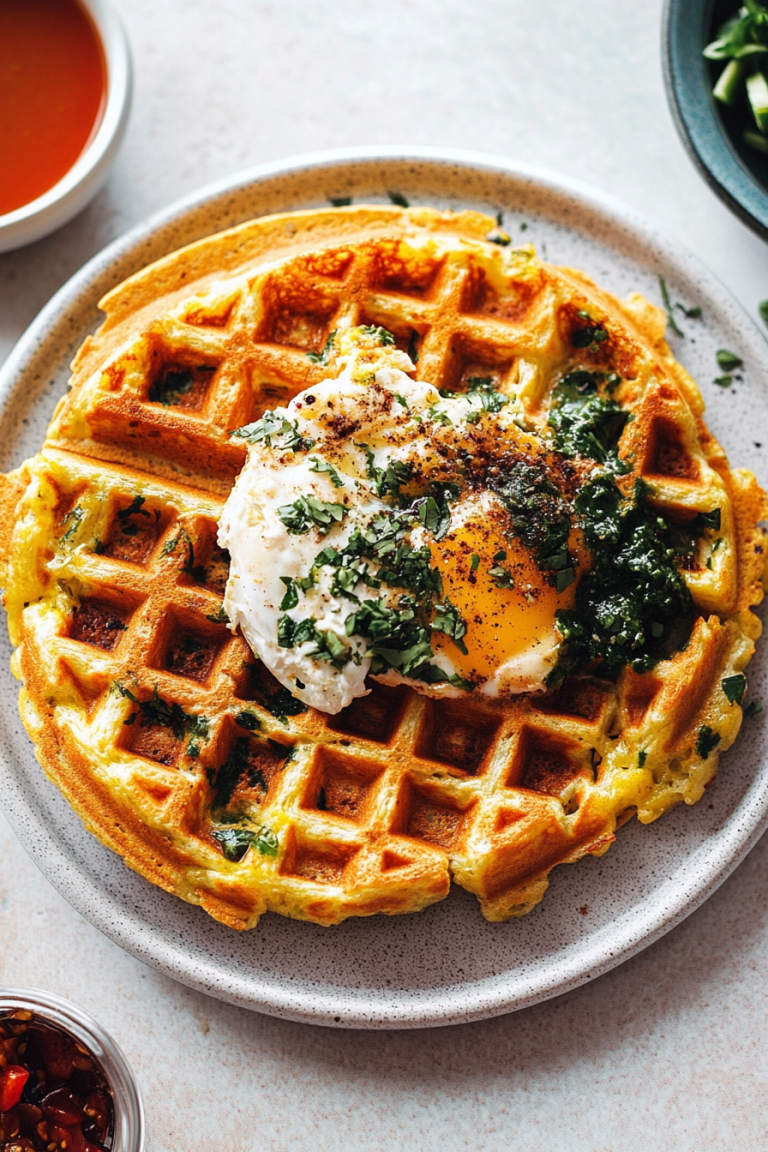
Scallion Pancake with Eggs
Ingredients
Method
- Fry your scallion pancake in the oil until golden on both sides. Remove from the pan and set aside. (I use a nonstick pan for this.)
- In the same pan, add a handful of spinach to wilt it down. When it’s softened, scoot it towards the center of the pan so the scallion pancake will catch all of it when you put it back down.
- Add the eggs; fry until the whites have started to set. Use a spatula to break the yolks and spread gently. Before the eggs are fully cooked, squish the scallion pancake on top of the eggs so it sticks to them as they finish cooking.
- Remove from heat, fill with toppings of choice (cheese, avocado, sauces, chili crisp is a good move). Roll it up and slice it in half and GO TO TOWN! These are amazing.