Simple Spanish Chicken Paella Recipe
I still remember the first time I made these zucchini muffins, how the smell alone brought my family rushing into the kitchen. There’s something about that gentle mix of sweet, spice, and the fresh scent of zucchini—like a comforting hug during those busy mornings. Honestly, these muffins have become a staple in my house; they’re so versatile and surprisingly easy to make. My kids ask for them all the time, especially when I don’t want to fuss over complicated recipes. Plus, they’re perfect for sneaking in a veggie or two without anyone noticing—trust me on this. I’ve tested these with everything from almond milk to coconut sugar, and they turn out just as cozy and flavorful every single time. This one’s a lifesaver on busy nights when everyone’s hangry, and I need something quick, wholesome, and genuinely delicious. Let me walk you through my favorite way to whip up these zucchini muffins—because once you try them, I swear they’ll become part of your family’s regular rotation like they are in mine.
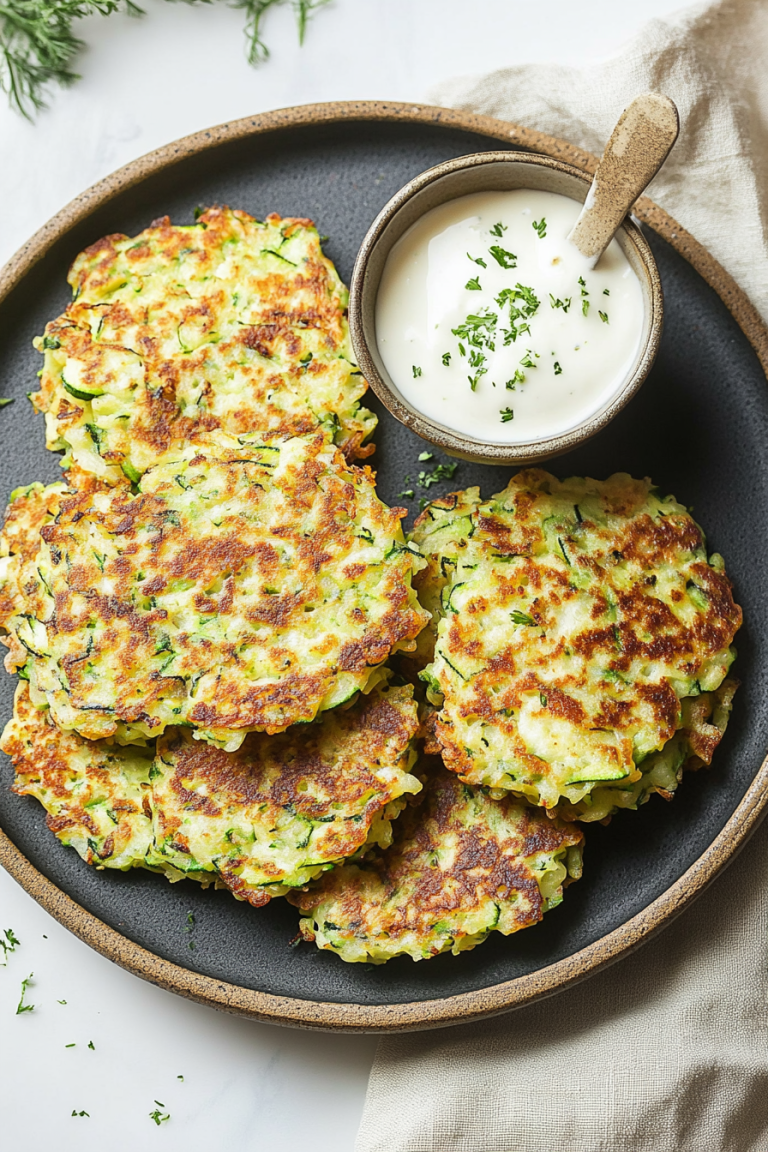
What is Zucchini Muffins?
Think of zucchini muffins as the sweet, slightly spiced cousins of your typical quick bread. It’s essentially a muffin version of that beloved summer vegetable—soft, moist, and packed with flavor. The name might throw you off if you’re imagining a savory side dish, but these muffins are all about that perfect balance of sweetness with just a hint of cinnamony warmth. The zucchini adds moisture and a subtle veggie goodness that keeps the muffins tender and light, without making them dense or heavy. They’re kind of like a muffin version of a breakfast cake—think of those cozy apple cinnamon loaf recipes, but in cute individual muffins you can grab on your way out the door. I love how these can be enjoyed at breakfast, or for a quick snack with coffee, or even slightly warmed with a smear of butter as dessert. They’re also a terrific way to sneak in vegetables, especially if you have picky eaters at home—spoiler: my kids ask for these as a treat!
Why you’ll love this recipe?
What I love most about these zucchini muffins is how they manage to be incredibly delicious while still feeling wholesome. The flavor is a warm, inviting combo of cinnamon, vanilla, and just enough sweetness to satisfy that craving. They’re also super simple—no fancy equipment or long preparation times. Honestly, I’ve made these countless times on busy school mornings, and I’ve never once been let down. Plus, they’re budget-friendly because you probably already have most of the ingredients in your pantry and fridge. I also love how versatile they are; I’ve played around with substituting whole wheat flour, adding a handful of chopped nuts, or even sprinkling a few chocolate chips for a kid-friendly twist. This recipe is perfect for batch-making—you can freeze extras and just thaw when hunger hits. And trust me, once you get the hang of it, it’s a recipe you’ll keep coming back to—my family’s favorite anytime I want a cozy, sweet pick-me-up.
How do you make Zucchini Muffins?
Quick Overview
This recipe comes together in just a few simple steps: grate fresh zucchini, mix dry ingredients, blend wet ingredients, and then combine everything with care. The key is not overmixing to keep the muffins light and fluffy. Once baked, these muffins emerge golden and fragrant—like little bundles of comfort. The best part? They’re totally forgiving; I’ve made them with extra zucchini, swapped sugar for honey, or added some chopped walnuts, and they still turn out amazing. In under an hour, you’ve got a batch of muffins that smell divine and taste even better. I promise, once you master this method, you’ll find yourself making them on repeat!
Ingredients
For the Main Batter:
– 2 cups grated zucchini (about 2 small zucchinis)
– 1 1/2 cups all-purpose flour (or a mix of whole wheat and white flour)
– 1 teaspoon baking powder
– 1/2 teaspoon baking soda
– 1/2 teaspoon salt
– 1 teaspoon cinnamon
– 1/2 teaspoon nutmeg (optional but adds warmth)
For the Wet Mixture:
– 2 large eggs
– 3/4 cup granulated sugar (or coconut sugar)
– 1/2 cup neutral oil (vegetable, canola, or melted coconut oil)
– 1 teaspoon vanilla extract
– 1/4 cup milk (dairy or any plant-based milk)
For the Optional Add-ins & Toppings:
– 1/2 cup chopped nuts (walnuts, pecans, or almonds)
– 1/4 cup chocolate chips
– A sprinkle of coarse sugar for topping before baking (optional)
Step-by-Step Instructions
Step 1: Preheat & Prep Pan
Set your oven to 350°F (175°C) and line a muffin tin with paper liners or lightly grease it. I always do this first—nothing worse than batter sticking or muffins sticking to the pan! Keep your rack in the middle to ensure even baking.
Step 2: Grate & Drain Zucchini
Grate the zucchini using the medium side of your box grater. Then, I squeeze out excess moisture with a clean kitchen towel or a paper towel—this step is crucial because it keeps the muffins from becoming soggy. I’ve learned that if you leave too much moisture, the texture gets weird and dense.
Step 3: Mix Dry Ingredients
In a large bowl, whisk together the flour, baking powder, baking soda, salt, cinnamon, and nutmeg—think of this as your dry party. Keep everything evenly combined so the leavening agents are distributed, which helps the muffins rise perfectly.
Step 4: Mix Wet Ingredients
In a separate bowl, beat the eggs lightly, then add the sugar, oil, vanilla, and milk. Whisk until smooth. I always taste the batter here—if it’s a little bland, I add a pinch more vanilla. The oil helps keep the muffins moist, and the eggs give structure and lift.
Step 5: Combine
Pour the wet mixture into the dry and fold gently. The key is not to overmix—stir just until no streaks remain. Overmixing makes tough muffins, so I mix until just combined, then toss in the zucchini and any add-ins like nuts or chocolate chips.
Step 6: Prepare Filling & Optional Add-ins
If you like a little surprise in your muffins, fold in chopped nuts or chocolate chips at this stage. For a prettier presentation, sprinkle a little coarse sugar on top before baking—it gives a subtle crunch and that bakery look.
Step 7: Fill & Bake
Use an ice cream scoop or two spoons to divide the batter evenly among muffin cups—about 3/4 full. Bake for 20-25 minutes, or until the tops are golden and a toothpick inserted in the center comes out clean. I always check around 20 minutes, especially if I’ve added more moisture with extra zucchini.
Step 8: Cool & Glaze
Let the muffins cool in the pan for 5 minutes, then move them to a wire rack. I love adding a simple glaze—powdered sugar mixed with a bit of lemon juice or milk—while they’re still warm. It seeps into the muffins and makes them irresistibly tender and sweet.
Step 9: Slice & Serve
Enjoy these muffins warm or at room temperature. They’re fabulous on their own, but I often pair them with a dollop of yogurt or butter. If I’m serving a crowd, I like to arrange them on a pretty platter and add a touch of fresh fruit for color and freshness. Trust me, these disappear in minutes at my house!
What to Serve It With
These zucchini muffins are so versatile, I’ve got a few ideas for you. For breakfast, serve them with your favorite brewed coffee or a glass of cold milk—my kids love dunking them like little breakfast sandwiches. They’re also perfect for a brunch spread, especially if you add fresh berries and a drizzle of honey. When I want something sweet after dinner, I warm a muffin, add a pat of butter, and maybe a sprinkle of cinnamon sugar—total comfort food. For lazy weekend mornings or quick snacks, I keep a stash in the freezer, defrosting a couple as needed. My family loves them with a side of fresh fruit or even a splash of whipped cream for a treat. Honestly, these muffins have turned into a staple over the years—easy, satisfying, and full of love.
Top Tips for Perfecting Your Zucchini Muffins
Over the years, I’ve learned a few tricks to make these muffins even better. First off, squeezing out as much moisture as possible from the zucchini is essential—it keeps everything from getting soggy. I tested this recipe with different flours and found that a mix of half white and half wheat flour gives a slightly nuttier flavor and keeps the muffins hearty but tender. Personally, I love adding a handful of chopped walnuts—gives a nice crunch. When it comes to mixing, I always fold gently after combining wet and dry ingredients; overmixing is the silent muffin killer, making them dense and flat. For the swirl technique, I sometimes drop a spoonful of cinnamon sugar into the batter before baking, creating beautiful marbled effects. You can swap out the sugar for honey or maple syrup—just remember to reduce the liquid slightly to keep the batter thick enough. And don’t forget, baking times can vary depending on your oven—so keep an eye out around 20 minutes. A toothpick is your best friend for checking doneness. Lastly, I experimented with different glazes, from simple powdered sugar to cream cheese frosting—trust me, the glaze makes a huge difference in that final touch. I’ve found that baking at a slightly lower temperature for a few extra minutes often yields muffins with an even softer crumb. A little practice makes perfect, but no matter what, these muffins will become a comfort classic in your kitchen too.
Storing and Reheating Tips
Once cooled, store your zucchini muffins in an airtight container at room temperature for up to two days—cover them up, and they’ll stay nice and soft. If I know I won’t eat them within that time, I pop them in the fridge where they last about a week, which is perfect for busy mornings. For longer storage, I freeze extras—wrap each muffin tightly in plastic wrap or foil, then stash them in a freezer-safe bag. They keep well for about three months. To reheat, I prefer warming them in the microwave for about 15-20 seconds; it makes them taste freshly baked. If you add glaze, it’s best to do that after reheating, just so it stays glossy and beautiful. When you’re defrosting from frozen, I recommend letting them sit at room temperature for 15 minutes or so before warming. This way, they regain their tender crumb without drying out. The secret is not to overheat them, or they can get crumbly or dry. With a little planning, you can enjoy these muffins all week long—fresh, warm, and full of flavor.
Frequently Asked Questions
Final Thoughts
If you’re craving a cozy baked good that feels like a warm hug from your kitchen, these zucchini muffins are exactly what you need. They’re simple enough for a weekday breakfast, special enough for brunch, and comforting enough as an afternoon treat. I love that they’re adaptable—whether you prefer gluten-free, want to toss in some chocolate, or keep them healthy with minimal sugar, they always turn out delicious. Over the years, I’ve tested every possible variation, and honestly, they never fail to brighten my day. Plus, they’re a way to get a little extra veggie boost without anyone batting an eye. I hope you try this recipe and fall in love with it as much as my family has. Happy baking! And hey, don’t forget to leave a comment—I’d love to hear your tips or variations!
chicken paella
Ingredients
Method
- Add 2 tablespoons olive oil to a large skillet or paella pan, sauté onion and pepper until soft, about 5-8 minutes.
- Add garlic and cook for about 1 minute; set aside the sofrito mixture.
- Add remaining 2 tablespoons olive oil, cook chicken until about 50% done, then remove from pan.
- Add rice and toast for about 3 minutes.
- Mix in chicken broth and Paellero, stir well. Add chicken back to the pan along with tomatoes and water, simmer for 20-25 minutes until rice is tender and liquid absorbed.
- Stir in peas and parsley, cook for 1-2 minutes to warm through.
- Taste and season with salt and pepper as needed, garnish with lemon wedges, and serve immediately.