Sweet Toffee Pretzels How to Make Them
Let me tell you, there’s nothing quite like pulling a warm slice of coffee cake out of the oven when the morning light spills through the kitchen window. I remember my grandma’s house, the smell of cinnamon wafting through the air, and how she’d always say, “Eat this quickly before it’s gone!” This zucchini coffee cake is a little piece of that cozy, nostalgic magic. It’s got the perfect balance of sweet and spice, with a tender crumb and a surprise swirl of cinnamon goodness in the middle. Honestly, I make this at least once a month—it’s my go-to when I want something comforting but still want to sneak in some veggies. Plus, it’s incredible how moist and flavorful it turns out, even with the zucchini sneaking in. And no one ever guesses! My kids ask for this all the time, especially on lazy weekends. Trust me, once you try this one, it’ll become a quick favorite for your family too—sometimes I’ll even double the batch because it disappears in minutes at my house!
What is Zucchini Coffee Cake?
Think of zucchini coffee cake as a lovely mash-up of a classic breakfast treat and a sneaky way to get some greens into your day. It’s essentially a moist, tender cake made with grated zucchini, which adds moisture without changing the flavor too much—though I always tell myself I can taste the hint of veggie richness when I have a slice. The star is that cinnamon swirl that runs through the middle, giving it a warm, inviting aroma and a little textural contrast. The beauty of this cake is how versatile it is—it’s perfect for breakfast, brunch, or even as a cozy afternoon snack. The name ‘coffee cake’ makes it sound fancy, but I promise it’s so simple to whip up, even on a busy morning. Think of it as a slightly healthier indulgence—just enough to satisfy your sweet tooth without feeling heavy or overly sugary. And the best part? It keeps well for days, which means leftovers are a rare luxury around here!
Why you’ll love this recipe?
What I love most about this zucchini coffee cake is how it manages to be comforting and a little wholesome at the same time. The flavor profile is just irresistible—warm cinnamon, sweet vanilla, and a hint of nutty zucchini shine through every bite. The aroma alone will draw everyone into the kitchen, I swear. And the best part? It’s super easy to make—no complicated techniques or fancy ingredients needed. I always do this when I need a baking win on a busy weekend; it comes together quickly, and the fact that I can sneak in zucchini makes me feel a little better about indulging. Plus, it’s budget-friendly since zucchini and pantry staples are often already in my fridge and cabinets. I love how adaptable it is, too. You can add walnuts or chocolate chips, or even swap out the cinnamon swirl for a fruit compote if you’re feeling adventurous. What I really adore about this recipe is how it’s become a family favorite—my kids actually ask for seconds, which is saying a lot for a vegetable cake! Whether I serve it with coffee in the morning or a glass of milk in the afternoon, it’s just the cozy treat everyone loves. It’s also perfect for brunch gatherings or a quick bake when friends pop by—always a hit! Honestly, this one’s a lifesaver on busy nights when I want something homemade but don’t want to spend hours in the kitchen. It’s simple, rustic, and incredibly satisfying—my kind of dessert.
How do I make Zucchini Coffee Cake?
Quick Overview
This zucchini coffee cake is all about ease and flavor. You start by preparing your loaf pan or baking dish, then whisk together a basic batter using flour, sugar, eggs, and a bit of oil or melted butter. The grated zucchini is folded into the batter, adding moisture and a touch of nutrition. Next, you swirl in a cinnamon-sugar mixture right in the middle for that irresistible ripple of spice. After pouring the batter into your pan and layering on the cinnamon swirl, it goes into the oven and bakes for about 45 minutes. The house fills with that warm cinnamon aroma that’s totally addictive. Once it’s golden and toothpick comes out clean, I let it cool just a bit before drizzling that sweet glaze on top. Simple, stress-free, and utterly delicious!
Ingredients
For the Main Batter:
– 2 cups all-purpose flour (trust me, I tested this with whole wheat and it’s still great, just a tad denser)
– 1 cup granulated sugar
– 1 teaspoon baking powder
– ½ teaspoon baking soda
– ½ teaspoon salt
– 1 teaspoon vanilla extract
– 3 large eggs
– ½ cup vegetable oil or melted butter
– 1 cup grated zucchini (don’t forget to squeeze out excess moisture after grating for a less soggy cake)
For the Filling (Cinnamon Swirl):
– ½ cup brown sugar
– 1 tablespoon ground cinnamon
– 2 tablespoons melted butter (for brushing or mixing together)
For the Glaze:
– 1 cup powdered sugar
– 1-2 tablespoons milk or cream
– ½ teaspoon vanilla extract
Step-by-Step Instructions
Step 1: Preheat & Prep Pan
Set your oven to 350°F (175°C). Grease a 9-inch loaf pan or square baking dish—trust me, this is the secret to getting a clean slice later. I like to line mine with parchment paper too, just to make removal even easier. Quick tip: if your zucchini is particularly watery, squeeze out as much moisture as you can after grating. It’s the little things that keep your cake from turning into a soggy disaster!
Step 2: Mix Dry Ingredients
In a large bowl, whisk together the flour, sugar, baking powder, baking soda, and salt. I always do this first—it ensures everything is evenly distributed. Plus, it’s satisfying watching the dry ingredients blend into a fluffy mixture. This step is key to avoiding clumps in your batter.
Step 3: Mix Wet Ingredients
In a separate bowl, beat the eggs, then add the vanilla, oil, and grated zucchini. I like to mix the eggs first so they’re well combined, then stir in the rest. It should look kind of shiny and a little thick. I’ve tested this with almond milk before—trust me, it made the batter even creamier, but regular milk works just fine too!
Step 4: Combine
Pour the wet mixture into the dry ingredients. Gently fold until just combined—don’t overmix, or your cake will turn tough instead of tender. The batter will look a little lumpy, that’s okay! Just make sure no flour pockets remain. Overmixing is my biggest rookie mistake, but I’ve learned to resist—it’s all about gentle folding here.
Step 5: Prepare Filling
Mix the cinnamon and brown sugar together. If you like, you can brush the melted butter onto the batter before adding the cinnamon mixture, or just sprinkle it evenly on top for that beautiful swirl. This is where you can get creative—try chopped nuts or chocolate chips if you’re feeling indulgent.
Step 6: Layer & Swirl
Pour half the batter into your prepared pan, then sprinkle or dollop the cinnamon mixture on top. Cover with the remaining batter and use a knife or skewer to swirl through the layers, creating beautiful marbling. If you’re particular about pattern, take your time—hey, it’s your masterpiece! If not, just a gentle swirl will do. The visual is just as tasty as the flavor.
Step 7: Bake
Slide it into your preheated oven and bake for 40-45 minutes. Keep an eye on it—if the top gets too dark, tent it with foil. To check doneness, insert a toothpick into the center; it should come out clean or with a few moist crumbs. Every oven varies, so start checking at 40 minutes.
Step 8: Cool & Glaze
Once baked, let it cool for at least 15 minutes—this helps it set. While it’s cooling, whisk together your glaze ingredients until smooth. When the cake is just warm or completely cooled, drizzle the glaze over the top. The sweetness and the sheen make it irresistible. I love doing this outside, even on rainy mornings—look at me with my bakery dreams!
Step 9: Slice & Serve
Use a sharp knife to cut clean slices. I recommend waiting until it’s mostly cooled so it doesn’t squish apart. Serve warm or at room temperature with a cup of coffee or tea. My family loves it with a little dollop of yogurt or fresh berries on the side, but honestly, it’s perfect just as it is. Better yet, take a moment and savor that moist crumb and that cinnamon swirl—trust me, it’s worth every bite.
What to Serve It With
This zucchini coffee cake is incredibly versatile. For breakfast, pair it with a steaming cup of black coffee or a frothy latte—nothing beats the aroma in the morning sunshine. On weekends, I like to serve it with fresh fruit and a dollop of whipped cream for a slightly more indulgent brunch. And because it keeps so well, I often make it for guests or family gatherings, where everyone asks for the recipe. As a dessert, I love it slightly warm with a scoop of vanilla ice cream or a drizzle of honey. For a cozy snack, it’s perfect on its own with a hot cup of tea or a glass of cold milk. It’s become a family tradition, especially when zucchini’s in season—the kids think it’s a special treat, and I love sneaking in those extra vegetables without fuss. This cake truly feels like a warm hug in every slice, and I’m sure it’ll bring a little sunshine to your table too.
Top Tips for Perfecting Your Zucchini Coffee Cake
After making this dozens of times, I’ve picked up a few tricks I’d love to share. First, always squeeze out excess moisture from the zucchini—this stops your batter from turning into a soggy mess. Use a fine grater so the zucchini incorporates smoothly; I don’t recommend the big chunks unless you like a rustic look. When mixing the wet and dry ingredients, fold gently and stop as soon as everything is just combined. Overmixing toughens up the crumb, and no one wants that!
The cinnamon swirl is one of my favorite parts—try to evenly sprinkle the cinnamon-sugar mixture so it distributes beautifully. If you want a more intense cinnamon flavor, increase the amount a little—I won’t judge. When baking, keep an eye on the top; every oven is a bit different, and I’ve learned to tent mine with foil if it’s browning too fast. For the glaze, I prefer it thicker so it doesn’t run off too quickly, but thinner glaze works well if you want a more drip-like effect. I’ve tested this with coconut sugar and maple syrup, which adds a lovely depth of flavor, so don’t be afraid to experiment a little. The biggest lesson I’ve learned? Patience is key—let it cool at least 15 minutes before slicing, or you might end up with a gooey mess. And finally, don’t forget to enjoy the process—and the smell—it’s all part of the fun!
Storing and Reheating Tips
This cake keeps surprisingly well. At room temperature, it’s best enjoyed within 2 days—just cover it loosely with foil or a kitchen towel so it stays moist. If you’re making it ahead, pop it into an airtight container and store it in the fridge; it’ll last for about 4 days. I love slicing it up and then gently warming individual pieces in the microwave for about 15 seconds—that way, it’s still warm but not soggy. For longer storage, freeze it well-wrapped in plastic wrap and foil—this prevents freezer burn. Thaw in the fridge overnight, then warm for a few seconds if you want that just-baked feel. A quick note: if you’re planning to add the glaze later, wait until the cake is fully cooled so it sticks and sets beautifully. Keep in mind, the flavor actually deepens after a day or two, and it gets even better the next morning with coffee. So, don’t feel like you have to eat it all at once—this cake is made for leftovers and moments of comfort, whenever you need them.
Frequently Asked Questions
Final Thoughts
This zucchini coffee cake has become a staple in my home because it hits all the right notes—moist, flavorful, and just a little fancy with that cinnamon swirl. It’s the kind of recipe that makes you feel like a baking hero, even on your busiest days, because it’s so forgiving and hard to mess up. I honestly love the way the zucchini keeps the cake so tender, and the cinnamon swirl gives it that cozy, homey vibe. Every time I bake this, I think about lazy Sunday mornings, making memories around the kitchen table, and hearing my kids ask for seconds. If you’re looking for a way to sneak more veggies into your baking or just craving a simple, comforting treat, give this recipe a shot—I promise, you’ll find yourself coming back to it again and again. Happy baking! And don’t forget to leave a comment sharing your twists or letting me know how your cake turned out—I’d love to hear!
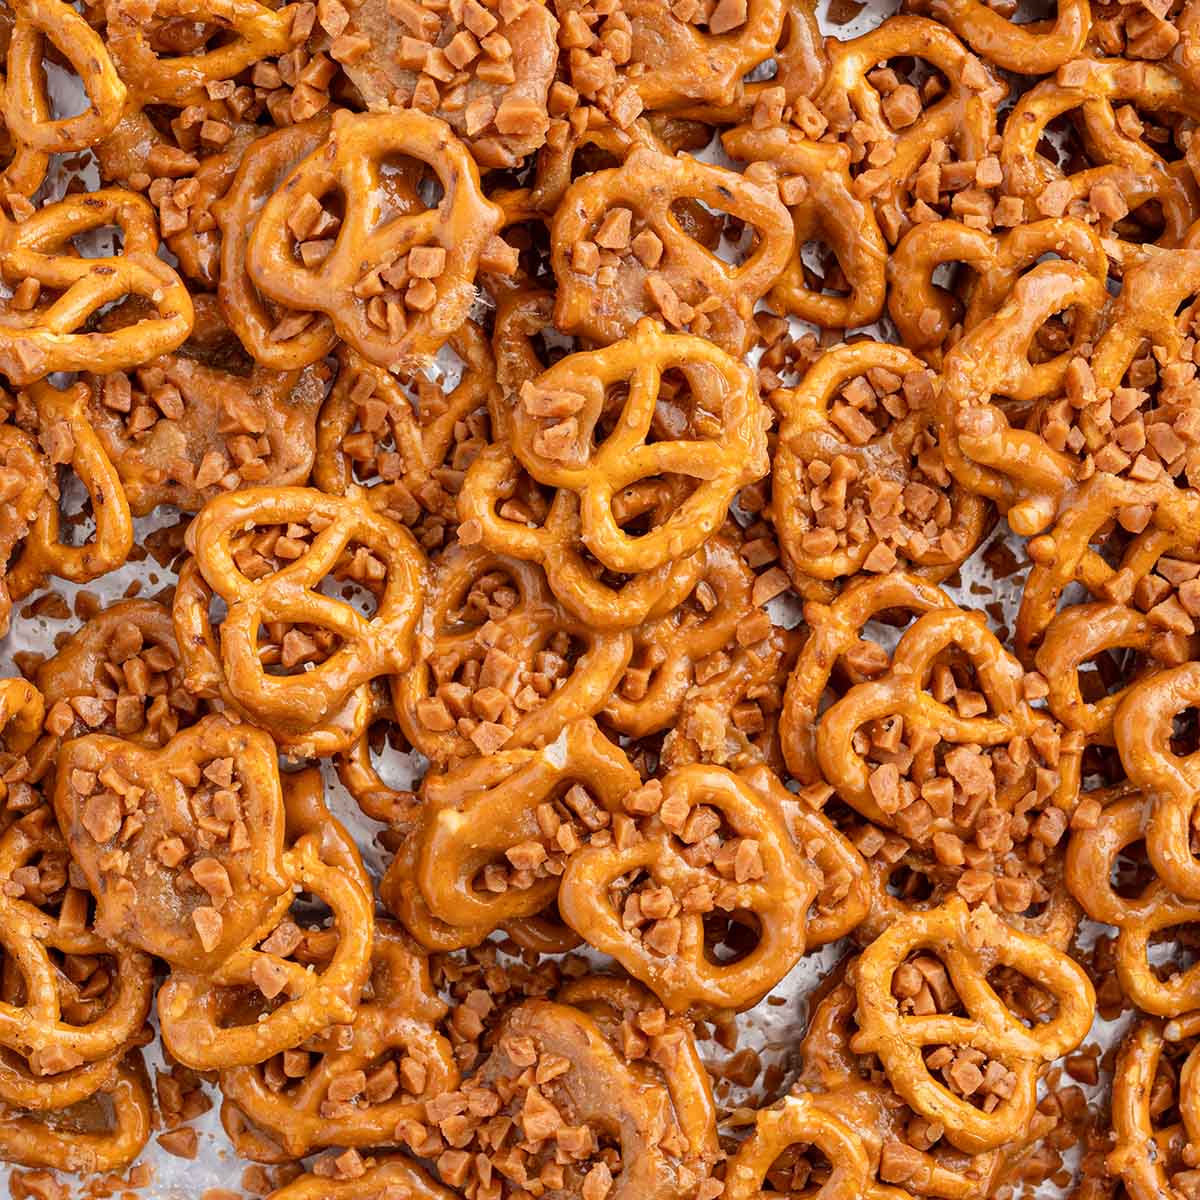
butter toffee pretzels
Ingredients
Method
- Preheat oven to 200°F. Line a baking sheet with aluminum foil and spray with nonstick spray.
- Pour pretzels into a heat-safe bowl.
- In a saucepan over medium heat, combine brown sugar, butter, and corn syrup. Bring to a low boil and cook for 5 minutes, stirring constantly.
- Remove from heat and stir in vanilla extract and baking soda carefully; the mixture will bubble.
- Pour the hot toffee mixture over the pretzels and stir to coat evenly.
- Spread pretzels on prepared baking sheet and sprinkle half of the toffee bits over the coated pretzels.
- Bake for 1 hour, turning every 15 minutes.
- After baking, sprinkle the remaining toffee bits and allow to cool before breaking into pieces.