Zesty Black Bean Burgers A Simple Delight
Oh, friend, do I have a treat for you today! You know that moment when summer zucchini takes over your garden (or your neighbor’s garden, no judgment here!) and you start looking for every possible way to use it up? Well, that’s exactly how this incredible recipe, my absolute favorite Swirled Zucchini Bread with Cream Cheese Glaze., became a permanent fixture in my kitchen. It all started with my grandma’s classic zucchini bread recipe – the one that smelled like pure comfort and made you forget veggies were even involved. But I thought, “What if we made it a little… extra?” And that’s where the magic swirl came in. This isn’t just good; it’s the kind of moist, tender bread that melts in your mouth, perfectly balanced by a tangy, sweet cream cheese ribbon, all finished with a luscious glaze. Honestly, it’s like banana bread met a cheesecake swirl and decided to have the most delicious, show-stopping baby. If you’re looking for a recipe that feels both nostalgic and utterly new, and disappears faster than you can say “more please,” you’ve hit the jackpot.
What is Swirled Zucchini Bread with Cream Cheese Glaze?
At its heart, Swirled Zucchini Bread with Cream Cheese Glaze is a delightful twist on a beloved classic. Forget everything you thought you knew about plain old zucchini bread! While it definitely has that familiar cozy warmth from spices and a tender crumb thanks to the hidden zucchini, what truly sets this loaf apart is the dreamy, tangy cream cheese filling that’s swirled right into the batter before baking. Think of it as a decadent cheesecake ribbon running through your favorite quick bread. It’s essentially two wonderful things – a spiced, moist zucchini bread and a creamy, slightly tart cheesecake – coming together in a harmonious, incredibly delicious bite. The whole thing is then crowned with a simple, sweet cream cheese glaze that truly elevates it from a humble snack to something special enough for any occasion. It’s comforting, it’s exciting, and it’s genuinely a joy to make (and eat!).
Why you
Why do I fall head over heels for this book?Swirled Zucchini Bread with Cream Cheese Glaze? It’s not just a recipe; it’s an experience. What I love most about this is how it effortlessly brings together so many wonderful things:
- Flavor that Sings: This isn’t just sweet; it’s a symphony of flavors. The zucchini bread itself is moist, warmly spiced with cinnamon and a hint of nutmeg, and just sweet enough. Then, you get that glorious cream cheese swirl – a tangy, creamy counterpoint that cuts through the sweetness beautifully. It’s a perfect balance that keeps you coming back for another slice (and another!).
- Simplicity You Can Trust: Don’t let the “swirl” fool you into thinking it’s complicated. This recipe is surprisingly easy! It uses simple, readily available ingredients, and the steps are straightforward. It’s truly a one-bowl-friendly batter with a quick, easy filling. This one’s a lifesaver on busy nights when you need a comforting treat without a fuss, or when you just want to bake something incredibly satisfying without all the stress.
- Budget-Friendly Goodness: Zucchini is often plentiful and inexpensive, especially during summer. The rest of the ingredients are pantry staples, making this a cost-efficient way to create something truly spectacular. It’s amazing how a few humble ingredients can create such a luxurious taste.
- Versatility for Days: This loaf is a chameleon! It’s perfect for a leisurely breakfast with your morning coffee, an elegant addition to a brunch spread, a delightful afternoon snack with tea, or even a surprisingly satisfying dessert after dinner. My kids ask for this all the time, and I’m always happy to oblige because it really does fit every moment.
This recipe truly stands out. It has the cozy appeal of a classic banana bread but with the unexpected, creamy indulgence of a cheesecake, like a fancy cousin to my Pumpkin Cream Cheese Swirl Bread. It’s the kind of recipe that makes your kitchen smell absolutely divine and brings smiles to everyone’s faces. Trust me on this one; you’re going to adore it.
How to Make Swirled Zucchini Bread with Cream Cheese Glaze
Quick Overview
Making this incredible Swirled Zucchini Bread with Cream Cheese Glaze is actually much simpler than you might imagine, and that’s one of the many reasons I love it so much! You’ll start by whisking together your dry ingredients, then mixing the wet ones until they’re lovely and combined. We’ll gently fold those together, taking care not to overmix (that’s my secret for a super tender loaf!). Then, a quick whip-up of that luscious cream cheese filling. Layer the batter and filling into your loaf pan, swirl it artfully, and let your oven do the rest. The best part? The aroma that fills your kitchen while it bakes is pure heaven. It’s an easy, comforting process that yields truly spectacular results every single time.
Ingredients
For the Main Batter:
- 1 ½ cups (180g) all-purpose flour: I always use unbleached for a slightly softer crumb.
- 1 teaspoon ground cinnamon: Make sure yours is fresh for the best aroma!
- ½ teaspoon ground nutmeg: A little goes a long way, don’t skip it; it adds warmth.
- 1 teaspoon baking soda: Helps with that lovely rise.
- ½ teaspoon salt: Balances the sweetness beautifully.
- ½ cup (100g) granulated sugar: Just enough sweetness for the bread itself.
- ¼ cup (50g) packed light brown sugar: Adds a lovely molasses note and moisture.
- 2 large eggs: Room temperature eggs mix better.
- ½ cup (120ml) neutral oil (like vegetable or canola): Keeps it incredibly moist.
- 1 teaspoon vanilla extract: Use good quality, it truly makes a difference.
- 1 ½ cups grated zucchini (about 1 medium zucchini): Squeeze out excess water! This is CRUCIAL.
For the Filling:
- 4 oz (113g) cream cheese, softened: Full-fat cream cheese works best here for creaminess.
- ¼ cup (50g) granulated sugar: For sweetness in the tangy swirl.
- 1 large egg yolk: Adds richness and helps the filling set.
- ½ teaspoon vanilla extract: Enhances that creamy flavor.
For the Glaze:
- 1 cup (120g) powdered sugar: Sift it if you want an extra smooth glaze.
- 1-2 tablespoons milk (any kind!) or heavy cream: Start with 1 tbsp and add more a tiny bit at a time.
- ¼ teaspoon vanilla extract: For that signature flavor.
- A tiny pinch of salt: Really makes the vanilla and sweetness pop.
Step-by-Step Instructions
Step 1: Preheat & Prep Pan
First things first, let’s get that oven ready! Preheat your oven to 350°F (175°C). Then, grab a standard 9×5-inch loaf pan. I always line mine with parchment paper, leaving a slight overhang on the long sides. This creates little “handles” that make lifting the finished bread out a breeze, and it ensures absolutely no sticking! After lining, give it a quick spray with non-stick cooking spray, just for extra insurance. Trust me, this little step saves so much frustration later.
Step 2: Mix Dry Ingredients
In a large bowl, whisk together your flour, cinnamon, nutmeg, baking soda, and salt. Make sure you whisk them really well for about 30 seconds. This step is super important because it ensures all those leavening agents and spices are evenly distributed throughout the batter. You don’t want a pocket of plain flour or a sudden burst of baking soda in your bread, right? A well-whisked dry mix guarantees a beautifully consistent texture and flavor in every bite.
Step 3: Mix Wet Ingredients
Now, in a separate medium bowl, combine your granulated sugar, brown sugar, eggs, oil, and vanilla extract. Whisk these together until they’re smooth and well incorporated, and the mixture looks a little lighter in color and slightly aerated. This usually takes about a minute or two of vigorous whisking. Making sure your wet ingredients are thoroughly mixed sets the stage for a cohesive and moist batter.
Step 4: Combine
This is where the magic starts to come together! Pour the wet ingredients into the dry ingredients. Now, here’s my cardinal rule: mix gently! Use a rubber spatula and fold the ingredients together *just* until no streaks of dry flour remain. Don’t be afraid of a few lumps; overmixing is the absolute enemy of tender quick breads. It develops the gluten too much, making your bread tough. Once it’s mostly combined, gently fold in your squeezed grated zucchini. It’s okay if there are still a few floury patches; they’ll disappear during baking, and your bread will thank you for the light hand!
Step 5: Prepare Filling
Time for that glorious swirl! In a small bowl, combine your softened cream cheese, granulated sugar, egg yolk, and vanilla extract. Use a fork or a small whisk to mix these together until the mixture is completely smooth and creamy. Make sure there are no lumps of cream cheese left; a smooth filling ensures a beautiful, even swirl in your bread. Having the cream cheese at room temperature is key here; it makes mixing so much easier.
Step 6: Layer & Swirl
Now for the fun part! Pour about two-thirds of your zucchini bread batter into the prepared loaf pan and spread it evenly. Next, dollop spoonfuls of your cream cheese filling over the batter. You can be pretty random with this, no need for perfection. Then, gently top with the remaining zucchini bread batter, spreading it out to cover most of the cream cheese. Finally, take a butter knife or a skewer and gently swirl it through the batter, creating beautiful marbled patterns. Don’t overdo it, or the swirl will get lost; just a few graceful passes are perfect for that stunning effect.
Step 7: Bake
Carefully place your loaf pan into the preheated oven. Bake for about 50-65 minutes. Every oven is a little different, so keep an eye on it! The bread is done when a wooden skewer or toothpick inserted into the center (making sure you miss the cream cheese swirl, which will always be a bit gooey) comes out with just a few moist crumbs attached, or clean. If you notice the top browning too quickly, you can loosely tent it with aluminum foil for the last 15-20 minutes of baking. The smell alone brings everyone to the kitchen at this stage!
Step 8: Cool & Glaze
Once baked, remove the loaf pan from the oven and let the Swirled Zucchini Bread cool in the pan for about 10-15 minutes. This allows it to firm up before you try to move it. After this initial cooling, use those parchment overhangs to gently lift the bread out of the pan and transfer it to a wire rack to cool completely. While it’s cooling (or when it’s still just barely warm, which is my preferred method for a slightly melty glaze!), whisk together your powdered sugar, milk, vanilla, and that tiny pinch of salt for the glaze. Add milk one tablespoon at a time until you reach your desired consistency – thick enough to coat a spoon, but thin enough to drizzle. Drizzle liberally over the cooled loaf.
Step 9: Slice & Serve
The hardest part is waiting! Once the glaze has set (or you simply can’t wait any longer!), slice your Swirled Zucchini Bread with Cream Cheese Glaze into thick, generous pieces. I always use a serrated knife for the cleanest cuts. Serve it up and watch it disappear. This bread is truly best enjoyed at room temperature, allowing all those wonderful flavors and textures to shine. Enjoy every single bite!
What to Serve It With
This Swirled Zucchini Bread with Cream Cheese Glaze is so versatile, it truly shines in almost any setting. Here are a few ways my family and I love to enjoy it:
For Breakfast:
There’s nothing quite like a thick slice of this bread with a steaming mug of strong, dark roast coffee. The tangy sweetness of the glaze and the warm spices in the bread are just incredible with that rich coffee flavor. Sometimes, I’ll serve it alongside a bowl of fresh berries – raspberries or blueberries add a lovely tart contrast. It’s my perfect start to a relaxed weekend morning, especially when I have guests.
For Brunch:
If you’re hosting brunch, this loaf makes a gorgeous centerpiece. Slice it elegantly and arrange it on a platter with some whipped cream on the side for an extra touch of indulgence, or even a simple fruit salad. It pairs wonderfully with a bright mimosa or a sparkling cider. It adds that homemade, comforting touch that always impresses without being overly fussy.
As Dessert:
While it’s a bread, it’s absolutely decadent enough for dessert. Warm a slice ever so slightly, and serve it with a scoop of really good vanilla bean ice cream. The cold, creamy ice cream melting into the warm, spiced bread with that tangy swirl is just out of this world. Or, for a simpler after-dinner treat, a dusting of extra cinnamon on top can be lovely.
For Cozy Snacks:
This is my ultimate afternoon pick-me-up. A slice (or two!) with a cup of herbal tea or a frothy latte is pure comfort. It’s perfect when you’re craving something sweet at 10 pm but don’t want to bake a whole cake. My kids love it as an after-school snack, too – it’s a brilliant way to sneak in some veggies without them even knowing! It’s one of those reliable recipes that always feels like a warm hug.
Top Tips for Perfecting Your Swirled Zucchini Bread with Cream Cheese Glaze
I’ve made this Swirled Zucchini Bread with Cream Cheese Glaze countless times, and I’ve learned a few tricks along the way that can really take your loaf from great to absolutely show-stopping. Trust me on these; they’re my golden rules!
Zucchini Prep is Key:
This is probably the most crucial step! Zucchini holds a surprising amount of water, and if you don’t remove it, your bread will be soggy and dense. After grating your zucchini, place it in a clean kitchen towel or several layers of paper towels and squeeze, squeeze, squeeze! You’ll be amazed how much liquid comes out. I learned this trick after years of making watery zucchini bread, and it’s a game-changer for that perfectly moist, never soggy, crumb. Don’t skimp on this part!
Mixing Advice: Don’t Overmix!
I cannot stress this enough: overmixing is the enemy of tender quick breads. Once you combine the wet and dry ingredients, mix just until the flour streaks disappear. A few lumps are perfectly fine, even desirable! Overmixing develops the gluten in the flour too much, leading to a tough, chewy bread instead of that lovely, tender crumb we’re aiming for. It’s a gentle folding motion with your spatula, not a vigorous beat-down!
Swirl Customization:
Don’t be afraid to make the swirl your own! For a more defined “ribbon” look, try spooning half the batter, adding all the cream cheese filling in a line down the center, then topping with the remaining batter before swirling. For a more marbled effect, like mine, dollop the filling as directed. You can even add a tiny bit of lemon zest to your cream cheese filling for an extra bright, zesty pop – it’s fantastic!
Ingredient Swaps for Versatility:
- Oil: While I prefer neutral oil for moisture, you can certainly swap it for melted butter for a richer flavor, or even unsweetened applesauce for a lighter version (though it might change the texture slightly).
- Flour: For a slightly heartier loaf, you can substitute up to half of the all-purpose flour with white whole wheat flour. If you’re going gluten-free, a good 1:1 gluten-free baking blend (the one with xanthan gum) works beautifully – I’ve tested this and it actually made it even creamier!
- Spices: Feel free to play with your spices! A pinch of allspice or ground ginger can add another layer of warmth.
- Add-ins: Want some crunch? Fold in ½ cup of chopped walnuts or pecans with the zucchini. Chocolate chips are also a huge hit, especially with the kids!
Baking Tips for Perfection:
Oven temperatures can vary, so an oven thermometer is your best friend. Make sure your oven is truly preheated. Position your loaf pan in the center of the oven for even baking. If you notice the top browning too quickly before the inside is done (which can happen with the sugar in the glaze), loosely tent the loaf with aluminum foil for the last 15-20 minutes. This little trick saves the top from burning while the inside finishes cooking.
Glaze Variations:
The glaze is so simple but so good! For a brighter glaze, add a teaspoon of fresh lemon or orange zest. For a thicker glaze that really coats, use less milk. For a thinner, more drizzly glaze, add a tiny bit more milk, a half-teaspoon at a time. You can even swap some of the milk for brewed coffee for a mocha-flavored glaze, or maple syrup for a fall-friendly twist. The possibilities are endless!
Storing and Reheating Tips
You’ve put all that love into making this incredible Swirled Zucchini Bread with Cream Cheese Glaze, so let’s make sure you know how to keep it fresh and delicious for as long as possible! Honestly, this bread disappears in minutes at my house, but if you happen to have any leftovers, here’s what I recommend:
Room Temperature:
If your bread is unglazed, you can store it wrapped tightly in plastic wrap or in an airtight container at room temperature for up to 2-3 days. However, because of that lovely cream cheese swirl, once it’s glazed, it really needs to be refrigerated to maintain its freshness and safety. Trust me, you don’t want that delicious cream cheese going bad!
Refrigerator Storage:
For glazed Swirled Zucchini Bread, your refrigerator is its best friend. Wrap the loaf tightly in plastic wrap, then place it in an airtight container. It will keep beautifully in the fridge for up to a week. The flavors actually deepen a little bit overnight, making it even more delicious the next day! Just be sure to let it come closer to room temperature before serving for the best texture and taste.
Freezer Instructions:
Yes, you can absolutely freeze this bread! This is my go-to method for always having a treat on hand. I prefer to freeze the loaf *before* glazing it. Once the baked loaf has cooled completely, wrap it very tightly in plastic wrap, then again in aluminum foil. It will stay fresh in the freezer for up to 3 months. When you’re ready to enjoy it, simply thaw it overnight in the refrigerator or on the counter, then prepare and drizzle with the fresh cream cheese glaze right before serving. You can also slice the unglazed loaf and freeze individual slices for easy grab-and-go portions. Just wrap each slice individually!
Glaze Timing Advice:
As I mentioned, always glaze your Swirled Zucchini Bread after it’s fully cooled, and especially if you plan to store it in the refrigerator or freeze it. Applying the glaze just before serving (or after thawing if frozen) ensures the freshest taste and best consistency. If you freeze a glazed loaf, the glaze might get a little watery upon thawing, affecting the texture. I learned this after trying to cut corners once – never again!
Frequently Asked Questions
Final Thoughts
And there you have it, my dear friend! This Swirled Zucchini Bread with Cream Cheese Glaze isn’t just another recipe; it’s a little slice of heaven that I genuinely hope becomes a beloved staple in your home, just like it is in mine. The combination of that incredibly moist, spiced zucchini bread with the tangy, creamy cheesecake swirl and the luscious glaze is truly something special. It’s the kind of bake that fills your kitchen with the most comforting aromas and brings smiles to every face. It’s perfect for sneaking in those extra veggies, and it makes any day feel a little bit more special. If you’ve enjoyed this, you might also love my Ultimate Carrot Cake or a classic Banana Nut Bread – they all share that wonderfully cozy, comforting vibe. I can’t wait to hear how yours turns out! Please do share your thoughts, any variations you try, and especially pictures in the comments below. Happy baking!
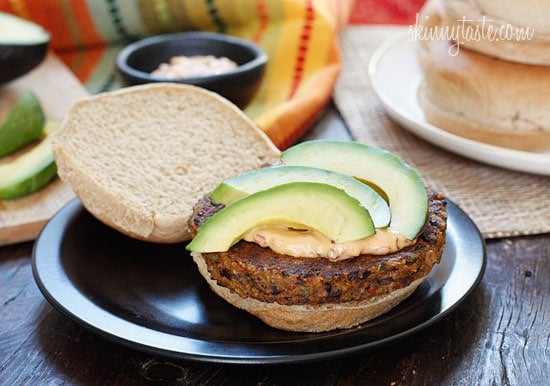
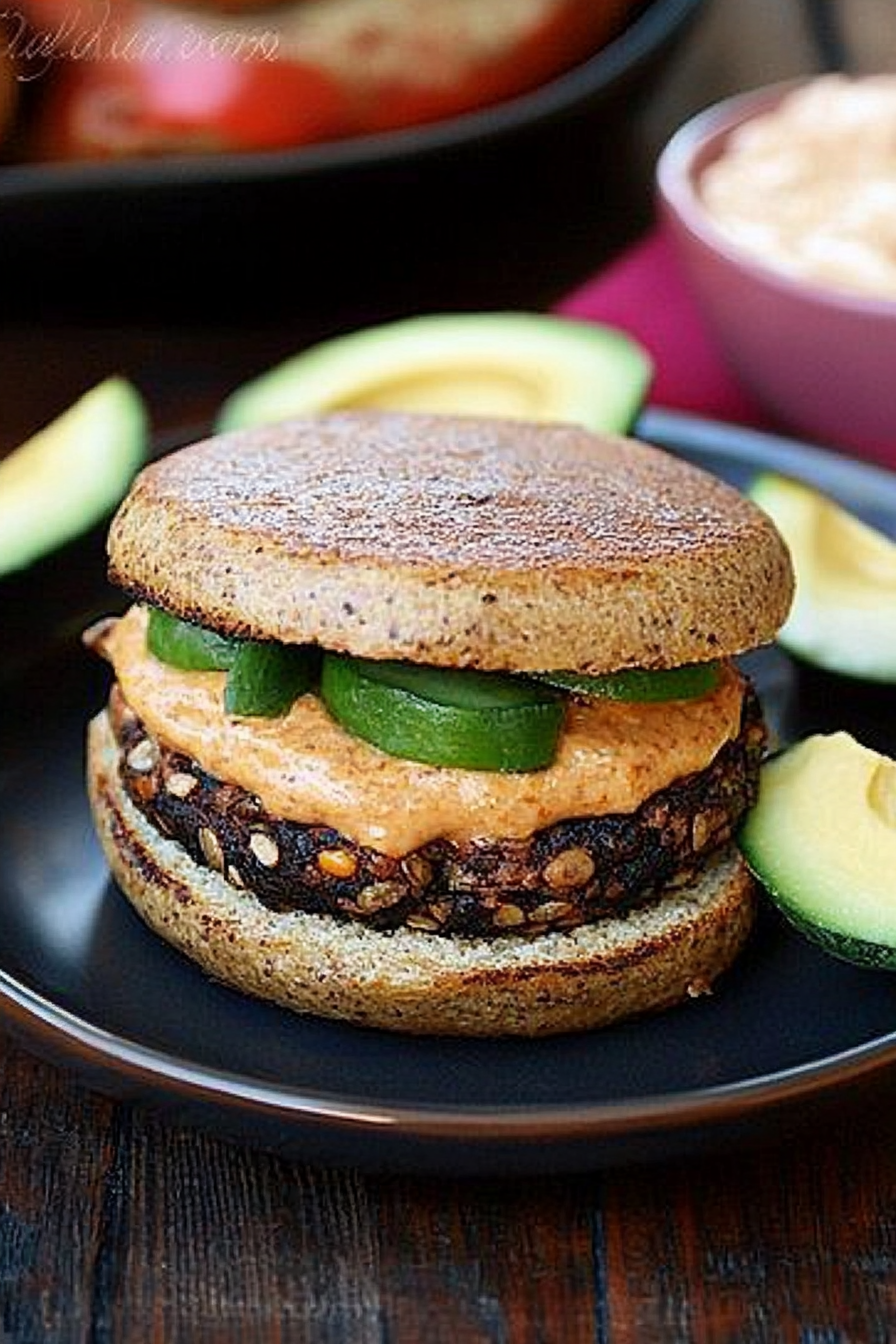
Black Bean Burgers
Ingredients
Method
- Combine mayonnaise and chipotle, set aside.
- Dry the beans well after washing, extra moisture will keep the burgers from sticking.
- In a medium bowl, mash beans with a fork until thick and pasty.
- In a food processor, finely chop bell pepper, cilantro, onion, and garlic, then add oats, then eggs and spices.
- Then stir into mashed beans.
- Divide mixture into four patties (using slightly oiled hands helps) and place them onto a flat surface covered with wax paper. (If it's too wet, chill the mixture 30 minutes in the refrigerator or add another tablespoon of oats)
- Freeze at least 2 hours before cooking or keep frozen until ready to cook.
- Heat a lightly sprayed skillet to medium heat and cook frozen burgers about 7 minutes on each side.
- If grilling, preheat grill over medium heat, and lightly oil a sheet of aluminum foil; grill 7-8 minutes on each side or bake in the oven at 375°F on a lightly oiled baking sheet.