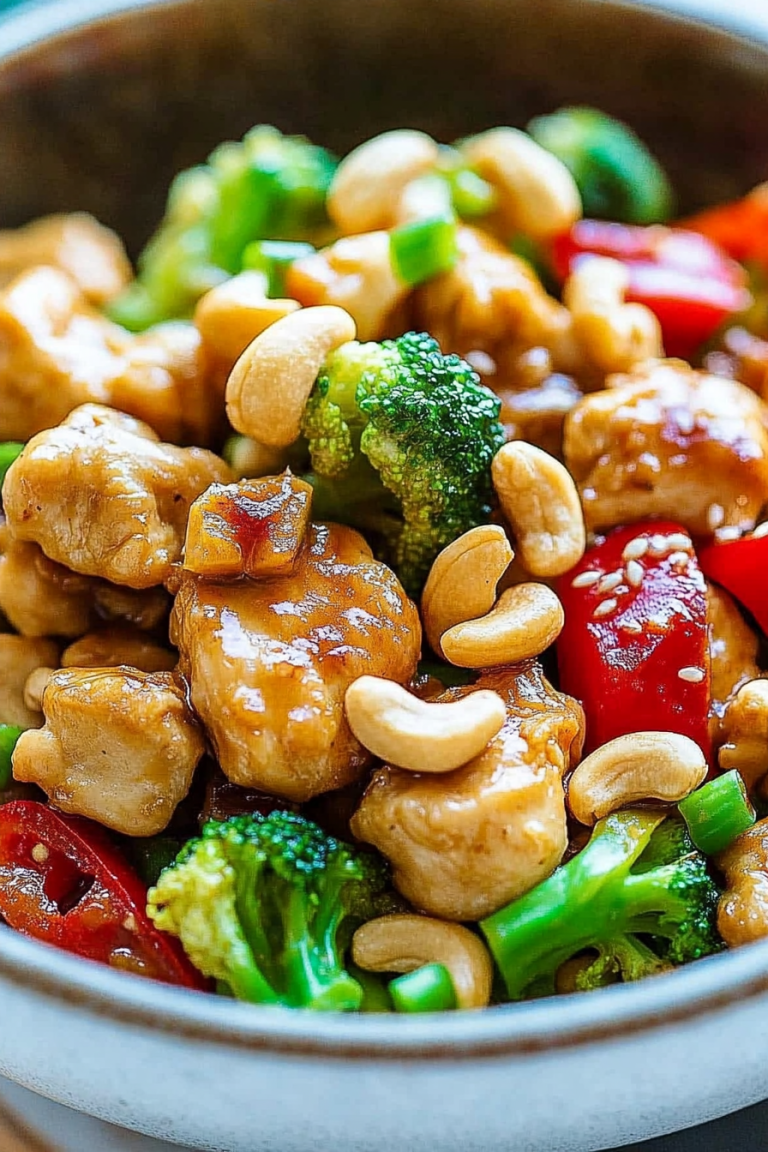
Easy Orange Chicken Recipe You’ll Love
There’s nothing quite like the smell of baking zucchini cake wafting through the house—it’s almost magical. I always do this when I have a little extra zucchini to use up—because let me tell you, zucchini gets plenty of love in my kitchen. This cake is a total lifesaver on busy nights. It’s sweet enough for dessert but wholesome enough for breakfast (trust me on this one). You know that feeling when you need a cozy treat but don’t want to spend hours in the kitchen? That’s exactly when I whip this up. My kids actually ask for this all the time—especially when I swirl a little cinnamon through the batter or add a splash of vanilla. I tested this with almond milk once, and honestly, it made the crumb even more tender. It’s a crowd-pleaser, the kind of recipe that disappears in minutes at my house, and I think you’ll love it too.
What is Zucchini Swirl Cake?
Think of zucchini swirl cake as the loving lovechild of a moist, flavorful cake and a tempting swirl of sweet filling. It’s essentially a tender, lightly spiced cake with a beautiful ribbon of cinnamon or fruit filling running through it. Its name says it all: zucchini gets grated into the batter, adding moisture and a touch of earthiness—almost like a hidden secret. The swirl, which can be a jam, nut mixture, or spiced fruit compote, is what makes it so special, giving it a lovely visual and flavor contrast that’s just irresistible. Despite the fancy-sounding name, this cake is a breeze to whip up, especially if you’ve got a stash of zucchini from your garden or farmers market. It’s kind of like a cozy hug with every slice—sweet, moist, and a little hint of surprise.
Why you’ll love this recipe?
What I love most about this zucchini swirl cake is how forgiving and flexible it is. It’s a real “kitchen sink” kind of recipe—you can swap in what you have on hand and still end up with something delicious. The flavor? Out of this world. The zucchini keeps it moist without overpowering the sweetness, and the cinnamon swirl adds just the right warmth. Plus, it’s budget-friendly—mostly pantry staples and a humble vegetable that’s transformed into something fancy. I always do this when I want something comforting but not overly heavy, and it’s a hit with kids and adults alike. The best part? It’s versatile enough for breakfast, brunch, or a simple treat after dinner. I especially love serving it with a dollop of whipped cream or a scoop of ice cream if I want to dress it up. It’s honestly become my go-to for those days I want a little something sweet but don’t want to overindulge.
How do I make Zucchini Swirl Cake?
Quick Overview
This cake comes together faster than you might think. You start by grating the zucchini and mixing your dry ingredients—then whisk your wet ingredients separately. Careful not to overmix, combine everything and pour into your prepared pan. Next, spread your swirl filling in the batter, giving it a gentle swirl with a skewer or knife. Pop it in the oven, bake until it’s golden and a tester comes out clean, then let it cool before glazing or dusting with powdered sugar. Honestly, it’s a straightforward process, and once you get the hang of swirling, you’ll want to make it all the time!
Ingredients
For the Main Batter:
- 2 cups grated zucchini (peeled or unpeeled, your choice)
- 1 ½ cups all-purpose flour (whole wheat works beautifully too!)
- 1 teaspoon baking powder
- ½ teaspoon baking soda
- ½ teaspoon salt
- 1 teaspoon ground cinnamon
- 1 cup sugar (or honey/maple syrup for natural sweetness)
- ½ cup vegetable oil or melted butter
- 3 large eggs
- 1 teaspoon vanilla extract
- ¼ cup milk (dairy or non-dairy)
For the Swirl Filling:
- ½ cup fruit jam (like apricot or raspberry) or a nut butter
- Optional: ¼ teaspoon cinnamon or a dash of cardamom for extra warmth
For the Glaze:
- 1 cup powdered sugar
- 2-3 tablespoons milk or cream
- Optional: lemon zest or vanilla for flavor
Step-by-Step Instructions
Step 1: Preheat & Prep Pan
Preheat your oven to 350°F (180°C). Grease your baking pan—either a loaf pan or a square 8-inch pan works great—and line it with parchment paper for easy removal. I always do this to prevent sticking. Make sure your zucchini is grated, then squeeze out excess moisture with a clean kitchen towel or paper towels; it helps keep the cake fluffy rather than soggy.
Step 2: Mix Dry Ingredients
In a bowl, whisk together the flour, baking powder, baking soda, salt, and cinnamon. This step ensures even distribution of leavening and spices. It’s the foundation for a tender, uniform crumb—trust me, skipping this step can lead to uneven results.
Step 3: Mix Wet Ingredients
In a large bowl, beat the eggs, sugar, and vanilla until light and frothy. Add the oil and milk, mixing well. I find that using a whisk works best here. The mixture should look smooth and slightly creamy. When I tested this with almond milk, it actually made it even creamier—so feel free to experiment.
Step 4: Combine
Next, fold the grated zucchini into the wet mixture. Then add the dry ingredients gradually, folding gently until just combined. Be careful not to overmix—this can make the cake dense. It’s okay if there are a few lumps; overmixing is the enemy of lightness.
Step 5: Prepare Filling
Spread your jam or nut butter in a thin layer over the batter, leaving about a one-inch border around the edges. If you want to add extra flavor, sprinkle cinnamon or chopped nuts on top of the jam before swirling.
Step 6: Layer & Swirl
Using a toothpick or skewer, swirl gently through the filling, creating a marbled effect. Try to keep the swirl pattern simple—think loose figure eights or gentle S-shapes. This technique creates a beautiful visual and a burst of flavor in each bite.
Step 7: Bake
Bake for 40-50 minutes, or until the edges are golden and a toothpick inserted in the center comes out clean. Ovens vary, so start checking around 40 minutes. When it’s done, the top should have a slight spring to it, and the filling will be bubbling at the edges.
Step 8: Cool & Glaze
Let it cool in the pan for about 15 minutes before transferring to a wire rack. When completely cooled, whisk together your glaze ingredients and drizzle over the top. For a prettier look, I often sprinkle a little extra cinnamon or edible glitter at this stage.
Step 9: Slice & Serve
Once the glaze is set, slice with a serrated knife and serve! It’s best enjoyed at room temperature. I love having a slice with my afternoon tea or a scoop of vanilla ice cream. The flavors mellow and meld after a day or two—so don’t be afraid to make it ahead. My kids ask for this as an after-school snack, and I always keep a stash in the freezer for quick treats on busy mornings.
What to Serve It With
This zucchini swirl cake is so adaptable, I could go on forever. For breakfast, pair it with a big mug of black coffee or milky chai—really warms the soul on cold mornings. If you’re hosting brunch, serve slices alongside fresh fruit and a bright citrus drink like orange-mint spritz. As a dessert, I love spooning a dollop of yogurt or whipped cream and maybe a drizzle of honey. It’s lovely with a scoop of vanilla ice cream, especially if you opt for a fruit filling or swirl. When I want something casual, I’ll just cut thick slices and enjoy with a glass of cold milk or tea—comfort food at its best. My family loves to keep a slice on hand after dinner, because it’s a perfect balance of healthy and indulgent, with that cozy homemade vibe. Honestly, I’ve made this for potlucks, picnic baskets, even as a quick tea-time snack for unexpected guests—always gets rave reviews. It’s one of those recipes that reminds me of lazy Sunday afternoons and warm kitchen chatter.
Top Tips for Perfecting Your Zucchini Swirl Cake
After making this countless times, I’ve learned a few little tricks to make it even better. First, don’t skip squeezing excess moisture from the zucchini—that’s key for a fluffy texture. I usually grate, then microwave it for 30 seconds to evaporate some moisture, then squeeze out the rest—trust me, it’s worth the extra step. When mixing your wet ingredients, don’t overbeat—just enough to combine. Overmixing can turn the batter dense and heavy, and that’s not what we want here. For the swirl, try a gentle, slow motion, especially if you’re using a thick jam—otherwise, it can sink to the bottom. I tested using nut butters, and adding a splash of honey in the filling made it less sticky and easier to swirl. Baking at the right temperature is crucial—I adjust my oven rack higher or lower depending on whether I want a browner top or softer crumb. For glaze, I recommend adding a teaspoon of lemon zest; it brightens the flavor beautifully. If I want a stronger cinnamon punch, I mix a little cinnamon into the glaze—yum. Oh, and finally, don’t skip the cooling step before glazing; it helps the glaze set properly. Every time I tweak my technique, I learn a little more, but honestly, it’s hard to screw this cake up—so relax and have fun with it!
Storing and Reheating Tips
This cake keeps well, which is great because I often bake it a day in advance. For best freshness, store it in an airtight container at room temperature for up to 2 days. If I want it to stay moist longer, I pop it in the fridge for 3-4 days—just bring it back to room temp or warm it gently in the oven. For longer storage, I wrap slices tightly in plastic wrap and freeze them—works like a charm. Thaw overnight in the fridge or at room temperature for a quick treat. I do recommend adding the glaze after thawing—otherwise, it can become soggy. In my experience, reheating slices gently in the microwave or oven preserves the moistness. You can even warm individual slices for about 15-20 seconds in the microwave—just enough to bring out that cozy aroma. No matter how you store it, I find that the flavor stays vibrant, and the moist texture makes it feel just as special as on day one. So, don’t worry if you bake a double batch—you’ll be happy to have leftovers, and trust me, it’s just as good reheated.
Frequently Asked Questions
Final Thoughts
Honestly, this zucchini swirl cake has become a little family tradition in my house. It’s warm, comforting, and endlessly customizable. Every time I make it, I feel like I’m sharing a hug with whoever’s sitting at my table. Whether it’s a lazy Sunday, a quick weekday treat, or a friendly bring-to-share, this cake always gets rave reviews. The beauty is in its simplicity and the fact that it’s a sneaky way to get extra veggies in, without anyone noticing. I encourage you to play around with the filling and flavors—make it your own. And don’t forget, cooking is all about fun and feeling good about what you create. So, have fun in the kitchen, and I can’t wait to hear how yours turns out!

orange chicken
Ingredients
Method
- Toss the chicken and cornstarch in a large bowl until the chicken is completely coated.
- In a medium-sized bowl, whisk ginger, garlic, dark brown sugar, soy sauce, oyster sauce, and orange juice until well combined. Set aside.
- Shake excess cornstarch off the chicken. Heat vegetable oil in a large pan or wok over medium-high heat. Fry chicken for 2 to 3 minutes on all sides until crispy and golden.
- Pour the sauce into the pan and add dried red chilis if using. Stir well until coated. Reduce heat to medium-low and simmer for 5 minutes until sauce thickens.
- Remove from heat. Garnish with green onions and sesame seeds and serve warm.