Sweet Toffee Chocolate Cheeseballs for Valentine’s
You know those afternoons when the house feels just a little too quiet, and all you want is the comforting smell of something sweet baking in the oven? That’s exactly how I feel most days, especially when I have zucchinis piling up from my garden. Instead of turning to the usual muffins or bread, I discovered that a loaf like this—moist, nutty, and packed with zucchini—can transform even the dullest days into a cozy moment. I always do this when I want something satisfying but don’t want to fuss over complicated baking. It’s my secret weapon for busy mornings or after-school treats. My kids ask for this all the time, and honestly, I love how versatile and forgiving it is. Plus, I tested it with a splash of almond milk once, and trust me, it made it even creamier. If you love baking that feels like a warm hug, you’re going to adore this zucchini walnut loaf as much as I do.
What is Zucchini Walnut Loaf?
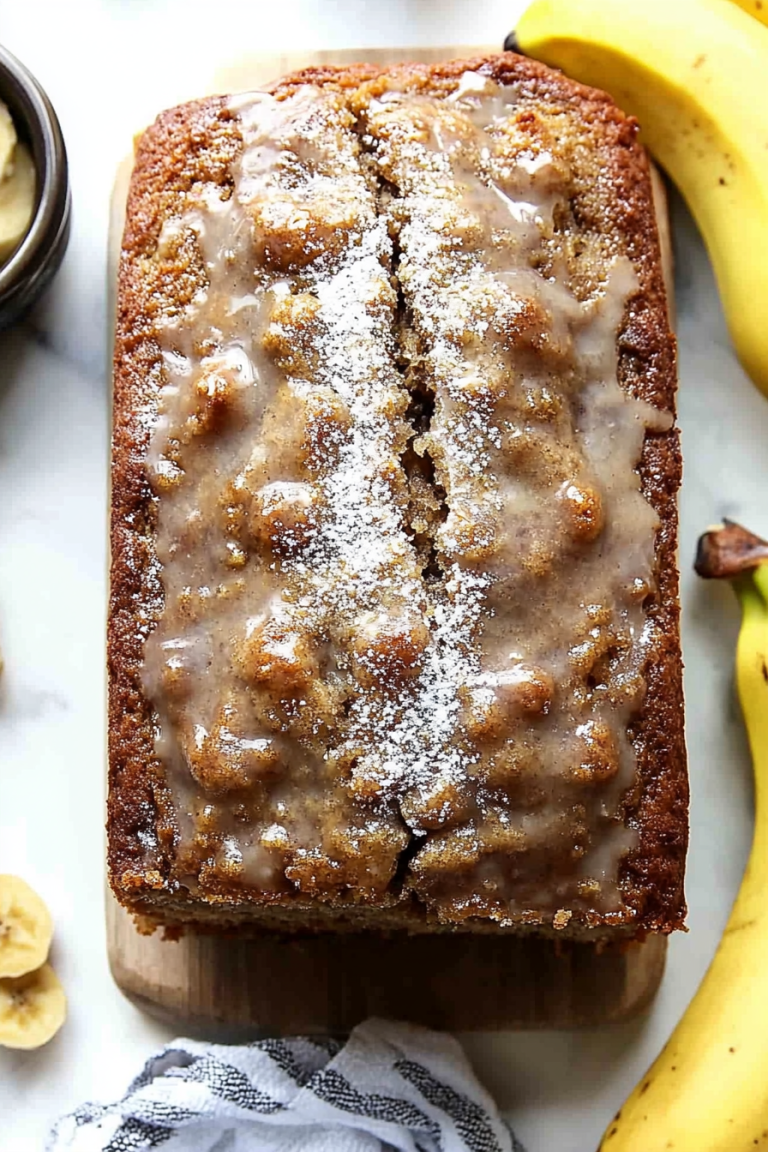
This zucchini walnut loaf is basically a tender, moist bread baked in a loaf pan that’s full of shredded zucchini, toasted walnuts, a hint of cinnamon, and a touch of sweetness. Think of it as a healthier, veggie-enhanced version of a classic quick bread—perfect for breakfast, snack time, or dessert. The name might sound fancy, but it’s super straightforward to make. The zucchini keeps the loaf incredibly moist without making it heavy, and the walnuts add a lovely crunch that makes each bite satisfying. It’s essentially like a cake, but in loaf form—and here’s the best part: it’s not overly sweet. The balance of flavors makes it a crowd-pleaser, and the leftovers are almost better the next day when everything has melded together. Think of it as a little slice of comfort you can bake on a whim and feel good about feeding your family.
Why you’ll love this recipe?
What I love most about this zucchini walnut loaf is how it hits the spot without feeling indulgent. The flavor? Oh, it’s just perfect—warm cinnamon and a hint of nutty aroma from the walnuts greet you every time you open the oven door. Plus, it’s incredibly simple to whip up, even on busy mornings or last-minute gatherings. I’ve made this countless times and it never fails—I often hide the last few slices just to keep some when I need a little pick-me-up. The best part? It’s budget-friendly, using basic ingredients like flour, sugar, eggs, and a zucchini or two from the garden. It’s also versatile—feel free to add chocolate chips, dried cranberries, or swap walnuts for pecans. Honestly, the neutral, cozy flavor makes it work for breakfast with a smear of butter, a tea-time treat, or a wholesome after-school snack. And if you’re watching calories or trying to eat healthier, you can swap out some of the sugar for honey or maple syrup, and it still turns out divine.
How do you make Zucchini Walnut Loaf?
Quick Overview
This zucchini walnut loaf comes together quickly—no fancy gadgets required—just a mixing bowl, a whisk, and a loaf pan. You start by shredding your zucchini, which I always do using a box grater—it’s soothing and quick. Then, mix the dry ingredients separately—flour, baking powder, cinnamon, salt—so everything’s evenly distributed. You beat the eggs, sugars, and oil in a second bowl, then fold everything together gently. The shredded zucchini and chopped walnuts go in last, giving the batter that lovely speckled appearance. Pour it into your prepared loaf pan, and bake until it’s golden brown and a toothpick comes out clean. While it’s cooling, I love to whip up a quick glaze or just sprinkle a little powdered sugar on top. It’s honestly one of those recipes that feels like a warm hug—so simple but genuinely satisfying.
Ingredients
For the Main Batter:
– 2 cups all-purpose flour (I prefer unbleached for flavor and texture)
– 1 teaspoon baking powder
– 1/2 teaspoon baking soda
– 1 teaspoon ground cinnamon
– 1/2 teaspoon salt
– 1/2 cup sugar (adjust depending on your sweetness preference)
– 1/4 cup light brown sugar (for a richer, molasses note)
– 1/2 cup vegetable oil (or applesauce for healthier swap)
– 3 large eggs
– 1 teaspoon vanilla extract
– 1 1/2 cups shredded zucchini (about 1 large zucchini)
– 1 cup chopped walnuts (toasted for extra flavor)
For the Filling (Optional):
– 1/2 cup mini chocolate chips or dried cranberries (swap according to mood!)
For the Glaze (Optional):
– 1/2 cup powdered sugar
– 1-2 teaspoons milk or lemon juice
– A pinch of cinnamon or vanilla for extra flavor
Step-by-Step Instructions
Step 1: Preheat & Prep Pan
Preheat your oven to 350°F (175°C). Grease a standard loaf pan with butter or non-stick spray, then line it with parchment paper for easy removal. This is the kind of step I always forget, but trust me, it’s worth it—nothing worse than your loaf sticking and ruining the beautiful top. Set aside while you prepare your batter.
Step 2: Mix Dry Ingredients
In a large mixing bowl, whisk together the flour, baking powder, baking soda, cinnamon, salt, and sugars. I like doing this first because it ensures all the leavening agents are evenly dispersed—and that pre-work saves you from having clumps later. The dry ingredients should look evenly combined, with no pockets of flour hiding in the corners.
Step 3: Mix Wet Ingredients
In a separate bowl, beat the eggs with vanilla, oil, and if you’re using it, the milk or lemon juice. I usually do this with a whisk to make sure everything’s well combined. The oil should be emulsified into the mixture nicely. I’ve tested using almond milk, and it actually made the loaf even creamier, which was a happy surprise! Be sure not to overmix here—just enough to combine.
Step 4: Combine
Pour the wet into the dry ingredients and fold gently—think of it as folding in your favorite secret ingredient. Overmixing can make the bread dense, so take your time. A few streaks of flour are fine; just stop when everything’s incorporated. The batter will be thick, but that’s what makes it so moist.
Step 5: Prepare Filling
If you’re adding extras like chocolate chips or cranberries, gently fold them into the batter now. This is where you can get creative—sometimes I toss in some shredded coconut or even a handful of chopped dried apricots. Just remember, the aim is to keep it from getting too heavy or soggy.
Step 6: Layer & Swirl
Pour about half of the batter into the prepared loaf pan. If you’re adding some filling, spread it evenly over, then add the rest of the batter on top. I love to swirl a knife or a skewer through the batter for a marbled effect—this makes the loaf look beautiful when sliced and adds a little surprise flavor in every bite.
Step 7: Bake
Bake for about 50–60 minutes, or until the top is golden and a toothpick inserted into the center comes out clean. Oven times can vary, so start checking around the 50-minute mark. If the top browns too quickly, tent it with foil and keep baking until your toothpick test comes out perfect.
Step 8: Cool & Glaze
Let the loaf cool in the pan for about 10 minutes, then transfer it to a wire rack to cool completely. This step is crucial because the bread continues to set as it cools. Once cooled, if you’re using a glaze, mix powdered sugar with just enough milk or lemon juice to make a drizzle-friendly consistency. Pour it over the loaf and let it set for a few minutes—it’s the finishing touch that makes it feel a little fancy.
Step 9: Slice & Serve
Use a serrated bread knife for clean slices—my secret is to let it sit at room temperature for 15 minutes before slicing if it’s been in the fridge. Serve it warm with a pat of butter or a dab of cream cheese. Honestly, it’s delicious even plain. I love making a big batch on Sunday and then enjoying it through the week for breakfast or snacks — it keeps well wrapped in foil or stored in an airtight container.
What to Serve It With
For breakfast, I love it with a hot cup of coffee or tea. If I’m feeling fancy, a smear of cream cheese or honey melts perfectly across the warm slices. On weekends, my kids prefer theirs toasted with a little butter—and maybe a drizzle of syrup. For brunch, I pair it with fresh fruit and Greek yogurt for a balanced, satisfying meal that’s not too heavy. It’s also lovely as a dessert—cut into thicker slices and topped with a scoop of vanilla ice cream or a dollop of whipped cream. When I want something more casual, I keep slices in the freezer, then toast them straight from frozen for a quick snack. Honestly, this loaf has become my kitchen staple—it’s what I reach for when I want something quick, nourishing, and satisfying. Plus, the smell alone brings everyone to the kitchen. I swear, it’s a little piece of home in every slice.
Top Tips for Perfecting Your Zucchini Walnut Loaf
Over the years, I’ve picked up a few tricks that make a big difference:
- Zucchini Prep: Grate the zucchini and then squeeze out excess moisture with a clean kitchen towel or paper towels. Moisture is your enemy here—it can make your loaf soggy and dense. I always do this step even if I’m in a rush because it’s the secret to that perfect moist crumb.
- Mixing Advice: When combining wet and dry, mix just until incorporated. Overmixing is a common mistake—trust me, I’ve learned the hard way that it’ll turn your loaf dense and flat. Be gentle and fold, fold, fold!
- Swirl Customization: For a pretty marbled effect, add dollops of batter and swirl with a skewer or knife vertically—this adds both visual charm and a flavor surprise.
- Ingredient Swaps: Swap walnuts for pecans or almonds, experiment with coconut flakes, or add dried fruits. Just keep the total mix-ins to about 1 cup so it stays fluffy and moist.
- Baking Tips: Bottom rack tends to bake more evenly. If your loaf browns too quickly on top, tent it with foil around the 40-minute mark. The toothpick test is your best friend—insert, remove, and see if the batter still clings.
- Glaze Variations: Add lemon zest, vanilla, or a sprinkle of cinnamon to your glaze for extra flair. I tested using maple syrup instead of milk, and it added a subtle caramel note that I loved.
Honestly, I’ve made this loaf countless times, tweaking a little here and there, and I think I finally nailed the perfect balance. It’s forgiving, intuitive, and always makes my kitchen smell wonderful.
Storing and Reheating Tips
This loaf stays fresh for about 2-3 days at room temperature, wrapped tightly with foil or stored in an airtight container. If I know I won’t finish it in that time, I pop it into the fridge—just be sure to wrap it well so it doesn’t dry out. To keep it longer, I freeze individual slices for up to 3 months; just wrap each slice tightly in plastic wrap and seal in a freezer bag. When I want to enjoy it, I thaw at room temperature or toast straight from frozen for quick snacks. Honestly, the flavor holds up beautifully even after freezing, and you get that warm, toasty smell every time you microwave a slice. The glaze is best added just before serving unless you want to keep it pretty and fresh-looking, in which case, add it right before slicing. Trust me, these little storage tips help preserve the deliciousness—plus, they make breakfast or snack prep super easy.
Frequently Asked Questions
Final Thoughts
If you’re looking for a cozy, veggie-packed treat that’s simple to make and endlessly adaptable, this zucchini walnut loaf is your new best friend. Over the years, I’ve made this at least a hundred times—sometimes with added chocolate chips, sometimes with dried fruit, and always with a grin on my face. It’s one of those recipes that makes the house smell like home, and honestly, I think it’s the perfect antidote to a busy day or a rainy afternoon. I hope it brings a little comfort to your kitchen, just as it did to mine. Dive in, get your hands a little floury, and enjoy every bite. I’d love to hear how yours turns out—leave a comment or share your tweaks. Happy baking, my friend!

toffee chocolate cheeseballs
Ingredients
Method
- In a large mixing bowl, beat cream cheese and butter until fluffy, about 3 minutes. Add both sugars and beat until completely blended. Stir in morsels and toffee bits.
- Wrap mixture in a large piece of plastic wrap and refrigerate for 1-2 hours. If desired, lay on serving tray and shape into a heart, then cover with sprinkles!