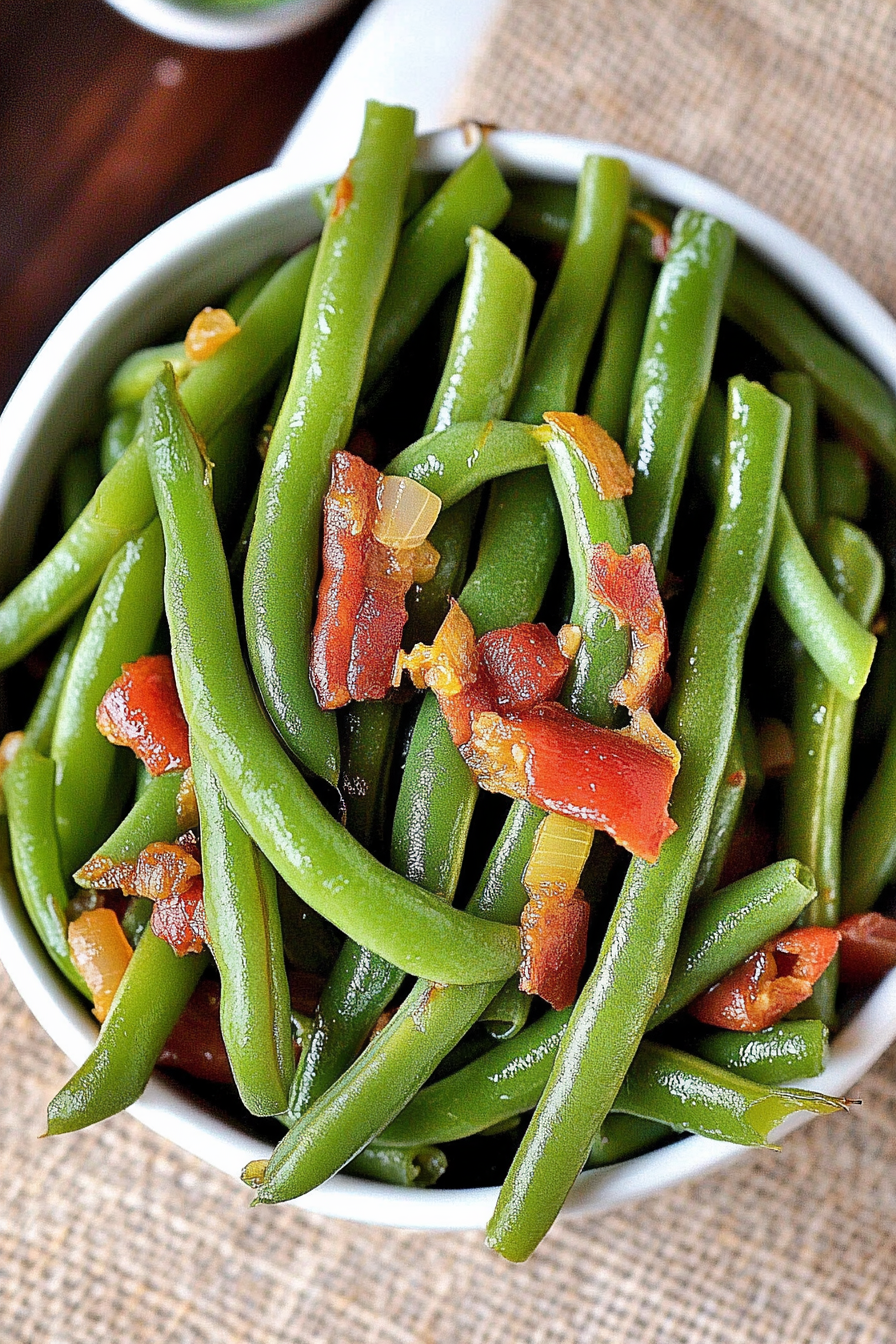
Easy Vintage Green Bean Recipe
There’s something about the smell of this zucchini coffee cake baking that takes me right back to lazy Sunday mornings at my grandma’s house. She always had a batch ready when I arrived, the warm, spicy aroma filling the entire kitchen, making it impossible to resist sneaking a piece before breakfast. Over the years, I’ve made this recipe countless times, tweaking it here and there but keeping the soul of that tender, moist cakey goodness. It’s one of those recipes that feels like a warm hug—perfect for breakfast, brunch, or whenever you need a bit of comfort. And honestly, what’s better than baking with zucchini? It’s sneaky healthy, keeps the cake moist as can be, and gives it that wonderful, subtle veggie sweetness. This recipe’s a lifesaver on busy nights when I crave something sweet but don’t want to fuss too much. My kids ask for this all the time, especially when I sprinkle a little extra cinnamon on top. Trust me—once you try it, it’ll become a family favorite for years to come!
What is Zucchini Coffee Cake?
This zucchini coffee cake is essentially a tender, slightly dense cake with a delightful swirl of cream cheese throughout. Think of it as a cross between a classic coffee cake and a quick bread, but with the added bonus of hidden zucchinis that melt into every bite. The name might sound fancy, but it’s really just a cozy, homey treat that’s easy to whip up any morning or afternoon. It’s called “coffee cake” because it’s perfect alongside a hot cup of coffee or tea, but honestly, it’s so good you’ll want to grab a slice anytime—no need for a special occasion. What makes this cake special is that perfect balance of sweetness, moisture, and a hint of spice, thanks to cinnamon and vanilla. The swirl of cream cheese makes each bite extra luscious, adding a richness that just makes this more than your average quick bread.
Why you’ll love this recipe?
First off, the flavor—oh my goodness, the cinnamon and vanilla combined with the sweet zucchini create a flavor profile that’s comforting yet fresh. I’ve made dozens of batches, and what I love most about this is how incredibly moist it stays, even a couple of days later. The zucchini acts like a natural moisturizer, so you get this melt-in-your-mouth texture every time. It’s also super budget-friendly—most of us have those zucchinis hiding in the fridge, waiting to be used up. Plus, the ingredients are simple, wholesome, and often things I already have on hand. This cake is really versatile, too; you can switch up the cream cheese swirl for lemon zest or add chopped nuts on top for some crunch. It’s a wonderful way to sneak in some veggies without anyone noticing, and it always disappears in minutes at my house. It’s one of those recipes I genuinely look forward to making—kind of like catching up with an old friend.
How do I make Zucchini Coffee Cake?
Quick Overview
This cake comes together quickly—mix your dry ingredients, whisk your wet ingredients, combine gently, then layer everything with the cream cheese swirl. The beauty is in the simple steps: no fancy equipment needed. Once baked, it’s all about patience—let it cool a bit so the swirl sets nicely, then drizzle with a simple glaze or dust with powdered sugar. It’s forgiving, adaptable, and practically foolproof if you follow the tips. Trust me, once you get the hang of it, you’ll have a go-to treat that’s perfect for breakfast or whenever sweet craving strikes!
Ingredients
For the Main Batter:
– 2 cups all-purpose flour (I like unbleached for a richer flavor)
– 1 cup granulated sugar (feel free to reduce slightly if you want it less sweet)
– 1 teaspoon baking powder
– ½ teaspoon baking soda
– ½ teaspoon salt
– 1 teaspoon ground cinnamon (the aroma is so cozy!)
– ½ teaspoon ground nutmeg (optional, adds a lovely warmth)
– 1 cup grated zucchini (squeeze out the excess moisture, don’t skip this!)
– ½ cup vegetable oil or melted butter
– 2 large eggs
– 1 teaspoon vanilla extract
For the Filling:
– 8 oz cream cheese, softened
– ¼ cup powdered sugar
– 1 teaspoon vanilla extract
– Optional: zest of ½ lemon for extra brightness
For the Glaze:
– ½ cup powdered sugar
– 1-2 tablespoons milk or cream
– A splash of vanilla or lemon juice for flavor
Step-by-Step Instructions
Step 1: Preheat & Prep Pan
Start by setting your oven to 350°F (175°C). Grease a 9-inch square pan or line it with parchment paper—this makes it so much easier to remove the cake without crumbling. I always do this first thing so I don’t forget—and trust me, a non-stick baking spray with a light flour dusting is my best friend here.
Step 2: Mix Dry Ingredients
In a large bowl, whisk together the flour, sugar, baking powder, baking soda, salt, cinnamon, and nutmeg. Mixing the dry ingredients well ensures everything is evenly distributed, so your cake rises perfectly and has balanced flavor in every bite.
Step 3: Mix Wet Ingredients
In a separate bowl, beat the eggs, then add the oil and vanilla. Stir until combined. I like to use a fork or whisk—it’s quick and effective. If you’re using almond milk or another substitute, adding a splash here won’t hurt, and I sometimes do that for a little extra creaminess.
Step 4: Combine
Gently fold the wet ingredients into the dry ones just until you see no more streaks of flour. Do not overmix; otherwise, the cake might turn a bit dense, which is not the vibe we’re going for. Stir in the grated zucchini last, making sure it’s evenly distributed without overworking the batter.
Step 5: Prepare Filling
For the cream cheese swirl, mix softened cream cheese with powdered sugar, vanilla, and lemon zest if using. Whip it until smooth—this is what makes the cake feel so indulgent and special. If I want to switch things up, I sometimes add a spoonful of lemon curd or dulce de leche for a different kind of sweet twist.
Step 6: Layer & Swirl
Pour half of the batter into your prepared pan. Drop dollops of the cream cheese mixture on top, then cover with the remaining batter. Using a butter knife or toothpick, swirl gently to create a marbled effect—just enough to get beautiful ribbons without mixing everything into one color.
Step 7: Bake
Slide it into the oven and bake for 40-45 minutes. The top should be golden, and a toothpick inserted in the center should come out clean or with just a few moist crumbs. I’ve learned that ovens vary, so start checking around the 40-minute mark—every oven has its quirks.
Step 8: Cool & Glaze
Let the cake cool in the pan for about 15 minutes, then transfer to a wire rack. While it cools, whisk together your glaze ingredients. Drizzle it over the slightly warm cake—it seeps in a little, giving each bite that lovely sweet shine. Patience here is key; letting it cool fully before slicing prevents messy crumbs.
Step 9: Slice & Serve
Cut with a serrated knife, wiping it clean between slices for neat cuts. Serve warm or at room temperature—personally, I love it slightly warmed, with a cup of coffee or tea. A dusting of powdered sugar or a little extra glaze makes it festive for brunch guests, but honestly, it’s just as amazing plain.
What to Serve It With
This zucchini coffee cake’s a true chameleon, so I’ve got a few ideas. For breakfast or brunch, serve a slice with a dollop of Greek yogurt and fresh berries—such a simple, bright combo that kids and adults love alike. My family often enjoys it with a hot cup of strong coffee or a glass of cold milk, especially on weekend mornings. If I want to elevate things for a special brunch, I’ll add a side of scrambled eggs or some crispy bacon. When dessert calls, I top it with whipped cream or a scoop of vanilla ice cream for extra indulgence. And let’s not forget, it’s perfect for cozy late-night snacking, especially when warmed up—your house will smell heavenly, and everyone’s going to ask for seconds!
Top Tips for Perfecting Your Zucchini Coffee Cake
Even after making this so many times, I’m always learning little tricks to make it even better. First, always squeeze out as much moisture from the zucchini as possible—moisture is the enemy of perfect cake texture. I like to grate it, then lay it on a clean kitchen towel and give it a good squeeze; it makes a big difference. When mixing the batter, fold gently to keep it light, especially if you’re adding mix-ins like nuts or chocolate chips. Speaking of swirl patterns, think of yourself as creating a landscape—zigzag, circular, whatever feels fun and looks pretty. I tested swapping oil for applesauce, and it made it a tad denser, so I’d say stay with oil or melted butter for that tender crumb. You can also experiment with different spices—cardamom or ginger are lovely additions. For baking, always check around the 40-minute mark—your cake should be fragrant and golden on top. As for the glaze, I like it thick enough to coat but not so runny it drips off—add more powdered sugar if needed. I learned to bake this on the middle rack for even heat, and that little extra step of cooling helps the swirl set perfectly without smudging. Trust me, patience pays off!
Storing and Reheating Tips
This cake stays moist and delicious for days—if it lasts that long! Store leftovers tightly wrapped in plastic wrap or in an airtight container at room temperature for up to two days. For longer storage, pop it in the fridge; it’ll keep well for about 4 days, just make sure to let it come to room temp or warm it slightly before slicing. Want to keep it even longer? Wrap whole slices or the entire cake in plastic and freeze for up to 3 months. Thaw at room temperature or give it a quick warm-up in the microwave—just a few seconds until it’s cozy again. I always add the glaze right before serving because it can soften or slide off if stored with it on. If you prefer a less-sweet cake, reduce the sugar slightly or skip the glaze altogether. When reheating, I like to cover the slice with a damp paper towel and warm it in the microwave for about 15-20 seconds—it’s like fresh from the oven all over again.
Frequently Asked Questions
Final Thoughts
If you’re looking for a cozy, reliably delicious treat that hides a secret ingredient—zucchini—then give this coffee cake a try. The moist crumb paired with the luscious cream cheese swirl makes every slice feel special, even if it’s just for a weekday breakfast. I love how adaptable it is; you can tweak the spices, add nuts or chocolate, or keep it simple. It’s a recipe I’ve been making for years, and each time I do, I feel a little nostalgic, remembering all the loved ones I’ve shared it with. Whether you serve it warm with a cup of coffee or let it cool to enjoy later, I promise it’ll become a go-to in your baking rotation. Happy baking! And I can’t wait to hear how yours turns out—leave a comment or share your twists! That’s what makes baking so fun, right?

green beans
Ingredients
Method
- Cut the bacon into small pieces and cook over medium heat in a heavy saucepan until fully rendered.
- Do not remove bacon grease; it adds flavor.
- Add diced onions and cook with bacon until transparent.
- Add green beans and season with pepper, stir to coat with bacon drippings.
- Pour in chicken broth and reduce heat to low.
- Cover and cook for 30 minutes, stirring occasionally. Ensure there is enough liquid.
- Check seasoning, add salt and pepper if needed.
- Serve hot and enjoy!