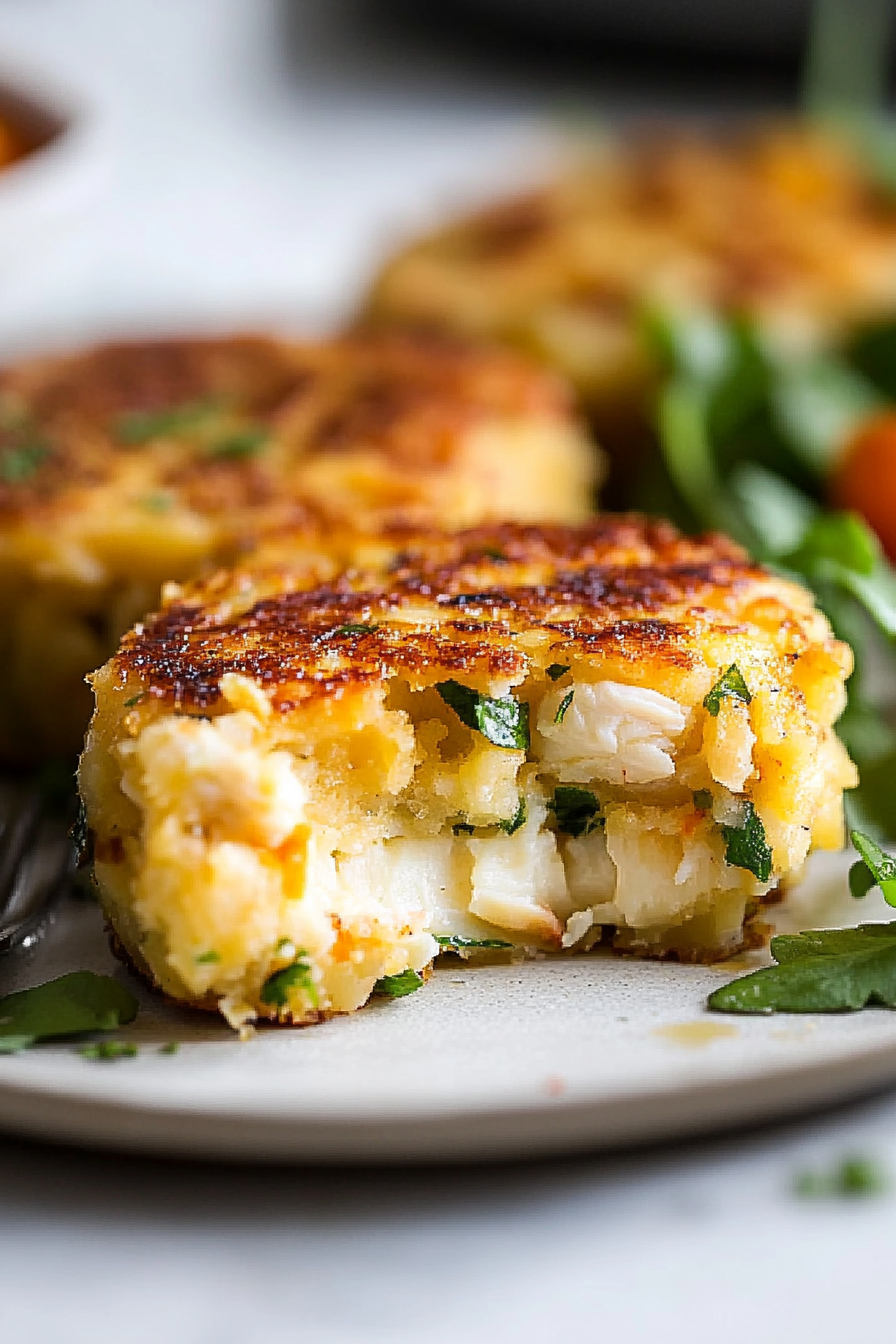
Easy Baked Crab Cakes with Red Pepper
There’s something so cozy about biting into warm banana bread, isn’t there? The smell alone can turn a bad day around. But you know what’s even better? When you add zucchini into the mix. I remember the first time I made zucchini banana bread — my kids looked at me like I’d whipped up a magic trick. “What’s in this?” they asked, eyes wide with curiosity. Turns out, it’s just my little secret ingredient to keep it moist and sneaky healthy. I’ve made this countless times, and I swear, it never fails to disappear in minutes at my house. It’s perfect when you’re craving something sweet at 10 pm but don’t want to bake a whole cake — trust me, this one’s a lifesaver on busy nights. Plus, the flavor? Rich, banana-y, with hints of cinnamon, and a tiny bit of zucchini’s earthiness that’s just enough to keep it interesting. I always do this when I want a little homemade comfort—hope you love it just as much as we do!
What is Zucchini Banana Bread?
Think of it as a cozy hybrid of your favorite banana bread with a sneaky veggie twist. It’s essentially a moist, tender loaf bursting with ripe banana sweetness, complemented by the subtle, almost creamy texture of grated zucchini. The name comes straight from the main ingredients — zucchini and bananas — which come together in a humble loaf that feels like a warm hug. It’s friendly, approachable, and a little smart — because zucchini, with its mild flavor and moisture-boosting properties, makes this bread extra tender without adding any fuss. This isn’t one of those fancy, over-the-top confections. Nope, it’s a simple, honest bread you can make on a Sunday morning or when you need a quick breakfast or snack. Think of it as a little bit indulgent, little bit healthy, and all-around irresistible.
Why you’ll love this recipe?
What I love most about this zucchini banana bread is how adaptable it is. You can tweak it in so many ways—add some nuts, toss in blueberries, or swap out the sugar for honey. It’s also a real quick fix: few ingredients, most of which you already have in your pantry. That’s why this one’s a lifesaver on busy nights! The aroma that fills your kitchen when it’s baking is nothing short of perfection; everyone suddenly needs a snack, and I swear, the kids come running from the other room—“Is it ready yet?” The flavor? Oh, it’s just right. Rich, banana-y, with a hint of warmth from cinnamon and the gentle earthiness of zucchini. What I love most about this is how moist and tender it stays, thanks to that zucchini hiding inside. Plus, it’s ridiculously cost-effective — simple ingredients, no fancy fuss. It’s basically my go-to when I want comfort and a little health boost all at once. And trust me, once you make it, you’ll be hooked—you’ll want to keep a loaf on hand all the time! I’ve tested this with almond milk, and honestly, it made it even creamier. The best part? My kids ask for this all the time, and honestly, I don’t mind sneaking extra veg into their snacks.
How do you make Zucchini Banana Bread?
Quick Overview
This zucchini banana bread is honestly so easy that I almost feel guilty calling it a recipe. You just mash ripe bananas, grate zucchini, whip up a simple batter, and layer in some flavorings. The secret is not overmixing — which keeps the loaf super tender — and baking just until it’s golden and a skewer comes out clean. The whole process from start to finish takes about an hour, with minimal fuss. What makes this method special is how forgiving it is—you really can customize it with nuts or chocolate chips, and it still turns out delicious. Plus, it’s the kind of baking that fills your home with that wonderful, warm smell that instantly makes you feel at home.
Ingredients
For the Main Batter:
- 3 ripe bananas, mashed—trust me, the more spots the better for flavor—and I always do this right before baking.
- 1 ½ cups grated zucchini—about 1 medium zucchini, grated fine and drained slightly if it’s super watery.
- 2 large eggs—preferably room temperature for better incorporation.
- ½ cup vegetable oil or melted coconut oil—whatever you’ve got in the pantry, really. I tested with almond milk, but the oil makes it richer.
- 1 ¾ cups all-purpose flour—gluten or gluten-free, your call, just make sure to measure accurately.
- ¾ cup granulated sugar—feel free to reduce lightly if you prefer less sweetness.
- 1 teaspoon baking soda
- 1 teaspoon baking powder
- ½ teaspoon salt
- 1 teaspoon cinnamon—because it pairs beautifully with bananas and zucchini.
For the Filling:
- Optional chocolate chips or chopped nuts—sprinkled on top or mixed in, it’s a game changer.
For the Glaze:
- ½ cup powdered sugar
- 1-2 teaspoons milk or lemon juice—adjust for your preferred consistency
- Optional: a dash of vanilla or citrus zest for extra flavor
Step-by-Step Instructions
Step 1: Preheat & Prep Pan
Set your oven to 350°F (175°C). Grease your loaf pan with butter or non-stick spray and line it with parchment paper if you like. This step guarantees your bread won’t stick and makes cleanup a breeze.
Step 2: Mix Dry Ingredients
In a bowl, whisk together the flour, baking soda, baking powder, salt, and cinnamon. This ensures all those leavening agents are evenly distributed and your loaf rises perfectly.
Step 3: Mix Wet Ingredients
In a large bowl, mash the bananas really well — I do this with a fork until smooth. Add the eggs, oil, and vanilla, and stir until combined. The mixture should look slightly frothy, and that banana scent? Pure heaven.
Step 4: Combine
Gradually add the dry ingredients to the wet, stirring gently. My biggest tip here: don’t overmix. Just fold until you don’t see streaks of flour. Overmixed batter can turn dense, and nobody wants that.
Step 5: Prepare Filling
If you’re adding chocolate chips or nuts, fold them into the batter now. I usually do this last, so they stay evenly dispersed. You can also sprinkle some on top before baking for a pretty presentation.
Step 6: Layer & Swirl
Pour about half the batter into your pan, then add a layer of the filling — more bananas, or maybe a spoonful of nut butter. Top with remaining batter and swirl it gently with a knife. This creates little beautiful marbling effect when baked.
Step 7: Bake
Pop it into the oven for about 50-55 minutes. Every oven is different—start checking around 50 minutes! Use a toothpick inserted into the center; if it comes out clean, it’s done.
Step 8: Cool & Glaze
Let the bread cool in the pan for about 15 minutes, then transfer to a wire rack. Mix your glaze ingredients while it cools, and drizzle on top once the loaf isn’t hot anymore. It’s the perfect sweet finish.
Step 9: Slice & Serve
Once fully cooled, slice with a serrated knife for clean edges. Serve slightly warmed or at room temperature, with a pat of butter or a dollop of cream if you’re feeling fancy. My kids actually ask for seconds—preferably still warm! It also makes a beautiful breakfast toast or afternoon snack. Honestly, I keep this loaf on hand like a treasure — it’s that good.
What to Serve It With
This zucchini banana bread is so versatile that it works any time of day. For a cozy breakfast, pair it with your favorite coffee or tea — I love a strong black coffee with a slice toasted lightly with butter. It’s also fantastic as part of a brunch spread — maybe add some fresh fruit and yogurt on the side for contrast. My family loves it after dinner alongside a scoop of vanilla ice cream or a drizzle of caramel sauce for that ultimate indulgence. And, on lazy weekends, I sometimes just have a slice with peanut butter for a quick, satisfying snack. Honestly, my kids ask for this all the time, and I don’t blame them. It’s grown-up enough to serve to guests but simple enough that my kids can help me make it. It’s just one of those recipes that feels like a warm hug right out of the oven.
Top Tips for Perfecting Your Zucchini Banana Bread
After making this dozens of times, I’ve learned a few tricks to make it even better:
- Zucchini Prep: Always squeeze out excess moisture after grating — a clean kitchen towel works wonders. This prevents sogginess. Also, try grating it finely; chunky bits can throw off the texture.
- Mixing Advice: Overmixing can really make the bread dense. Fold gently, just until ingredients are combined. It’s worth the patience.
- Swirl Customization: When layering, don’t just pour the batter—try swirling with a toothpick or skewer to create pretty marbled effects. It’s a small detail that makes the loaf look store-bought but tastes homemade.
- Ingredient Swaps: I’ve used maple syrup instead of sugar, and it worked beautifully — just adjust the liquid content slightly. Also, nut flour can be a fun experiment if you want a gluten-free version; just remember it can change the texture.
- Baking Tips: Always check with a toothpick or skewer—don’t rely solely on the timer. Ovens vary, and you don’t want a dry loaf. Also, placing the pan on the middle rack ensures even baking.
- Glaze Variations: Experiment with lemon zest or vanilla extract in the glaze. It adds a fresh twist and elevates the look if you’re serving this for company.
After years of tweaking, I’ve found that using ripe bananas and squeezing out the zucchini moisture are game changers. A tip I learned the hard way? Don’t skip the cooling time; it sets the structure so slices don’t crumble. Also, I tested making mini-loaves for gifts—I cut the baking time down by about 10 minutes, so don’t be shy about adjusting.
Storing and Reheating Tips
This bread is best eaten within 2-3 days at room temperature, stored in an airtight container or wrapped tightly in plastic wrap. The smell alone will make your kitchen smell like a bakery. If you want to keep it longer, pop it in the fridge — it will stay fresh for about a week, but I recommend bringing it to room temp or giving it a quick warm-up in the microwave before slicing. For freezing, wrap the loaf tightly with plastic wrap, then foil, and store it in the freezer for up to 3 months. It’s perfect for quick breakfasts—you can thaw slices overnight or microwave directly from frozen. I do this often when I need a quick snack for the kids. Just remember, if you’re adding glaze, it’s best to glaze just before serving to keep it looking shiny and fresh.
Frequently Asked Questions
Final Thoughts
This zucchini banana bread has really become a staple in my kitchen. It’s one of those recipes that feels like a little gift—moist, flavorful, and adaptable enough to suit any occasion. I love how the zucchini keeps it tender and adds a subtle earthiness that balances out the sweetness of bananas. Plus, it’s a great way to sneak some greens into the kids’ snacks without any fuss. Whether you’re baking it for breakfast, a casual coffee date, or just because the house smells amazing, I promise it won’t disappoint. I encourage you to experiment—add nuts, switch up the flavorings, or make mini versions. Every time I think I’ve perfected it, I find a new tweak that makes it even better. I’d love to hear how yours turns out! Drop a comment or share your variations below. Happy baking—and enjoy every warm, delicious slice!

crab cakes
Ingredients
Method
- In a small blender, puree mayonnaise, lime juice, roasted peppers, and chipotle.
- In a large bowl, combine crushed crackers, eggs, scallions, red bell pepper, mayonnaise, cilantro, lime juice, salt, and pepper.
- Fold in crab meat carefully, ensuring large chunks remain intact.
- Shape mixture into 4 patties using a 1/2 cup measuring cup. Chill for at least 30 minutes.
- Preheat oven to 400°F and line a baking sheet with cooking spray.
- Bake crab cakes for 8-10 minutes per side until golden brown.
- Drizzle with red pepper chipotle lime sauce before serving.