Easy Baked Zucchini Sticks Recipe
There’s something about baking with zucchini that takes me back. Maybe it’s the memories of helping my grandma in her cozy kitchen, the smell of warm cocoa filling the air, or just the fact that zucchini – yes, that humble veggie! – can transform into the most luscious, moist, and downright addictive treat. I always do this when I want something comforting but still a little sneaky—because trust me, nobody notices the zucchini hidden inside this chocolate swirl loaf until their fork hits that perfect, fudgy layer. It’s basically a family secret I can’t keep to myself anymore! This one’s a lifesaver on busy nights or when you’re craving something sweet but don’t want to go all-out baking a cake. Plus, it’s kinda healthy, right? Well, healthy-ish! I tested this with almond milk and it actually made it even creamier, and honestly, I think I prefer it that way now. My kids ask for this all the time—seriously, I’ve caught them sneaking slices for breakfast—and I think you’re going to love it as much as we do!
What is Zucchini Chocolate Swirl Loaf?
Think of it as a chocolate lover’s sneaky secret—moist, tender, and packed with hidden greens! This zucchini chocolate swirl loaf is basically a soft, sweet bread that combines the subtle flavor and moisture of shredded zucchini with rich cocoa swirls that make it look almost too pretty to cut. It’s kind of like a cross between a quick bread and a cake, but without the fuss. The “swirl” part comes from marbling the dark, chocolatey batter with a lighter, zucchini-infused portion—so every bite has a little bit of everything. The name might sound fancy, but I promise, this is totally doable even if you’re new to baking. Think of it as a cozy weekend project or a sneaky snack for when you want to indulge without feeling too guilty. I’ve made this countless times, tweaking the amount of cocoa and experimenting with add-ins, but one thing’s for sure—this loaf always disappears in minutes at my house!
Why you’ll love this recipe?
What I love most about this zucchini chocolate swirl loaf is how it hits all the right notes—moist, rich, with a touch of wholesome. The flavor profile is heavenly: the dark cocoa gives it a deep, chocolatey essence that’s perfectly balanced by the light, fresh note of zucchini. It’s surprisingly simple to make, too. With just a handful of pantry staples—flour, sugar, cocoa, pantry spices—you’re pretty much set. This recipe is also budget-friendly because zucchini is so affordable, especially at the height of summer when I always have a bunch sitting around. Also, it’s super versatile! You can swap in dark chocolate chunks, add a handful of nuts, or even some dried berries if you’re feeling adventurous. The best part? It’s a wonderful way to sneak some veggies into dessert for the kids—without a single complaint! And honestly, I enjoy the process as much as eating it. The swirl step is such a fun art project, and watching the batter turn marbled is so satisfying. This loaf isn’t just a treat; it’s almost like a hug in bread form. Trust me, once you bake this, it becomes an instant family favorite—you’ll be making it over and over!
How do you make Zucchini Chocolate Swirl Loaf?
Quick Overview
This recipe is surprisingly fuss-free. First, grate the zucchini and squeeze out excess moisture—trust me, that makes the loaf super tender. Then, whisk together your dry ingredients like flour, cocoa powder, baking soda, and salt. In a separate bowl, mix your wet ingredients, including oil, eggs, and vanilla, plus the grated zucchini. Combine the two just until they come together—no overmixing or you’ll get a dense loaf. Divide the batter in half, stir cocoa into one part to make the rich chocolate swirl, then gently layer and marble the two batters in your loaf pan. Pop it in the oven, bake until a skewer comes out clean, cool a bit, and glaze if you like. Honestly, it’s so straightforward, it’s one of those recipes I turn to when I need a quick, impressive-looking treat that’s almost guaranteed to be a crowd-pleaser.
Ingredients
For the Main Batter:
– 2 cups all-purpose flour (I like unbleached for flavor)
– ½ cup unsweetened cocoa powder (use Dutch-processed for richer color)
– 1 teaspoon baking soda
– ¼ teaspoon salt
– ¾ cup granulated sugar (or a mix of honey and sugar for a more complex sweetness)
– ½ cup vegetable or neutral oil (can substitute with melted butter or applesauce)
– 3 large eggs (or flax eggs for vegan version)
– 1 teaspoon vanilla extract
– 1 cup finely grated zucchini (squeezed dry—don’t skip this!)
For the Filling:
– ¼ cup unsweetened cocoa powder
– 2 tablespoons sugar (or coconut sugar if you want a deeper flavor)
– 2 tablespoons milk (or almond milk for dairy-free)
– 1 tablespoon melted butter or coconut oil (optional, for richness)
For the Glaze:
– ½ cup powdered sugar
– 1-2 teaspoons milk or lemon juice
– A sprinkle of grated zucchini or chocolate shavings for garnish (if you’re feeling fancy)
Step-by-Step Instructions
Step 1: Preheat & Prep Pan
Set your oven to 350°F (175°C). Grease your loaf pan well—either with butter or non-stick spray—and line with parchment paper if you like. This keeps things tidy, especially when you’re dealing with a sticky batter. While that warms up, grate the zucchini on the fine side of your box grater. Then, squeeze out as much moisture as you can using a clean dish towel or cheesecloth. Moisture is the enemy here—less water, more luscious bread! Trust me, I’ve made this mistake before, and a soggy batter makes for a dense loaf. So, squeeze out those zucchinis good!
Step 2: Mix Dry Ingredients
In a large bowl, whisk together the flour, cocoa powder, baking soda, salt, and sugar. Mixing everything evenly helps the baking process go smoothly and keeps clumps from forming. It’s a simple step but makes all the difference in the texture of your loaf.
Step 3: Mix Wet Ingredients
In a separate bowl, combine the oil, eggs, and vanilla. Whisk until smooth, then stir in the grated zucchini. If you’re using almond milk instead of regular milk, go ahead and add it here — I tested this with almond milk and it made the loaf even creamier, which was a happy accident. Keep it gentle, though—you don’t want to deflate that egg foam too much.
Step 4: Combine
Pour the wet mixture into the dry ingredients, folding gently until just combined. Don’t overmix! A few lumps are okay. Overmixing develops gluten and can lead to a tougher bread, which is exactly what we want to avoid. You’ll notice the batter is thick but pourable—perfect for swirling!
Step 5: Prepare Filling
In a small bowl, mix the cocoa powder, sugar, milk, and melted butter—adjust the consistency with a bit more milk if it’s too thick. This will be your rich chocolate swirl layer. You can add a handful of chocolate chips here if you want extra indulgence. It’s all about creating that marbled effect that makes this loaf so pretty and tempting.
Step 6: Layer & Swirl
Pour half of the plain batter into your loaf pan. Spread it out evenly. Dollop half of the chocolate filling on top, then swirl with a knife or skewer—be gentle, you want that nice marbled pattern. Repeat with remaining batter and filling. The swirling step is my favorite part; it’s like creating art with batter. Don’t overdo it—you want pretty streaks, not a muddy mess!
Step 7: Bake
Pop it into your preheated oven and bake for about 50-60 minutes. Start checking around 50 minutes with a skewer—insert in the center, and if it comes out clean, it’s ready. I sometimes tent mine with foil if the top is browning too fast. Every oven differs, so don’t be surprised if yours takes a little longer or shorter. Patience is key here.
Step 8: Cool & Glaze
Once out of the oven, let it cool in the pan for 15 minutes, then transfer to a wire rack. This waiting part is the hardest—I always want to cut into it hot, but the texture is so much better after a proper cool-down. Mix your powdered sugar and milk until smooth, then drizzle over the slightly warm loaf. I love adding a sprinkle of grated zucchini or chocolate shavings on top—they look pretty and add a little extra flair.
Step 9: Slice & Serve
Use a serrated bread knife for neat slices—patience pays off here. Serve slices at room temperature or slightly warmed. A mug of coffee or a glass of cold milk just completes the picture. I’ve been known to sneak a slice at midnight when I’m craving something sweet—that’s when I really appreciate how moist and rich this loaf is. The swirl pattern shows up beautifully each time, and the first bite always makes me smile. If you want to be fancy, serve it with a dollop of whipped cream or a dusting of cocoa powder. Honestly, it’s fantastic as-is—trust me on this one. Happy baking!
What to Serve It With
This zucchini chocolate swirl loaf is versatile enough to be a breakfast treat, a cozy afternoon snack, or a crowd-pleasing dessert. For breakfast, slice it thick and toast it lightly—top with a smear of butter or almond butter, and a drizzle of honey. The warm, fudgy center pairs perfectly with a strong cup of coffee or tea. I often serve slices alongside fresh berries or with a dollop of Greek yogurt for a little tang that balances the richness. When I make this for brunch, I like to dust the top with powdered sugar and add a side of scrambled eggs and crispy bacon—it’s a hit with everyone!
As a dessert, this loaf shines on its own but also works beautifully with a scoop of vanilla ice cream or a drizzle of caramel. My kids love putting whipped cream and sprinkles on top for a fun twist—really, it’s all about making it your own. For casual snack times, I wrap slices in parchment and take them on the go. It stays moist for a couple of days, though honestly, it’s usually gone sooner. I’ve even had friends ask for the recipe—once they see how simple and forgiving it is, they’re hooked. Trust me, this loaf becomes one of those recipes you keep on repeat because it’s just too good to pass up!
Top Tips for Perfecting Your Zucchini Chocolate Swirl Loaf
Over the years, I’ve learned a few tricks to make this recipe even better. First, always squeeze out excess moisture from the zucchini—that little step makes a huge difference. I’ve tested grate-and-squeeze methods with both a clean dish towel and cheesecloth, and the drier, the better.
When mixing, fold gently—overmixing is my biggest rookie mistake. I used to get dense loaves until I learned that light, gentle folding keeps the batter tender and airy. For the swirl, I love using a toothpick or skewer to create beautiful, uneven streaks—smooth, uniform swirls look pretty, but I think imperfect patterns look charming and rustic.
If you want to switch things up, try adding a handful of chopped walnuts or even dried cherries into the batter before layering. I’ve also experimented with using dark chocolate chunks instead of cocoa filling, which makes it extra gooey. Baking time can vary depending on your oven—my tip is to start checking around the 50-minute mark and look for a skewer that comes out clean. You’ll want a light browning on top, but not burned—every oven is different.
Finally, I’ve found that glazing the loaf while it’s still warm gives it that shiny, luscious finish. You can swap the powdered sugar glaze for a simple chocolate ganache, or sprinkle a pinch of sea salt on top for a sweet-salty combo. A little practice, patience, and love—and you’ve got the perfect loaf every time. Oh, and don’t forget—keep a few slices aside for yourself. You deserve it!
Storing and Reheating Tips
This loaf is best enjoyed within a day or two, but it keeps well if stored properly. At room temperature, wrap it tightly in plastic wrap or store in an airtight container—it’ll stay fresh for about 2 days. If you want to keep it a bit longer, refrigerate for up to 4 days. Just be sure to wrap it well so it doesn’t dry out—trust me, refrigeration can sometimes make baked goods a bit tougher if not sealed properly.
For longer storage, pop the loaf in the freezer—wrapped tightly with aluminum foil and then placed in a zip-top bag. It’ll hold up for about 2 months. When you’re ready to enjoy, thaw it overnight in the fridge or at room temperature. Reheat slices in the microwave for about 15-20 seconds, or gently warm the whole loaf in a low oven (around 300°F or 150°C) until warmed through. The microwave can sometimes soften the glaze, so if you want that shiny finish, just add a fresh drizzle of glaze after reheating.
If you’ve glazed the loaf, I recommend adding the glaze after reheating to keep the shiny look and fresh flavor. The smell alone during reheating is worth the wait—the chocolate and zucchini aroma always draws everyone into the kitchen. This loaf is one of those recipes that rewards patience and care. Once you get the hang of storing and reheating, it’s like having a little piece of heaven ready whenever you fancy it!
Frequently Asked Questions
Final Thoughts
Honestly, this zucchini chocolate swirl loaf has become my go-to when I want something warm and comforting. It’s a little bit indulgent, a little bit sneaky, and completely irresistible. Every time I bake it, I’m reminded that simple ingredients—like zucchini and cocoa—can come together to create something truly special. Plus, it’s proof that you don’t need fancy equipment or complicated steps to make a show-stopping treat. Just a handful of pantry staples, a little patience, and a whole lot of love. I love how the swirl pattern makes each slice look like a work of art, and my family? They’re in heaven every single time. Whether for a quick breakfast or a weekend dessert, this loaf always hits the spot. So, go ahead—grab that zucchini from the fridge, and let’s get baking. I can’t wait to hear how yours turns out! Happy baking!
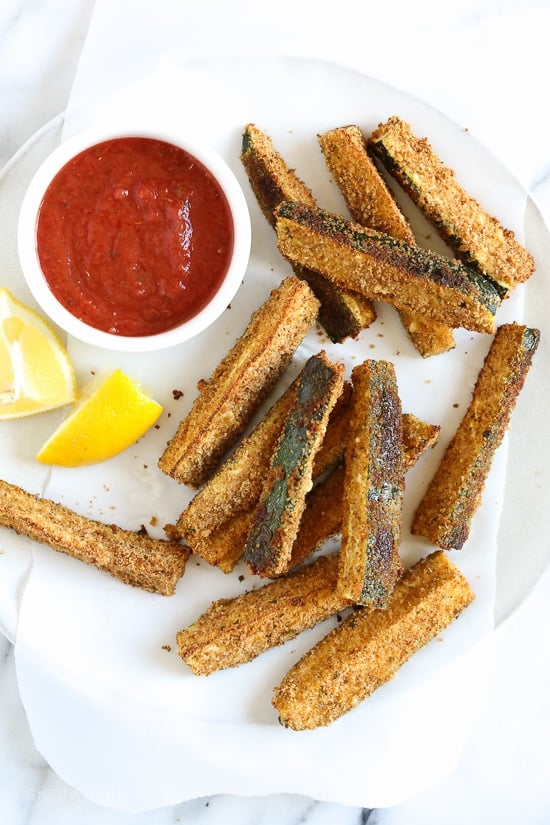
zucchini sticks
Ingredients
Method
- Preheat the oven to 425°F. Spray baking sheets with cooking spray.
- Cut each zucchini into 16 sticks, about 3 inches long and 1/2 inch thick.
- In a bowl, beat egg whites and season with salt and pepper. Mix breadcrumbs, cheese, and garlic powder in a shallow dish.
- Dip zucchini sticks into beaten egg whites, then coat with breadcrumb mixture.
- Arrange coated zucchini on prepared baking sheets. Spray with cooking spray and bake for 22-25 minutes until golden.