Spicy Chicken Dip Recipe: How to Make It!
Oh, you guys. I’m so excited to share this recipe with you. This isn’t just any zucchini bread; it’s *the* zucchini bread. The one that makes my house smell like pure comfort, the one my kids beg for when they get home from school, and the one that disappears from the counter in record time. Seriously, I’ve made this so many times that I can almost do it with my eyes closed. It’s the perfect balance of sweet, moist, and utterly delicious, and the best part? You’d never guess it’s packed with hidden veggies. If you’ve ever found zucchini bread to be dry or bland, this recipe is going to change your mind completely. Think of it as a warm hug in every bite, way better than that dry, crumbly stuff you might have tried before. This is the real deal, folks.
What is Zucchini bread?
So, what exactly *is* zucchini bread? At its heart, it’s a quick bread, which means no yeast, no rising, just simple mixing and baking. The “zucchini” part comes from shredded zucchini, which is the secret weapon that makes this bread unbelievably moist and tender. It sounds a little wild, right? Adding a vegetable to a sweet treat? But trust me, you don’t taste the zucchini at all. It just lends its moisture and a lovely soft texture. The name “zucchini bread” is pretty straightforward, and honestly, it’s a genius invention. It’s essentially a delicious cake masquerading as bread, perfect for breakfast, a snack, or even dessert. It’s the kind of recipe that’s super forgiving and always turns out wonderfully, which is why I turn to it so often.
Why you’ll love this recipe?
There are so many reasons why this zucchini bread has earned a permanent spot in my recipe binder, and I know you’ll fall in love with it too. First off, the FLAVOR is just out of this world. It’s perfectly spiced with cinnamon and a hint of nutmeg, with a sweetness that’s just right – not too overwhelming. Each bite is incredibly moist and tender, thanks to that secret ingredient, zucchini. And speaking of moist, this recipe is a lifesaver for anyone who’s ever made a dry loaf! What I absolutely adore about this is its SIMPLICITY. You can have it mixed up and in the oven in about 15 minutes flat. No fancy techniques, no complicated steps, just pure, easy baking. This makes it a total lifesaver on busy weeknights when everyone’s suddenly craving something sweet. Plus, it’s surprisingly COST-EFFECTIVE. Zucchini is usually pretty affordable, especially when it’s in season, and the other ingredients are pantry staples. You don’t need anything exotic or expensive to make this loaf shine. And don’t even get me started on its VERSATILITY! Beyond just eating it plain, you can stir in chocolate chips, nuts, or even a swirl of cream cheese. It’s delicious on its own, but it also pairs beautifully with a cup of coffee or tea, making it perfect for breakfast, brunch, or a cozy afternoon treat. It’s also quite similar to a banana bread in terms of texture and ease, but with a subtly different, delightful flavor profile. Honestly, it’s the perfect way to use up those extra zucchini from the garden!
How do you make Zucchini bread?
Quick Overview
This recipe is all about ease and deliciousness. We’re talking about simply mixing wet and dry ingredients together, folding in that magical shredded zucchini, maybe adding some chocolate chips if you’re feeling decadent, and then baking it to golden perfection. The whole process from start to finish, including a quick cleanup, is remarkably quick, making it ideal for any day of the week. It’s designed to be fuss-free, so even if you’re new to baking, you’ll nail this one. The result is a loaf that’s incredibly tender and moist, with a flavor that will have everyone asking for the recipe.
Ingredients
For the Main Batter:
Here’s what you’ll need to get started. I always like to use fresh, firm zucchini for this – the smaller ones tend to have fewer seeds and a better texture. You’ll need about 2 cups of finely shredded zucchini, loosely packed. I usually use a box grater on the fine side. And for the flour, all-purpose is perfect, about 2 cups. If you’re feeling adventurous, I’ve also tested this with a gluten-free blend, and it worked beautifully – just make sure it’s a 1:1 substitute! For leavening, we’ll use baking soda and baking powder, a teaspoon of each. Don’t forget the salt, about half a teaspoon, to balance out the sweetness. And for that warm, comforting flavor, ground cinnamon is a must, 1 to 2 teaspoons depending on how much you love that spiced aroma. I also like to add a pinch of nutmeg, but it’s totally optional.
For the Filling:
This is where you can get a little creative, but the classic is pure simplicity. We’ll need about 3/4 cup of granulated sugar and 1/2 cup of packed light brown sugar for sweetness and that lovely moist texture. Then, we’ll use 2 large eggs, lightly beaten, to bind everything together. And for that incredibly tender crumb, 1/2 cup of vegetable oil or melted unsalted butter. If you use butter, it adds a little extra richness, but oil makes it super moist. I’ve even used melted coconut oil in a pinch, and it was delicious! And the star moisture-giver: 1 teaspoon of vanilla extract. You can also add in about 1 cup of your favorite add-ins like chocolate chips, chopped walnuts or pecans, or even dried cranberries. I personally love a mix of chocolate chips and walnuts!
For the Glaze:
This is optional but highly recommended! It adds an extra touch of sweetness and beauty. You’ll need about 1 cup of powdered sugar. For the liquid, I usually use 2-3 tablespoons of milk (any kind works – I’ve used dairy, almond, and oat milk, and they all give a slightly different creamy texture). You can also use lemon juice for a tangier glaze, or even some orange juice for a citrusy kick. A tiny splash of vanilla extract in the glaze is also lovely!
Step-by-Step Instructions
Step 1: Preheat & Prep Pan
First things first, preheat your oven to 350 degrees Fahrenheit (175 degrees Celsius). It’s super important to get the oven to the right temperature before your batter goes in so it bakes evenly. Grab a standard 9×5 inch loaf pan. I like to grease it really well with butter or cooking spray, and then lightly dust it with flour. Or, for extra insurance against sticking, I’ll line it with parchment paper, leaving some overhang on the sides. This makes lifting the finished loaf out a breeze. Make sure you get into all the corners!
Step 2: Mix Dry Ingredients
In a large bowl, whisk together the all-purpose flour, baking soda, baking powder, salt, cinnamon, and nutmeg (if you’re using it). Give it a good whisk until everything is evenly combined. This step ensures that your leavening agents and spices are distributed perfectly throughout the batter, so you don’t get any weird salty or flat spots. I always do this first to make sure I don’t forget any of the dry bits.
Step 3: Mix Wet Ingredients
In a separate medium bowl, whisk together the granulated sugar and brown sugar. Then, add the lightly beaten eggs, vegetable oil (or melted butter), and vanilla extract. Whisk until everything is well combined and the mixture looks smooth. You want to make sure the sugar is mostly dissolved here.
Step 4: Combine
Now for the magic! Pour the wet ingredients into the bowl with the dry ingredients. Gently fold them together with a spatula until *just* combined. Don’t overmix this! A few streaks of flour are okay; they’ll disappear as you add the zucchini. Overmixing develops the gluten too much, which can make your bread tough. Trust me, I’ve made that mistake before, and the texture just wasn’t the same.
Step 5: Prepare Filling
Gently fold in your shredded zucchini and any add-ins like chocolate chips or nuts. Stir until they’re just evenly distributed. Be careful not to stir too vigorously here either. You want to incorporate everything without overworking the batter.
Step 6: Layer & Swirl
Spoon the batter evenly into your prepared loaf pan. If you’re adding a swirl (like cream cheese or a cinnamon-sugar mixture), now’s the time to do it! I usually just dollop the filling on top and then swirl it in gently with a knife or skewer. You want those beautiful ribbons of flavor throughout the bread.
Step 7: Bake
Pop the loaf pan into your preheated oven. Bake for about 50-65 minutes. The exact time will depend on your oven, so keep an eye on it. You’ll know it’s done when a wooden skewer or toothpick inserted into the center comes out clean, with maybe a few moist crumbs attached (but no wet batter). If the top starts to brown too quickly, you can loosely tent it with aluminum foil.
Step 8: Cool & Glaze
Once it’s baked, let the loaf cool in the pan for about 10-15 minutes. This allows it to set up a bit. Then, carefully invert it onto a wire rack to cool completely. I know it’s tempting to dig in immediately, but letting it cool makes it easier to slice and prevents it from falling apart. Once it’s completely cool, whisk together the powdered sugar, milk (or your liquid of choice), and vanilla until smooth. Drizzle or spread this glaze over the top. Let the glaze set for a bit before slicing.
Step 9: Slice & Serve
Once the glaze has set (or if you skipped the glaze!), slice the bread using a serrated knife for clean cuts. Serve it warm or at room temperature. It’s absolutely delicious on its own, but it’s also wonderful with a smear of butter or cream cheese.
What to Serve It With
This zucchini bread is so versatile, it fits into almost any meal or occasion! For a simple and satisfying BREAKFAST, I love to have a thick slice with a piping hot cup of coffee. It’s hearty enough to keep you going, and the sweetness is just perfect to wake up your taste buds. Presentation-wise, a dusting of powdered sugar can make it feel a little more special, or just a simple, rustic slice on a plate is divine. If you’re planning a BRUNCH, this bread is a definite crowd-pleaser. You can serve it alongside other breakfast staples like scrambled eggs, bacon, or fresh fruit salad. A more elegant presentation could involve arranging slices on a tiered stand or adding a dollop of whipped cream or a drizzle of honey. For an afternoon pick-me-up, it’s the ultimate COZY SNACK. It pairs wonderfully with a mug of tea or a glass of cold milk. It’s that perfect something sweet when you’re craving it but don’t want anything too heavy. As a DESSERT, it’s surprisingly sophisticated. Serve a warm slice with a scoop of vanilla bean ice cream or a dollop of crème fraîche. The warm bread with cold ice cream is pure bliss! My family also loves it when I cut it into little squares and serve them as a sweet treat after dinner, almost like a brownie.
Top Tips for Perfecting Your Zucchini Bread
Over the years, I’ve learned a few tricks that help make this zucchini bread absolutely perfect every single time. Here are my top tips:
Zucchini Prep: The most crucial step is to shred your zucchini finely and then give it a good squeeze to remove excess moisture. You can do this by placing the shredded zucchini in a fine-mesh sieve and pressing down with a spoon, or even better, wrap it in a clean kitchen towel or cheesecloth and wring out as much liquid as possible. This is key to preventing a soggy loaf and ensuring a tender crumb. If your zucchini is very watery, the bread might turn out gummy. Also, if you’re using larger zucchini, you might want to scoop out the seeds before shredding.
Mixing Advice: Remember that gentle folding is your friend. As I mentioned, overmixing the batter will result in a tough, dense loaf. Mix only until the dry ingredients are *just* incorporated into the wet. A few tiny streaks of flour are perfectly fine. The batter should be thick but pourable. I learned this the hard way after one too many tough loaves in my early baking days!
Swirl Customization: If you want to add a swirl, don’t overdo it. A few gentle swirls with a knife or skewer are enough to create beautiful patterns without making the bread dense or unevenly cooked. For a cinnamon-sugar swirl, mix about 2 tablespoons of sugar with 1 teaspoon of cinnamon and sprinkle it over the batter before swirling. For a cream cheese swirl, whip softened cream cheese with a little sugar and a splash of vanilla, then dollop and swirl.
Ingredient Swaps: I’ve already mentioned using gluten-free flour, which works great. For the oil, melted butter adds a lovely richness, but if you use it, make sure it’s not too hot when you add it to the eggs. You can also use unsweetened applesauce as a partial fat substitute for a slightly healthier twist, but I find the texture is best with oil or butter. For the spices, feel free to adjust them to your liking. A bit of ginger or cloves can add another layer of warmth.
Baking Tips: Always use the middle rack of your oven for the most even heat distribution. If you notice the top is browning too quickly before the center is cooked, loosely tent the loaf with aluminum foil. A good test for doneness is to gently press the top of the loaf; it should spring back slightly. And don’t be afraid to let it bake a few minutes longer if needed – a slightly longer bake is better than an undercooked center!
Glaze Variations: If you’re not a fan of sweet glazes, you can simply dust the cooled loaf with powdered sugar or even enjoy it plain! For a tangier flavor, use lemon juice or orange juice instead of milk in the glaze. You can also add a touch of almond extract for a different flavor profile.
Storing and Reheating Tips
Proper storage is key to keeping this zucchini bread wonderfully moist and delicious. If you’re lucky enough to have any leftovers, here’s how to keep them fresh.
Room Temperature: Once completely cooled, you can store the zucchini bread at room temperature, well-wrapped in plastic wrap or an airtight container, for about 2-3 days. It’s best to avoid this for too long, though, as it will start to dry out slightly. I usually find it’s gone by then anyway!
Refrigerator Storage: For longer storage, place the cooled loaf in an airtight container or wrap it tightly in plastic wrap and then foil. It will keep well in the refrigerator for up to a week. The moisture from the zucchini helps it stay relatively soft, even when chilled. When you’re ready to eat a slice, you can enjoy it cold, or warm it up gently.
Freezer Instructions: This bread freezes beautifully! Once completely cooled and if you’re not glazing it, wrap the loaf tightly in plastic wrap, then in aluminum foil, or place it in a freezer-safe bag. It can be frozen for up to 3 months. To thaw, unwrap it and let it sit at room temperature for a few hours, or thaw it in the refrigerator overnight. You can also slice it before freezing; this makes it super easy to just grab a single slice to thaw.
Glaze Timing Advice: If you’ve glazed your bread, it’s best to store it at room temperature for 1-2 days or in the refrigerator for up to 4-5 days, as the glaze can become sticky in humid conditions or if stored too long at room temp. If freezing, I highly recommend glazing *after* thawing for the best texture and appearance. You can re-glaze slices after they’ve thawed if needed.
Frequently Asked Questions
Final Thoughts
There you have it, my absolute favorite zucchini bread recipe! It’s more than just a recipe to me; it’s a little bit of sunshine and comfort that I love sharing. It’s proof that you can create something incredibly delicious and satisfying with simple ingredients, and sneak in some goodness at the same time. The moist texture, the warm spices, and that perfect hint of sweetness – it’s just a truly wonderful treat that never disappoints. If you’re a fan of quick breads, you might also enjoy my [Link to another popular recipe, e.g., ‘Cranberry Orange Quick Bread’] – it’s got a similar ease and delightful flavor profile. I truly hope you give this zucchini bread a try. I can’t wait to hear how it turns out for you and what your favorite additions are! Happy baking, friends!
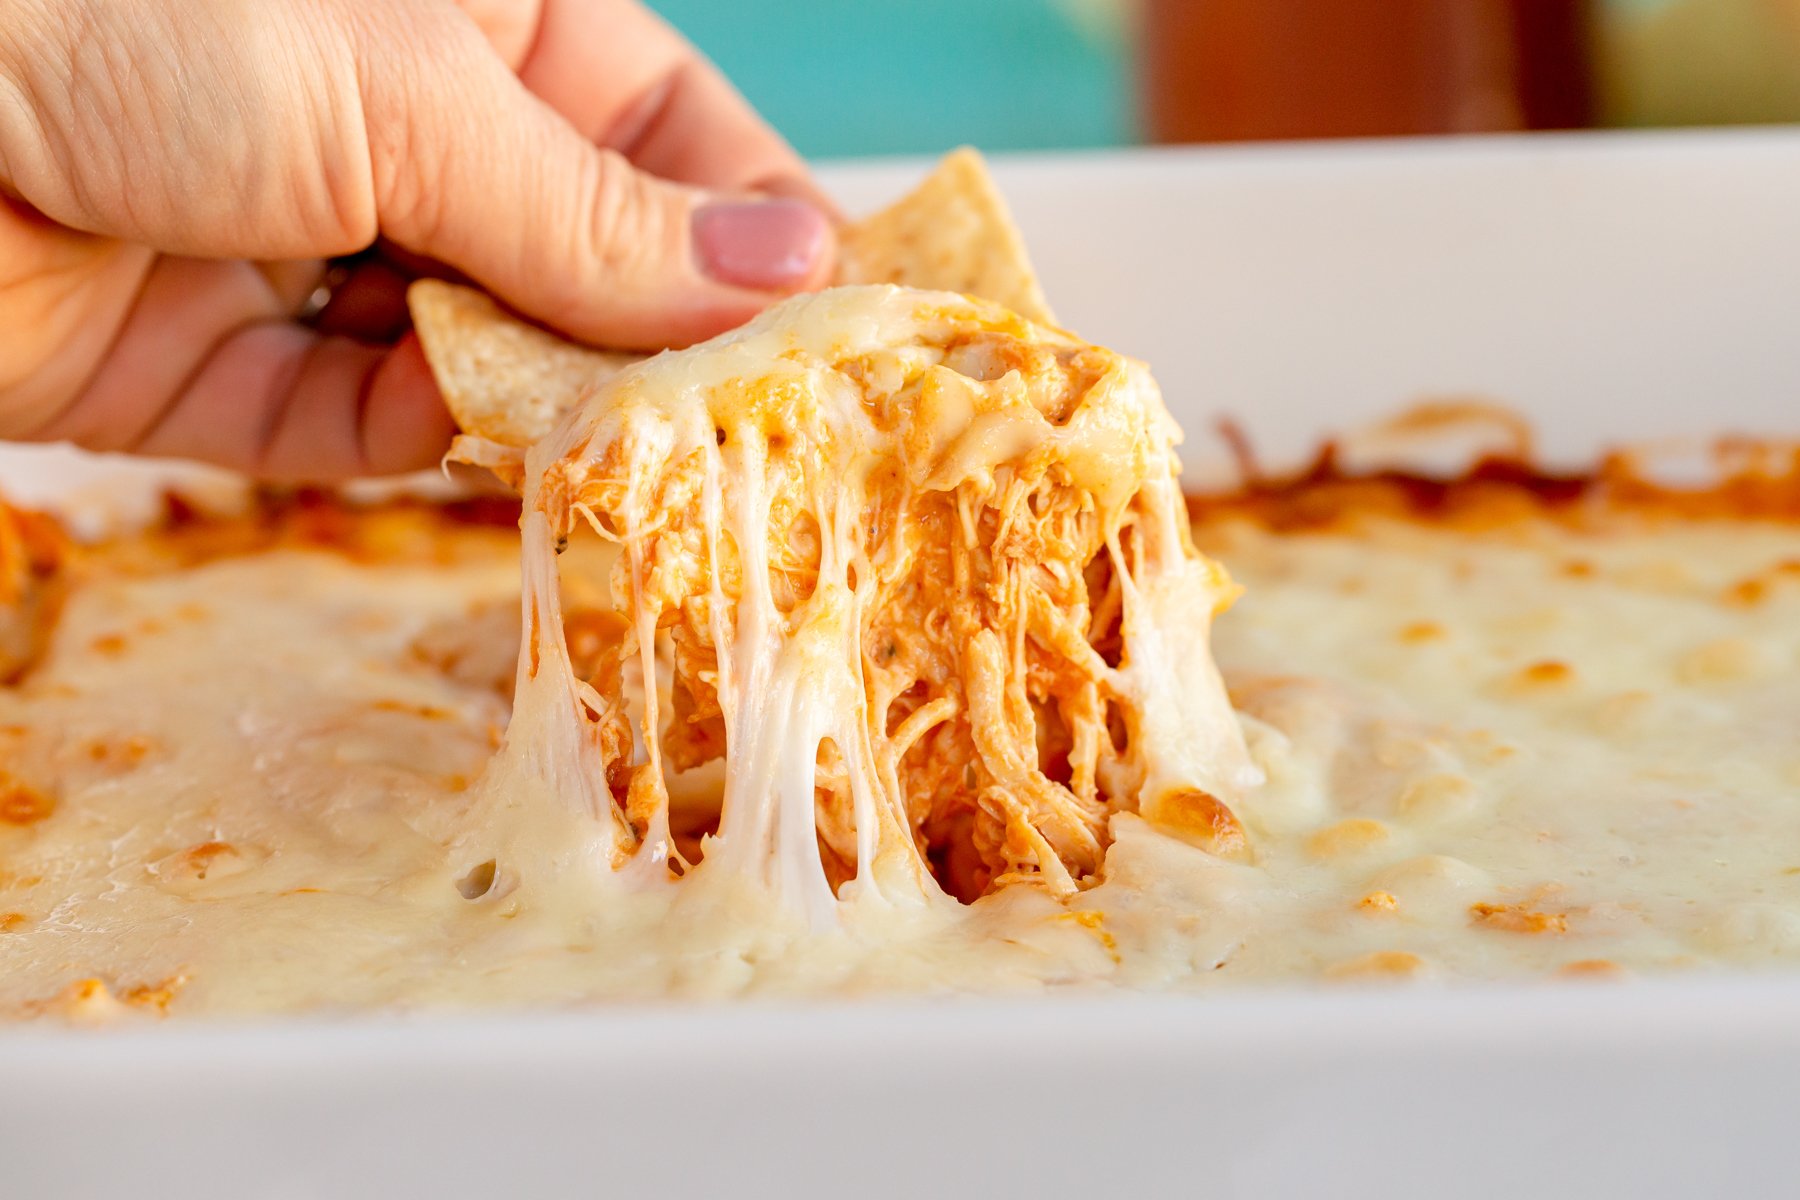
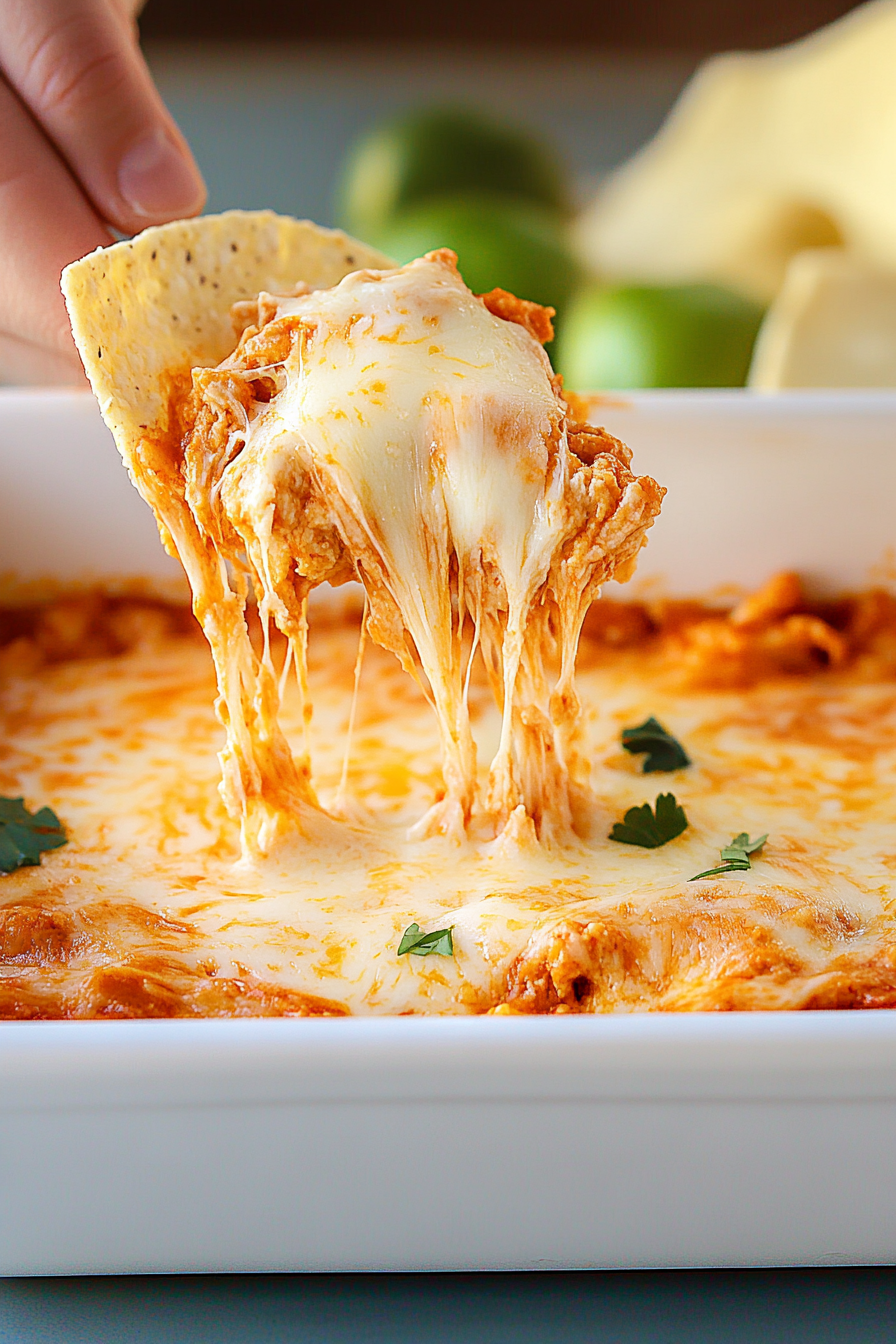
buffalo chicken dip
Ingredients
Method
- Preheat oven to 350 degrees F (175 C).
- Combine shredded chicken and buffalo sauce in a large plastic bag. Mix until all chicken is coated with buffalo sauce.
- Spread cream cheese evenly on the bottom of a 9x13 inch baking dish.
- Add the buffalo chicken in a single layer on top of the cream cheese.
- Pour ranch dressing on top of the buffalo chicken, do not mix in.
- Top the chicken and ranch layers with shredded mozzarella cheese.
- Bake at 350 degrees F (175 C) for 15-20 minutes or until the cheese is melted and bubbly.
- Serve warm with chips, bread, crackers, and fresh vegetables like celery and carrots.