Easy Mediterranean Bean Salad Recipe
There’s something magic about this time of year—whether it’s the fall crunch underfoot or the smell of cinnamon wafting through the house—that always makes me crave cozy comfort food. And let me tell you, nothing hits that spot quite like a slice of homemade chocolate zucchini bread. I’ve been making this recipe for years; it’s like a secret little hug in every bite. My kids ask for it all the time, especially when those blistering summer zucchinis turn into a baking adventure that’s honestly surprisingly easy and so, so worth it. I always do this when I want something sweet but also kinda healthy—because zucchini keeps it moist and light, and the chocolate makes me feel like I’m sneaking dessert before dinner. Trust me on this one, it disappears faster than I can say “more, please!”—and it’s absolutely perfect when you’re craving something decadent at 10 pm but don’t want to bake a whole cake. This recipe? It’s a keeper.
What is chocolate Zucchini bread?
Think of it as a cozy, slightly indulgent loaf that’s secretly got a veggie twist. It’s essentially a moist, dense bread made with grated zucchini, cocoa powder, and a handful of simple ingredients that you probably already have tucked away in your pantry. The name says it all: chocolate, zucchini, bread. The zucchini pretty much disappears after baking, leaving behind this tender crumb that’s loaded with deep cocoa flavor and tiny melting chocolate chips—kind of like a brownie’s best friend. The best part? It’s not just tasty; it’s also sneaky healthy. I love bringing it to picnics, slicing it up for breakfast, or just grabbing a warm piece when the house feels a little too cold and lonely. Over the years, I’ve tweaked this recipe to make it foolproof—no fuss, just pure, chocolatey goodness with a hint of vegetable sneaking in. And honestly, once you try it, it’ll become your go-to comfort snack too.
Why you’ll love this recipe?
What I love most about this zucchini bread is how flexible and forgiving it is—seriously, I’ve made it with less sugar, more chocolate chips, and even tested it with almond milk (which made it even creamier, by the way). The flavor? Oh my gosh, it’s rich and deeply chocolatey, but not overly sweet, so it hits that perfect bittersweet balance. Plus, the moisture level… let’s just say this bread is moist enough to make your hands sticky, but in a good way. The smell alone brings everyone to the kitchen—warm cocoa, toasty zucchini, and that faint vanilla scent—my house smells like a bakery, even if I just pulled it out of the oven. It’s incredibly simple to whip up, even if you’re not much of a baker. Honestly, what I love most is that it’s budget-friendly—just a few pantry staples—and it’s versatile enough for breakfast, snacks, or dessert. It’s truly one of those recipes I keep coming back to, especially when I want a little bit of magic during a busy week.
How do I make Zucchini bread?
Quick Overview
This bread comes together mostly in one bowl, which is a lifesaver on busy nights. You start by grating the zucchini—don’t forget to squeeze out some excess moisture, or your bread might turn out a bit soggy. Then, whip up your wet ingredients—eggs, oil, vanilla—and combine with the dry ingredients, including cocoa powder, flour, and a touch of baking soda. The magic happens when you fold in the shredded zucchini and chocolate chips. After that, it’s simply pouring into a loaf pan and baking until a toothpick comes out clean. The best part? The whole process takes less than an hour, and the smell will fill your home like you’ve just walked into a cozy bakery.
Ingredients
For the Main Batter:
– 2 cups grated zucchini (about 2 medium zucchinis) — washed, grated, and squeezed of excess water
– 1/2 cup vegetable oil (or melted coconut oil if you prefer) — I tested this with almond milk and it actually made it even creamier!
– 1 1/2 cups granulated sugar — or honey if you want a touch more natural sweetness
– 3 large eggs — fresh from the coop or store-bought, whichever you like
– 1 teaspoon vanilla extract — for that warm aroma
– 1 3/4 cups all-purpose flour — I always do this with unbleached flour for a richer flavor
– 1/2 cup cocoa powder — good quality unless you want it extra intense
– 1 teaspoon baking soda
– 1/2 teaspoon salt
– 1 cup semi-sweet chocolate chips — or dark chocolate chunks if you’re feeling luxe
For the Filling (Optional but highly recommended):
– A handful of additional chocolate chips or chopped walnuts can be folded into the batter for extra texture and flavor.
For the Glaze (If You’re Feeling Fancy):
– 1/2 cup powdered sugar
– 2 teaspoons milk
– A dash of vanilla
Mix until smooth—spread on cooled slices for that pretty, glossy finish.
Step-by-Step Instructions
Step 1: Preheat & Prep Pan
Set your oven to 350°F (175°C). Grease a loaf pan with butter or line it with parchment paper—trust me, this makes removal so much easier and prettier. If you want that bakery-style crust, a little sprinkle of flour on the bottom can help prevent sticking.
Step 2: Mix Dry Ingredients
In a large bowl, whisk together your flour, cocoa powder, baking soda, and salt. I always do this first to make sure everything’s evenly distributed—no one wants a surprise pocket of baking soda or flour clump!
Step 3: Mix Wet Ingredients
In a separate bowl, beat the eggs with sugar, vanilla, and oil until they’re nice and combined—this takes a couple of minutes. I usually use a whisk instead of a spoon; it whips a little air into the mixture, making the bread lighter.
Step 4: Combine
Gently fold the wet mixture into the dry ingredients—don’t overmix! Just stir until they’re just combined, a few gentle strokes—and that’s where the magic happens. Overmixing can make the bread dense, and nobody wants a brick. Keep it gentle, and you’ll be golden.
Step 5: Prepare Filling
Stir in the shredded zucchini and chocolate chips into your batter. If you want, fold in some chopped walnuts or pecans for an added crunch—my kids love that extra little surprise.
Step 6: Layer & Swirl
Pour half of the batter into your pan, then sprinkle some more chocolate chips on top. The rest goes over, and if you want to swirl, use a knife or skewer to gently create patterns—this makes it look beautiful when sliced.
Step 7: Bake
Pop it into the oven and bake for about 50-60 minutes. Check for doneness by inserting a toothpick in the center; if it comes out clean, you’re good. Every oven is a bit different—I once had to add 10 extra minutes because my oven runs slightly cold, so trust your nose and toothpick!
Step 8: Cool & Glaze
Let the bread cool in the pan for about 10 minutes, then transfer it to a wire rack. Don’t cut it too early—warm bread can be crumbly. If you’re glazing, do so once it’s cooled a bit; it’ll set beautifully and add a shiny, chocolatey finish.
Step 9: Slice & Serve
The best way? Use a serrated bread knife and go gentle. Serve warm or at room temperature—personally, I think it’s divine when slightly warmed. I like to pair mine with a bit of vanilla ice cream or a cup of coffee for a real treat.
What to Serve It With
This zucchini bread is so versatile, it can shake up any meal. For breakfast, a thick slice with coffee and a smear of butter feels like a little piece of heaven. On brunch tables, I love serving it alongside fruit salads and maybe a dollop of whipped cream—or even as part of a fancy bread basket. As a dessert, it’s super cozy with a drizzle of extra chocolate or a scoop of vanilla ice cream—and I swear, my kids ask for it all the time after dinner. And for a quick snack? Toasted with a little butter or nut butter, this bread totally redeems a lazy afternoon. I’ve shared it with friends, taken to potlucks, and even packaged a few slices as gifts—everyone loves it.
Top Tips for Perfecting Your Chocolate Zucchini Bread
First, always squeeze out the excess moisture from the zucchini—no one wants soggy bread, and your batter should be moist but not wet. It took me a few tries to get that right, but now I just press the shredded zucchini in a clean towel and wring it out like crazy. I’ve learned that overmixing is the enemy—stir just until combined, and you’ll avoid dense, heavy loaves. For swirl perfection, I use a skewer or the back of a spoon to gently drag the batter into pretty marbled patterns. Want to customize? You can swap out half the cocoa for nutella or peanut butter for a different flavor profile. If your oven runs hot or cold, keep an eye on the baking time—don’t be shy about testing for doneness with a toothpick! Also, if your chocolate chips sink or float, try tossing them in a little flour before adding—they cling better then. The glaze? You can add a splash of coffee or vanilla to amp up the richness. I’ve found that slightly underbaking it a tad keeps the center super moist, like a brownie. And trust me, this recipe improves with a day or two—cover and store in an airtight container, and the flavors meld beautifully.
Storing and Reheating Tips
This bread keeps surprisingly well—almost too well, if I’m honest! At room temp, I suggest wrapping it in foil or storing in an airtight container; it stays moist for about 2-3 days. If you’re not planning to eat it sooner, pop slices into the fridge—just make sure it’s in a sealed container or bag to prevent drying out. For longer storage, the freezer is your friend. Wrap tightly in plastic wrap and foil, and it’ll hold for up to 3 months. To reheat, I recommend warming slices gently in the microwave for about 15-20 seconds or toasting them until just golden. The glaze is best added when the bread is fully cooled—if you plan to freeze it, I’d wait until you’re ready to serve to add that shiny, sweet touch. Honestly, this bread tastes just as good toasted the next day, especially topped with a smear of butter or cream cheese. It’s a real life-saver on busy mornings or when unexpected guests drop by—your secret weapon for a warm, homemade treat at any time.
Frequently Asked Questions
Final Thoughts
If you’re anything like me, baking is about more than just making something sweet—it’s about creating moments, memories, and a little bit of joy. This chocolate zucchini bread is exactly that: cozy, forgiving, and incredibly delicious. It’s perfect for when you want a treat that feels luxurious but is actually simple enough to make on a weeknight. I love how the zucchini keeps it moist and tender, and the chocolate is always a crowd-pleaser. Trust me, once you make this once, it’ll become part of your regular rotation. I recommend baking a double batch—you’ll thank yourself later when you’re sneaking a slice in the afternoon. Happy baking! And don’t forget to leave a comment or share your own variations—I’d love to hear how yours turns out!
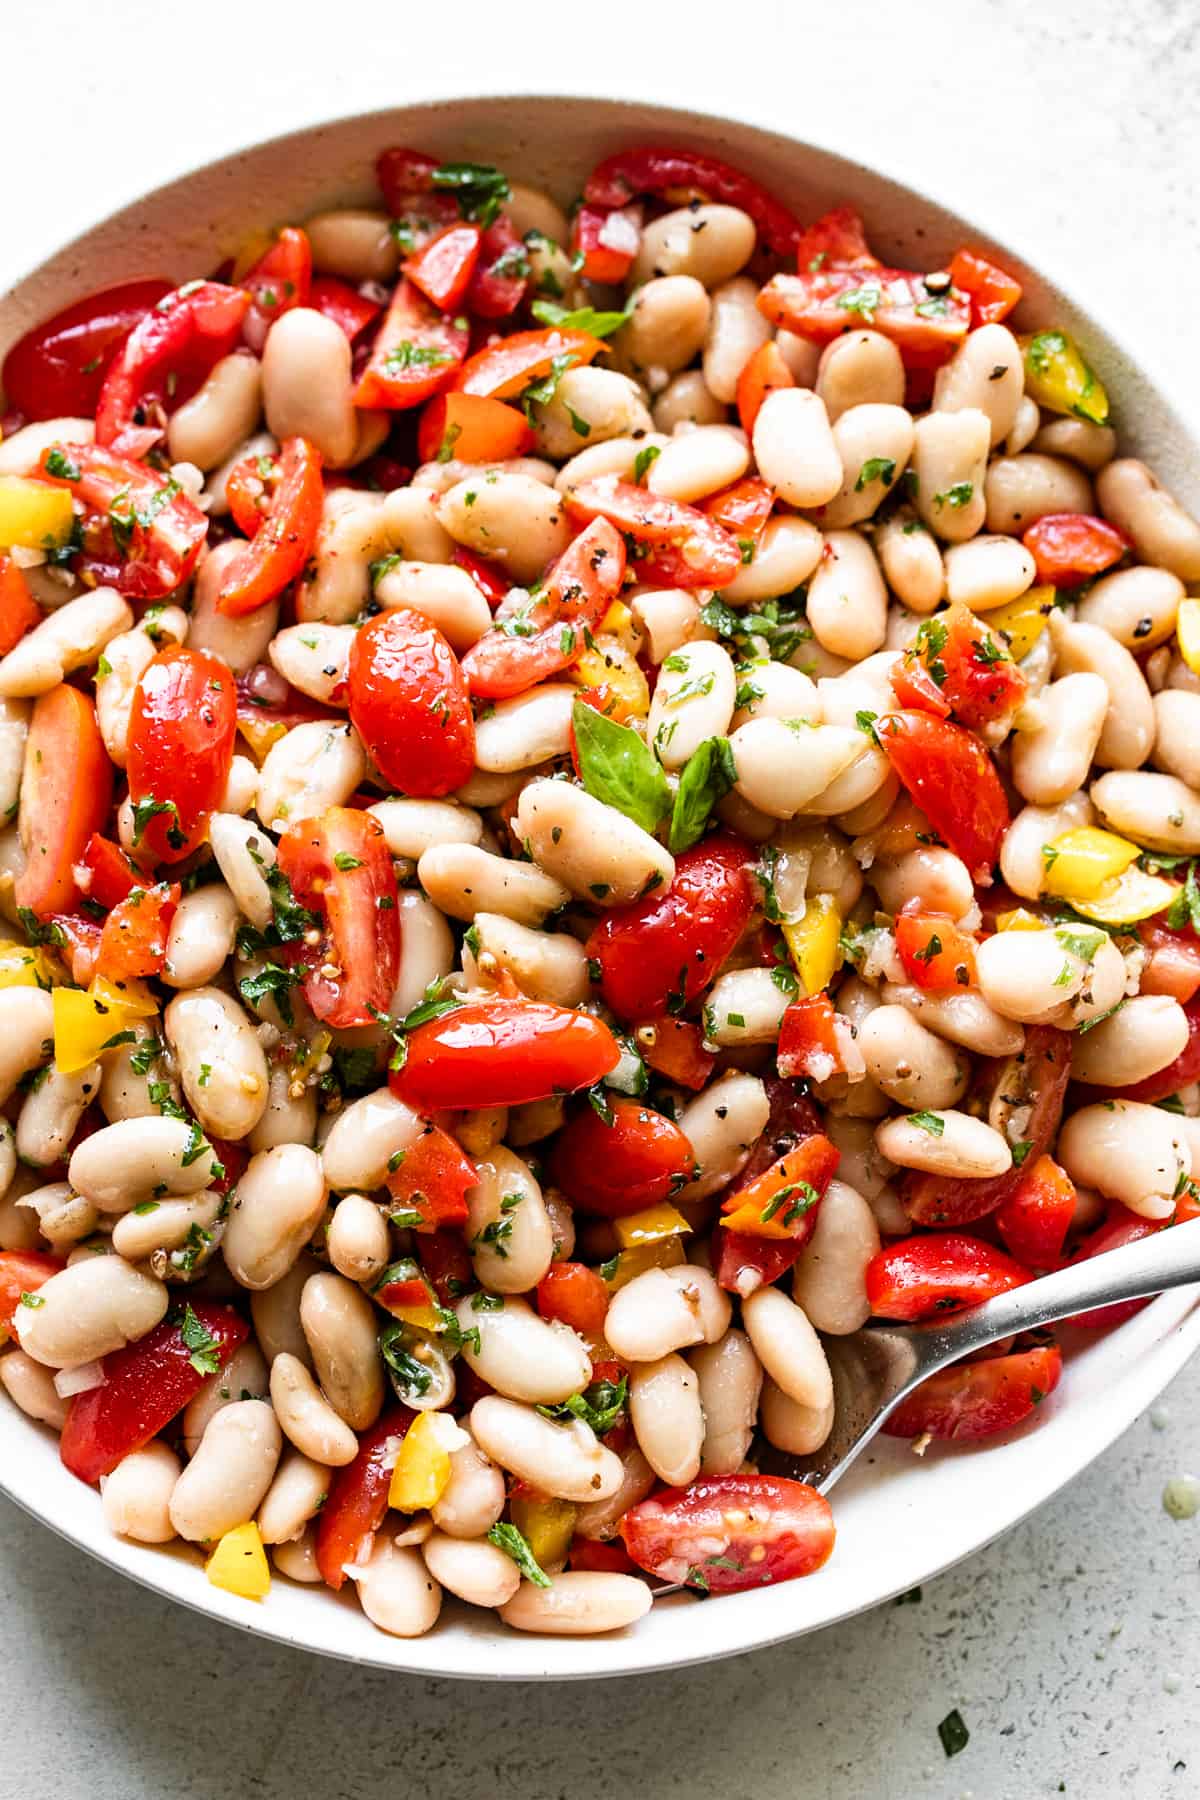
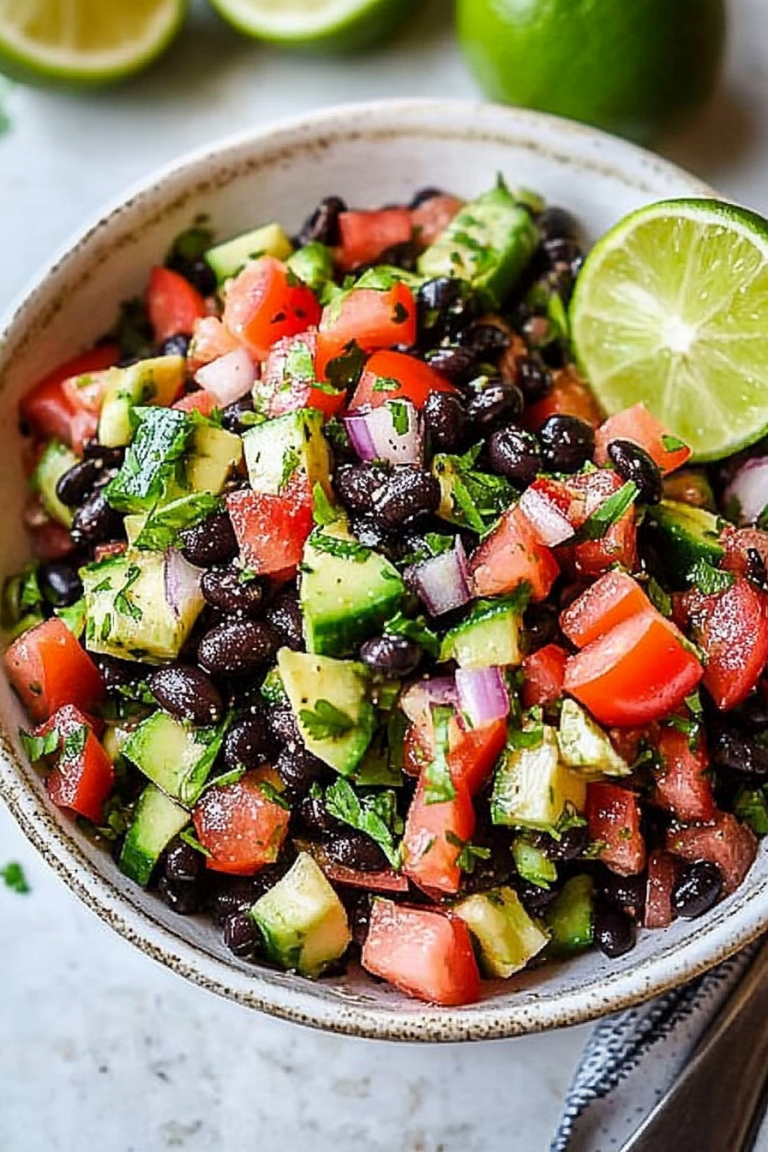
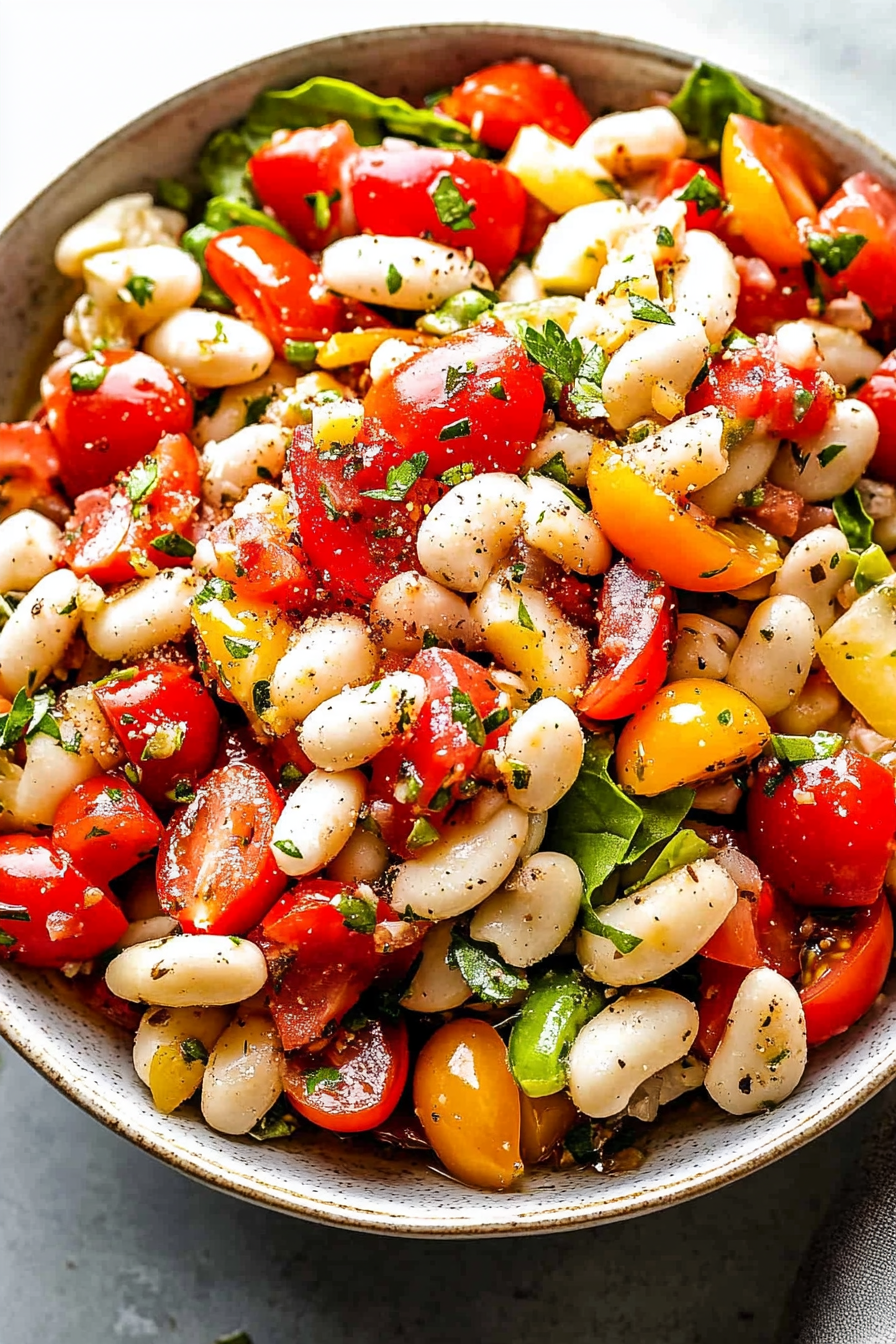
Mediterranean salad
Ingredients
Method
- Heat 1 tablespoon olive oil in a saucepan set over medium heat.
- Add garlic and cook for 30 seconds until golden brown.
- Add beans and 2 cups water, season with salt, bring to a simmer, and cook for 15 minutes.
- Remove from heat, cover, and let stand for 15 minutes.
- Meanwhile, whisk together remaining olive oil, lemon juice, vinegar, and shallot in a large bowl. Let stand for 15 minutes.
- Drain beans and rinse with cold water. Add to the dressing.
- Stir in bell peppers, cherry tomatoes, basil, parsley, and black pepper.
- Gently toss to combine and let sit for 20 minutes before serving.
- Serve cold and enjoy!