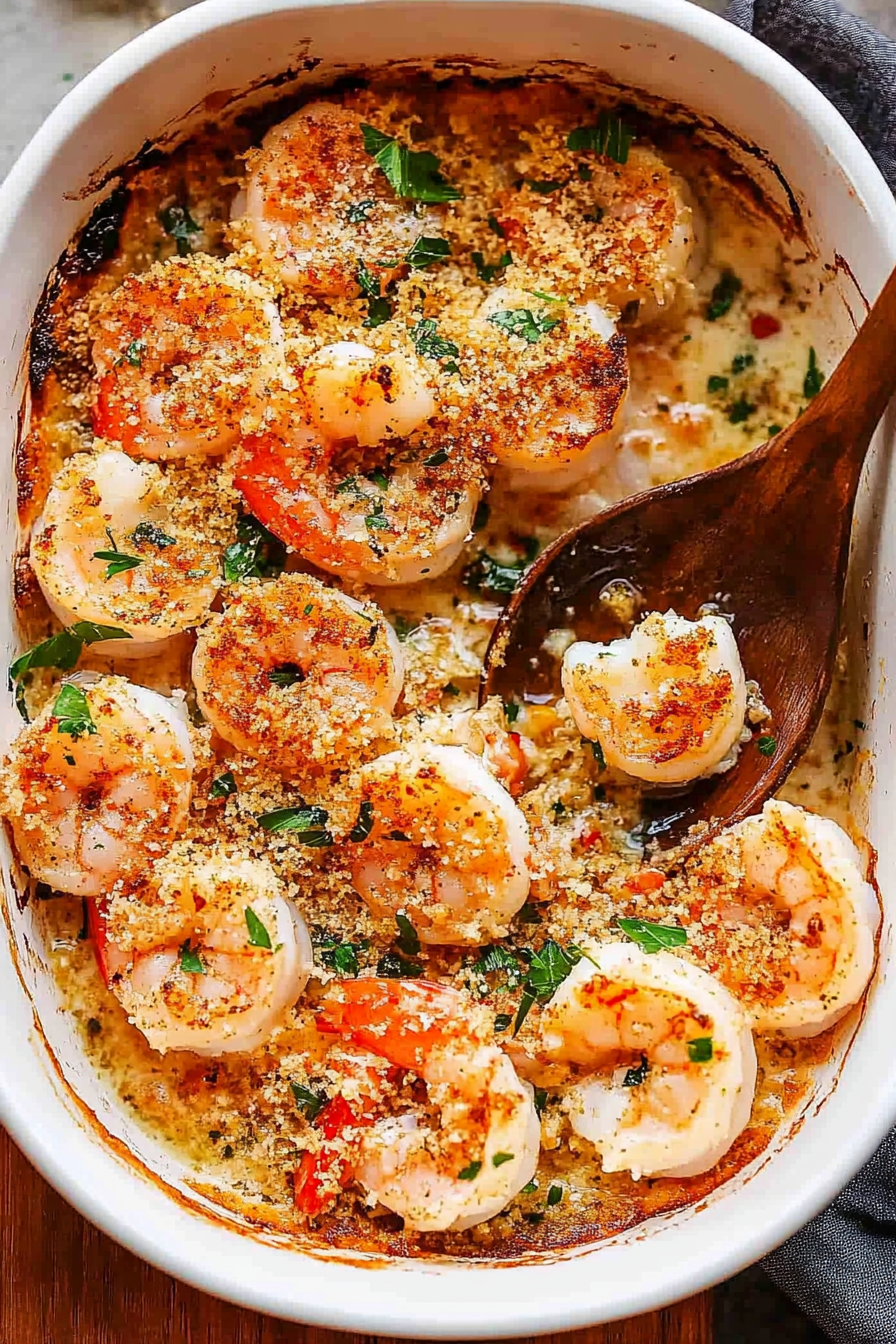
Easy Oven-Baked Shrimp Scampi Delight
There’s something incredibly comforting about pulling out a loaf of homemade cake, especially when it’s made with good-for-you ingredients like zucchini and ripe bananas. I remember my mom baking a version of this on lazy Sunday mornings, the smell wafting through the house and drawing everyone into the kitchen so we could indulge in that first warm, slightly gooey slice. It’s funny—this zucchini banana bread is one of those recipes that’s not only a treat but also feels like a little act of love I do for my family. And trust me, it disappeared in minutes at my house. My kids are obsessed with the moist texture and that perfect swirl of flaky cinnamon and sweet banana running through the middle. Honestly, I think I’ve made this at least a dozen times, tweaking the spices and ingredients just to get that perfect bite. It’s great for breakfast, snacking, or even an easy dessert—what I love most about this is how versatile and forgiving it is. Plus, it’s a sneaky way to get in some veggies without anyone batting an eye. Just wait til you try it—your kitchen will smell divine, and your family will ask for seconds without even knowing that’s it’s good for them. Let’s get baking!
What is Moist Zucchini Banana Bread?
This isn’t your average banana bread—think of it as a cozy hybrid between a moist quick bread and a veggie-packed loaf that’s so flavorful, nobody will guess it’s secretly healthy. The star ingredients are mashed bananas and shredded zucchini—bright, tender, and packed with moisture. The reason I keep coming back to this recipe is how it balances sweetness with just a touch of earthiness from the zucchini, which keeps the bread incredibly moist and tender. It’s essentially a “healthy-ish” treat, but with such a rich flavor and satisfying texture, I often serve it just as it is, no fuss. The name might sound fancy, but it’s really just a cozy homey bake that’s perfect on a chilly morning or when you’re craving something comforting. I like to think of it as a delicious way to sneak in some extra nutrients, but really, it’s just a go-to comfort snack that everyone loves. Plus, the swirl of cinnamon and banana on top makes it look so pretty—like a bakery-quality loaf at home.
Why you’ll love this recipe?
What I love most about this zucchini banana bread is how effortlessly it comes together—no fancy equipment needed, just a bowl, a spoon, and a little patience while it bakes. The flavor? Incredible. The bananas lend a deep sweetness and a soft, almost caramelized note, while the zucchini adds moisture and a subtle, sneaky veggie goodness. It’s like a hug in every bite. I’ve made this countless times, and I swear, the recipe is so forgiving that even if you forget to drain the zucchini a bit, it still turns out beautifully—although I learned my lesson the hard way a few times and now I always squeeze out the excess moisture. The cinnamon swirl on top? That’s just a little magic touch I sometimes experiment with—trust me, it elevates the whole loaf. It’s also budget-friendly since it uses ingredients I usually keep stocked—ripe bananas, a zucchini or two, sugar, and basic pantry staples. And because it’s so versatile, you can swap out ingredients based on what you have—like using coconut sugar or almond flour for a different twist. My kids ask for this all the time, and I love that I can feel good sharing a slice, knowing it’s friendly on the tummy and deep down, just downright delicious. Plus, it freezes beautifully—perfect for those mornings when I need a quick breakfast or an afternoon pick-me-up. Honestly, it’s become a bit of a family tradition around here, and I can’t wait for you to try it!
How do I make Moist Zucchini Banana Bread?
Quick Overview
This recipe is as simple as mash, mix, swirl, and bake. I start by shredding the zucchini and mashing the bananas, then toss everything into a big bowl. The batter is moist but thick enough that you can fold in a cinnamon swirl or nut extras if you like. Pour the batter into a loaf pan, add a swirl of cinnamon or streusel on top if you want, and bake until golden and a toothpick comes out clean. The entire process takes about 15 minutes of prep, and then you just wait for that heavenly smell to fill your kitchen. It’s perfect when you want something homemade but don’t want to spend hours fussing. The key to super moist bread is not overmixing and making sure the zucchini is well-drained—I’ve learned that the hard way, too. And if you’re feeling adventurous, I love swapping in applesauce or a dash of vanilla in the batter—it’s a game-changer. Once out of the oven, I let it cool just a bit before slicing so it holds together beautifully. This bread is a winner every time, and I promise, your family will ask for it again and again.
Ingredients
For the Main Batter:
– 2 large ripe bananas, mashed (the riper, the sweeter!)
– 1 cup shredded zucchini (about 1 small zucchini)
– 1/2 cup vegetable oil or melted coconut oil
– 3/4 cup granulated sugar or coconut sugar
– 2 large eggs
– 1 1/2 cups all-purpose flour or whole wheat flour
– 1 teaspoon baking soda
– 1/2 teaspoon baking powder
– 1/2 teaspoon salt
– 1 teaspoon vanilla extract
For the Filling:
– 2 tablespoons brown sugar
– 1 teaspoon ground cinnamon
For the Glaze (optional but recommended):
– 1/2 cup powdered sugar
– 1-2 teaspoons milk (or almond milk)
– A dash of vanilla or lemon zest for extra zing
Step-by-Step Instructions
Step 1: Preheat & Prep Pan
Set your oven to 350°F (175°C). Grease a standard loaf pan with butter or spray, then lightly dust with flour or line with parchment paper. This step guarantees a no-stick, perfectly easy release once it’s baked. While the oven heats, grate your zucchini and squeeze out any excess moisture—I like to do this with a clean dish towel, which helps keep the bread moist without becoming soggy.
Step 2: Mix Dry Ingredients
In a bowl, whisk together the flour, baking soda, baking powder, salt, and cinnamon (if you’re using it for the swirl). This helps ensure even distribution, so every bite has just the right amount of rise and spice. Set this aside for now.
Step 3: Mix Wet Ingredients
In a large bowl, mash the bananas until smooth—don’t worry if some small lumps remain; I actually like a bit of texture. Add the shredded zucchini, oil, sugar, eggs, and vanilla and mix until nice and combined. The batter will seem a little thick, but that’s perfect for holding layers and swirls in place.
Step 4: Combine
Pour the dry ingredients into the wet and fold gently until just combined. I can’t stress enough—don’t overmix! Overworking the batter can make the bread dense instead of moist and tender. If you notice a few lumps, that’s totally fine. Trust your instincts here.
Step 5: Prepare Filling
In a small bowl, mix the cinnamon and brown sugar. This is your classic cinnamon swirl—think of it as a little flavor explosion in the middle. If you prefer other flavors, like nutmeg or even a splash of orange zest, go for it!
Step 6: Layer & Swirl
Pour half of the batter into your prepared loaf pan. Sprinkle half of the cinnamon-sugar mixture over it, then add the rest of the batter on top. Use a toothpick or a butter knife to gently swirl the cinnamon into the batter—don’t overdo it; you want a pretty marbled effect, not a muddy mess.
Step 7: Bake
Pop the loaf into the oven and bake for about 55-60 minutes. Check the doneness with a toothpick inserted in the center—if it comes out clean, you’re golden! If the top gets too browned before the center is cooked, tent it with foil for the last 10 minutes.
Step 8: Cool & Glaze
Let the bread rest in the pan for about 10 minutes before transferring to a wire rack. While it cools just a bit, whip up your glaze by mixing powdered sugar, milk, and vanilla until smooth. Drizzle over the top once the bread is slightly cooled—but trust me, a little warm glaze melts beautifully and feels like a bakery treat.
Step 9: Slice & Serve
This bread is best enjoyed slightly warm or at room temperature. Use a serrated knife to cut clean, even slices. I like to serve it with a pat of butter or a dollop of yogurt—delicious and cozy. It’s also fantastic toasted the next day with a smear of jam or nut butter. Honestly, a slice of this with a cup of coffee is my perfect little moment of peace.
What to Serve It With
This banana zucchini bread is so versatile that I often serve it in different ways depending on the mood or occasion. For breakfast, I love pairing it with a steaming mug of coffee or tea—think of those slow weekend mornings where everything feels a little extra special. My family sometimes asks for it as a quick afternoon snack, warmed and topped with a bit of butter or cream cheese. It also makes a charming brunch centerpiece, sliced and drizzled with honey or maple syrup. When it’s dessert time, a dollop of whipped cream or a dusting of powdered sugar transforms it into an elegant treat, perfect after dinner. My favorite casual way? Just a simple slice on a plate and a good movie—cozy, satisfying, and totally addictive. Over the years, this bread has become a family favorite, and I love experimenting with toppings or adding chopped nuts or chocolate chips for extra fun. Honestly, I keep a loaf in the fridge almost always—because once you taste it, you’ll see why it’s a treasured staple in my kitchen.
Top Tips for Perfecting Your Moist Zucchini Banana Bread
After making this so many times, I’ve picked up a few tricks that make all the difference. First, when shredding zucchini, I always squeeze out the excess moisture—don’t skip this step! It’s what keeps the bread from becoming soggy and heavy. I’ve tested different flours, and whole wheat works beautifully, but I do add an extra splash of liquid to keep it moist. About mixing—gentle folding is your best friend. Overmixing can toughen the crumb, and nobody wants a dense banana bread. For the swirl, I like to sprinkle the cinnamon sugar evenly over the batter—sometimes I sprinkle in chopped nuts or chocolate chips for a surprise element. As for baking, I recommend positioning your oven rack in the middle for even heat and starting to check for doneness at 55 minutes. Every oven is different, and a toothpick test is always your best indicator. When it’s done, I let it cool ten minutes in the pan—that makes slicing so much easier—and then I transfer it to a wire rack for cooling completely. The glaze, if you decide to make it, should be thick but pourable—if it’s too runny, add a little more powdered sugar; if it’s too thick, whisk in a few drops of milk. One mistake I made early on was glazing it straight from the oven—trust me, wait until it’s just warm or cool enough to prevent the glaze from melting off. Personal tip? I sometimes warm some honey and drizzle that over for a richer flavor. Overall, patience and a gentle touch make this recipe shine. It’s forgiving, but these little tips really bring out the best.
Storing and Reheating Tips
This bread stays wonderful for days—if you can keep it around that long! Once cooled, I wrap it tightly in plastic wrap or store it in an airtight container at room temperature. It’s good for about 2-3 days, but honestly, it’s so moist and flavorful that it won’t last that long. If I want to keep it longer, I pop it in the fridge—just make sure it’s well wrapped to prevent it from drying out. When reheating, I like to warm slices gently in the microwave for about 15-20 seconds—just enough to bring out that cozy, bakery-fresh warmth. If I’m short on time, I toast a slice and spread a little butter or jam for a quick, satisfying snack. Freezing is a game-changer: I slice the loaf beforehand, wrap individual pieces tightly, and pop them in a freezer bag. They stay fresh for up to 3 months! When I want a treat, I defrost at room temp or warm in the microwave. As for the glaze—if you’re serving leftovers, I recommend adding a fresh drizzle when ready to serve for that just-baked look and taste. One thing I’ve learned over the years is not to store the loaf uncovered; keeping it airtight keeps it moist and lively. This way, a slice of warm, freshly glazed bread is just minutes away whenever you crave it.
Frequently Asked Questions
Final Thoughts
This zucchini banana bread has become a beloved staple in my kitchen, and I hope it finds a special place in yours too. The moist crumb, the burst of banana flavor, and that cinnamon swirl make every slice feel like a little celebration. It’s the kind of recipe that’s forgiving enough for weeknights and cozy enough for weekends. Plus, knowing I can sneak in some veggies makes it even more satisfying. Whether you serve it warm with a pat of butter, toasted with jam, or just on its own, I promise this will be a hit. Feel free to tweak the ingredients—you might discover your own favorite variation! I love hearing about your twists and turns, so don’t forget to leave a comment or share your photos. Happy baking, and may your kitchen always smell as inviting as mine when I’m making this!

Baked Shrimp Scampi
Ingredients
Method
- Preheat oven to 425°F. Arrange the shrimp in a baking dish and season with salt and pepper.
- Melt the butter in a bowl, then whisk in the lemon juice, minced garlic, and parsley. Pour half of the butter mixture over the shrimp and toss to coat. Arrange shrimp in a single layer.
- In a small bowl, mix remaining melted butter with panko crumbs, parmesan, and paprika. Sprinkle this mixture evenly over the shrimp.
- Bake for 12 minutes, then switch to broil and cook for an additional 1-2 minutes until top is golden and crispy.
- Remove from oven, garnish with chopped parsley, and serve with lemon wedges.