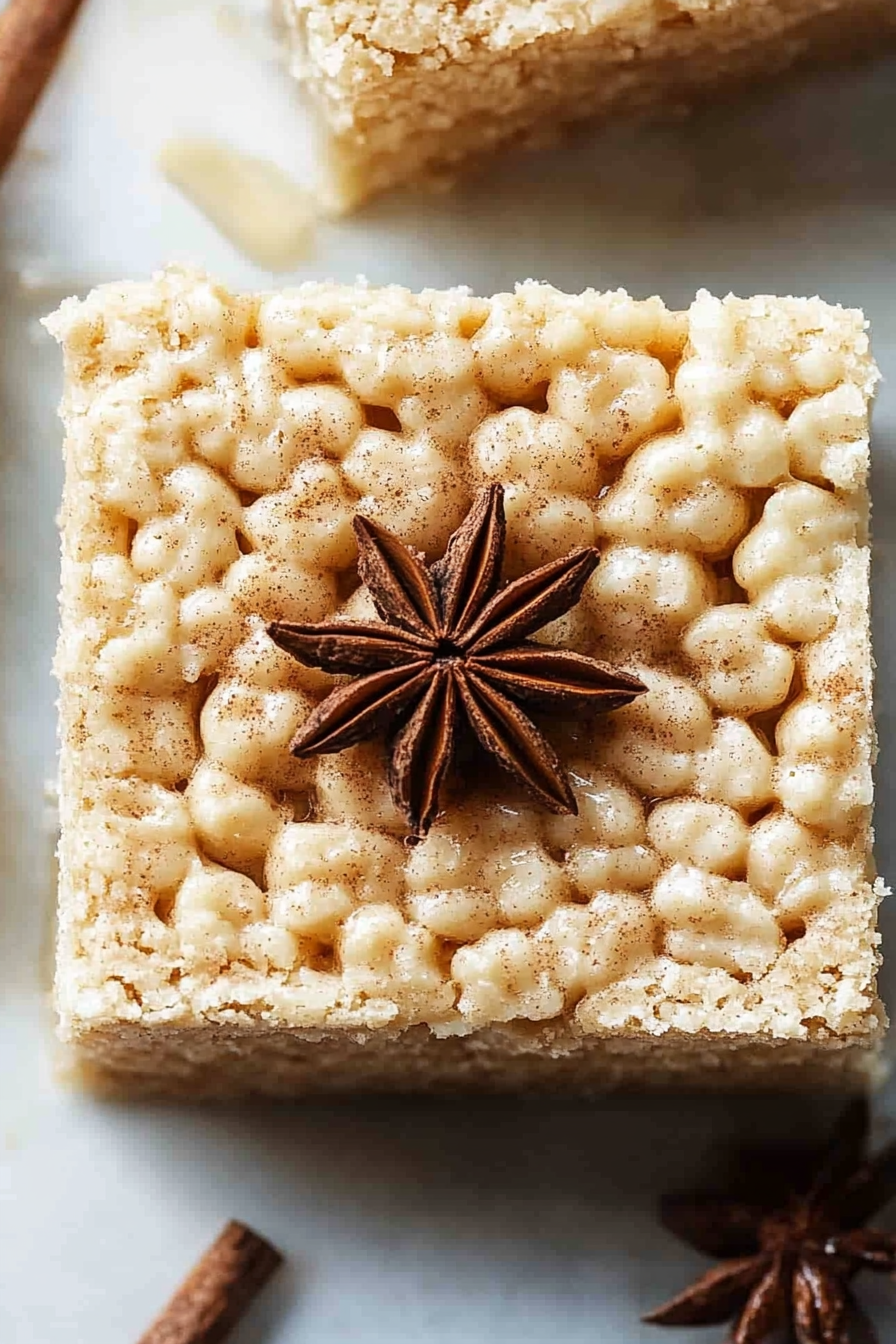
Golden Chai Rice Krispie Treats Delight
Oh, hey there! Come on in, grab a mug. You know, sometimes when I think about the perfect comfort food, my mind always drifts back to this chocolate zucchini bread. It’s more than just a quick bread, really. It’s like a warm hug in cake form. My mom used to make it when I was a kid, and the smell would just fill our little house with this incredible, sweet, chocolatey aroma. Honestly, it’s the recipe I run to when I’m craving something sweet but don’t want to spend hours in the kitchen, or when I need to use up those zucchini from the garden that seem to multiply overnight. It’s incredibly forgiving, too. If you’ve ever tried making a classic chocolate cake and ended up with a dry, disappointing mess, this bread is your new best friend. It’s got all the decadent chocolate flavor you could dream of, but with this unbelievably moist and tender crumb that you just can’t get any other way. And the best part? It’s secretly packed with goodness from the zucchini, so you can feel a *tiny* bit better about devouring that second slice!
What is chocolate Zucchini bread?
So, what exactly *is* this magic that happens when chocolate meets zucchini? Think of it as the ultimate mashup of a rich chocolate cake and a moist, tender quick bread. The zucchini might sound a little… odd, I know! But trust me, it’s the secret weapon. When grated and baked into the batter, it pretty much disappears, leaving behind only its moisture. This is what gives the bread that unbelievably soft, tender crumb that stays moist for days. It’s not a dense, heavy bread; it’s light, fluffy, and practically melts in your mouth. The name itself, chocolate zucchini bread, is pretty straightforward, but it hints at this wonderful surprise. It’s essentially a flavorful quick bread that happens to be infused with cocoa powder and often chocolate chips, with the humble zucchini lending its moisture-boosting superpower. It’s the kind of baked good that’s perfect for breakfast, a snack, or even a casual dessert.
Why you’ll love this recipe?
There are so many reasons why this chocolate zucchini bread has become a staple in my kitchen, and I just know you’re going to love it too. First off, the flavor. It’s deeply chocolatey without being overwhelmingly rich. The cocoa powder gives it this lovely depth, and if you’re feeling extra decadent, tossing in some chocolate chips is a game-changer – they create little pockets of melted chocolate bliss throughout. Then there’s the simplicity. Seriously, this is a lifesaver on busy weeknights or when unexpected guests pop over. You just mix everything in a couple of bowls, bake, and you’re done. No fancy techniques, no special equipment needed. And for all of us watching our grocery bills, this recipe is incredibly cost-effective. Most of the ingredients are pantry staples, and if you have a garden, you’ve already got the star ingredient! Beyond that, its versatility is off the charts. It’s fantastic on its own, but I’ll get into all the ways you can serve it later. What I really adore about this bread, though, is its texture. It’s just so incredibly moist and tender, thanks to that sneaky zucchini. It doesn’t dry out like so many other quick breads can. If you’re a fan of my popular Moist Blueberry Muffin recipe, you’ll appreciate this bread’s similar commitment to a tender crumb. This one just happens to trade berries for bold chocolate flavor, making it a delightful year-round treat.
How do I make Zucchini bread?
Quick Overview
Making this chocolate zucchini bread is wonderfully straightforward. You’ll whisk together your dry ingredients, then your wet ingredients, and then bring them together. We’ll fold in the shredded zucchini and any optional chocolate chips, pour it into a loaf pan, and bake until a toothpick comes out clean. It’s about as easy as it gets, and the result is a wonderfully moist, chocolatey loaf that will have everyone asking for the recipe. You can whip this up in under 15 minutes of active prep time, making it perfect for any day of the week.
Ingredients
For the Main Batter:
You’ll need all-purpose flour, granulated sugar, unsweetened cocoa powder, baking soda, baking powder, and a pinch of salt. For the flour, just your standard all-purpose works beautifully. Don’t get too fancy here; the magic happens with the other ingredients. The cocoa powder is key for that deep chocolate flavor – make sure it’s unsweetened so you can control the sweetness yourself. I usually reach for a good quality natural unsweetened cocoa powder. Baking soda and baking powder are our leaveners, giving the bread its lift and airy texture. Salt, even in sweet baking, is so important to enhance all those other flavors.
For the Moisture & Richness:
Here’s where our star ingredient comes in: grated zucchini! You’ll want about two cups, packed. It might seem like a lot, but trust me, it disappears and works wonders. I usually just use a box grater on the medium side. You’ll also need eggs, vegetable oil (or another neutral oil like canola), milk (I’ve tested this with almond milk and it actually made it even creamier!), and vanilla extract. The oil keeps things incredibly moist, and the eggs help bind everything together. The milk adds a bit more liquid for that tender crumb, and vanilla extract just rounds out all those flavors.
Optional Add-ins:
This is where you can really personalize it! I always add about a cup of semi-sweet chocolate chips. They melt into little puddles of chocolatey goodness. You could also add chopped nuts like walnuts or pecans if you like a bit of crunch, or even a dash of cinnamon for a different flavor profile. Mini chocolate chips also work wonderfully and distribute more evenly.
Step-by-Step Instructions
Step 1: Preheat & Prep Pan
First things first, preheat your oven to 350°F (175°C). This is a pretty standard temperature for most quick breads, and it ensures even baking. While the oven is heating up, grab a standard 9×5 inch loaf pan. I like to grease mine really well with butter or non-stick spray, and then lightly flour it. This step is crucial for preventing your beautiful loaf from sticking. You can also line it with parchment paper, leaving some overhang on the sides, which makes lifting it out a breeze.
Step 2: Mix Dry Ingredients
In a large mixing bowl, whisk together your all-purpose flour, granulated sugar, unsweetened cocoa powder, baking soda, baking powder, and salt. Give it a good whisk to make sure everything is thoroughly combined and there are no lumps of cocoa powder. This step ensures that your leavening agents and cocoa are evenly distributed, which is super important for an even rise and consistent chocolate flavor throughout your bread. You don’t want any surprise bites of just baking soda!
Step 3: Mix Wet Ingredients
In a separate medium bowl, whisk together your eggs, vegetable oil, milk, and vanilla extract until they’re well combined. This is where the moisture starts building. Make sure the eggs are broken up and fully incorporated into the liquid. Getting this mixture smooth and consistent means it will blend seamlessly with the dry ingredients later.
Step 4: Combine
Now, pour the wet ingredients into the bowl with the dry ingredients. Using a spatula or wooden spoon, gently mix until *just* combined. It’s really important not to overmix here! A few streaks of flour are okay; they’ll disappear as you add the zucchini. Overmixing can develop the gluten too much, leading to a tough bread, and nobody wants that. We’re aiming for a thick, pourable batter, but it should still be relatively smooth.
Step 5: Prepare Filling (Zucchini)
This is where our star ingredient makes its grand entrance. Grab your grated zucchini. If you notice your zucchini is releasing a ton of water, you can gently press it with a paper towel to remove some excess moisture, but don’t squeeze it dry. You want that moisture! Stir the grated zucchini into the batter until it’s evenly distributed. If you’re adding chocolate chips or nuts, this is the time to gently fold them in as well. Just a few folds to get them incorporated. You want to distribute them, not beat them into oblivion!
Step 6: Layer & Swirl (Optional, but fun!)
For this particular recipe, we’re not really doing a traditional swirl like you might with a cinnamon roll. The zucchini itself will create lovely little pockets of moisture. So, simply pour the batter evenly into your prepared loaf pan. If you’re feeling adventurous, you *could* reserve a little bit of extra chocolate chips to sprinkle on top before baking for an extra burst of chocolatey goodness on the surface.
Step 7: Bake
Pop that loaf pan into your preheated oven. Bake for about 50-65 minutes. The exact time can vary depending on your oven. You’ll know it’s done when a wooden skewer or toothpick inserted into the center comes out clean or with just a few moist crumbs attached (no wet batter!). If the top starts to brown too quickly, you can loosely tent it with aluminum foil for the last 15-20 minutes of baking. Patience here is rewarded with a perfectly baked loaf.
Step 8: Cool & Glaze (Optional)**
Once baked, let the bread cool in the pan for about 10-15 minutes. This allows it to set up properly. Then, carefully invert it onto a wire rack to cool completely. It’s really important to let it cool completely before slicing, especially if you plan to glaze it. If you’re glazing, this is the perfect time to prepare your glaze and drizzle it over the top. It will set up nicely as the bread cools.
Step 9: Slice & Serve
Once fully cooled, use a sharp knife to slice your delicious chocolate zucchini bread. The aroma alone is enough to make your mouth water! Serve it as is, or with a dollop of whipped cream, a smear of butter, or even a light dusting of powdered sugar. It’s absolutely perfect!
What to Serve It With
This chocolate zucchini bread is so versatile, it can truly fit into any part of your day. For a casual breakfast, I love it toasted just slightly with a generous smear of butter. It’s fantastic alongside a hot cup of coffee or a glass of cold milk. The slightly crisp edges from toasting are divine! If you’re planning a more elaborate brunch, this bread adds a wonderfully decadent touch. You can serve it alongside fresh fruit salad, maybe some scrambled eggs and crispy bacon. For an elegant presentation, slice it a bit thinner and arrange it on a nice platter. It’s also a perfect fit for dessert! After dinner, I sometimes serve it warm with a scoop of vanilla bean ice cream or a drizzle of raspberry sauce. The contrast between the warm bread and the cold ice cream is heavenly. And for those cozy snack moments, when you just need something comforting, this bread is it. It’s perfect for an afternoon pick-me-up with a cup of tea or hot chocolate. My family always loves it as an after-school treat, and it’s just as satisfying as any store-bought cookie, but so much more wholesome!
Top Tips for Perfecting Your Chocolate Zucchini Bread
Over the years, I’ve learned a few tricks that make this chocolate zucchini bread consistently amazing. First, regarding the zucchini prep: you don’t need to peel it! The skin is thin and adds nice color and nutrients. Just grate it on the medium holes of your box grater. If your zucchini is super watery, I do gently press it with a paper towel to absorb some excess liquid, but avoid squeezing it completely dry. You want that moisture! For mixing, remember the golden rule of quick breads: don’t overmix! Mix until *just* combined. A few little flour streaks are perfectly fine. Overworking the batter leads to a tough, chewy texture, and we want tender and moist here. If you’re adding chocolate chips, I always toss them with a tablespoon of the dry flour mixture before adding them to the batter. This helps them stay suspended and not sink to the bottom. When it comes to baking, oven temperatures can be wildly different. Get to know your oven! If yours tends to run hot, you might need to reduce the temperature slightly or tent with foil earlier. A simple toothpick test is your best friend for checking doneness – it should come out with moist crumbs, not wet batter. For ingredient swaps, I’ve tested this with almond milk and it actually made it even creamier! You can also use melted coconut oil instead of vegetable oil, though it might impart a subtle coconut flavor. If you find your bread is browning too quickly on top, loosely tenting it with foil for the last 20 minutes of baking is a lifesaver. And for the glaze, I often just whisk together powdered sugar with a splash of milk and a drop of vanilla until it’s pourable, but you can add cocoa powder for a chocolate glaze, or even a bit of espresso powder to enhance the chocolate flavor. It’s all about what you’re in the mood for!
Storing and Reheating Tips
One of the best things about this chocolate zucchini bread is how well it keeps! For storing at room temperature, I usually let it cool completely, then wrap it tightly in plastic wrap or place it in an airtight container. It stays wonderfully moist for about 3-4 days this way. Just make sure it’s fully cooled before wrapping, otherwise condensation can make it soggy. If you live in a warmer climate or just want it to last a bit longer, refrigerator storage is your friend. Wrap it well or keep it in an airtight container in the fridge for up to a week. It might firm up a little in the fridge, but that’s easily fixed with a quick toasting. For longer storage, this bread freezes beautifully! I wrap individual slices or the whole loaf tightly in plastic wrap, then in aluminum foil, or pop them into a freezer-safe bag. It’ll keep well in the freezer for up to 3 months. When you’re ready to enjoy it, you can thaw it at room temperature, or pop a slice in the toaster or microwave for a warm, comforting treat. If you plan to freeze it, I recommend adding the glaze after thawing and reheating, just to keep it looking its best. Otherwise, leave it plain for freezing and glaze upon serving.
Frequently Asked Questions
Final Thoughts
So there you have it – my beloved chocolate zucchini bread! It’s the kind of recipe that brings smiles to faces, uses up those garden surplus veggies, and always delivers on moist, chocolatey goodness. It’s proof that sometimes, the simplest recipes are the most rewarding. If you’re a chocolate lover, or just looking for a reliable, incredibly easy, and delicious quick bread, you’ve got to give this one a try. It’s perfect for sharing, or for tucking away a slice for yourself when you need a little treat. If you enjoy this, you might also love my recipe for Moist Banana Bread or my Easy Apple Crumble Bars – they share that same comforting, homemade feel. I truly hope this recipe becomes a favorite in your kitchen too. I can’t wait to hear how yours turns out, so please share your thoughts and any delicious variations you try in the comments below! Happy baking!
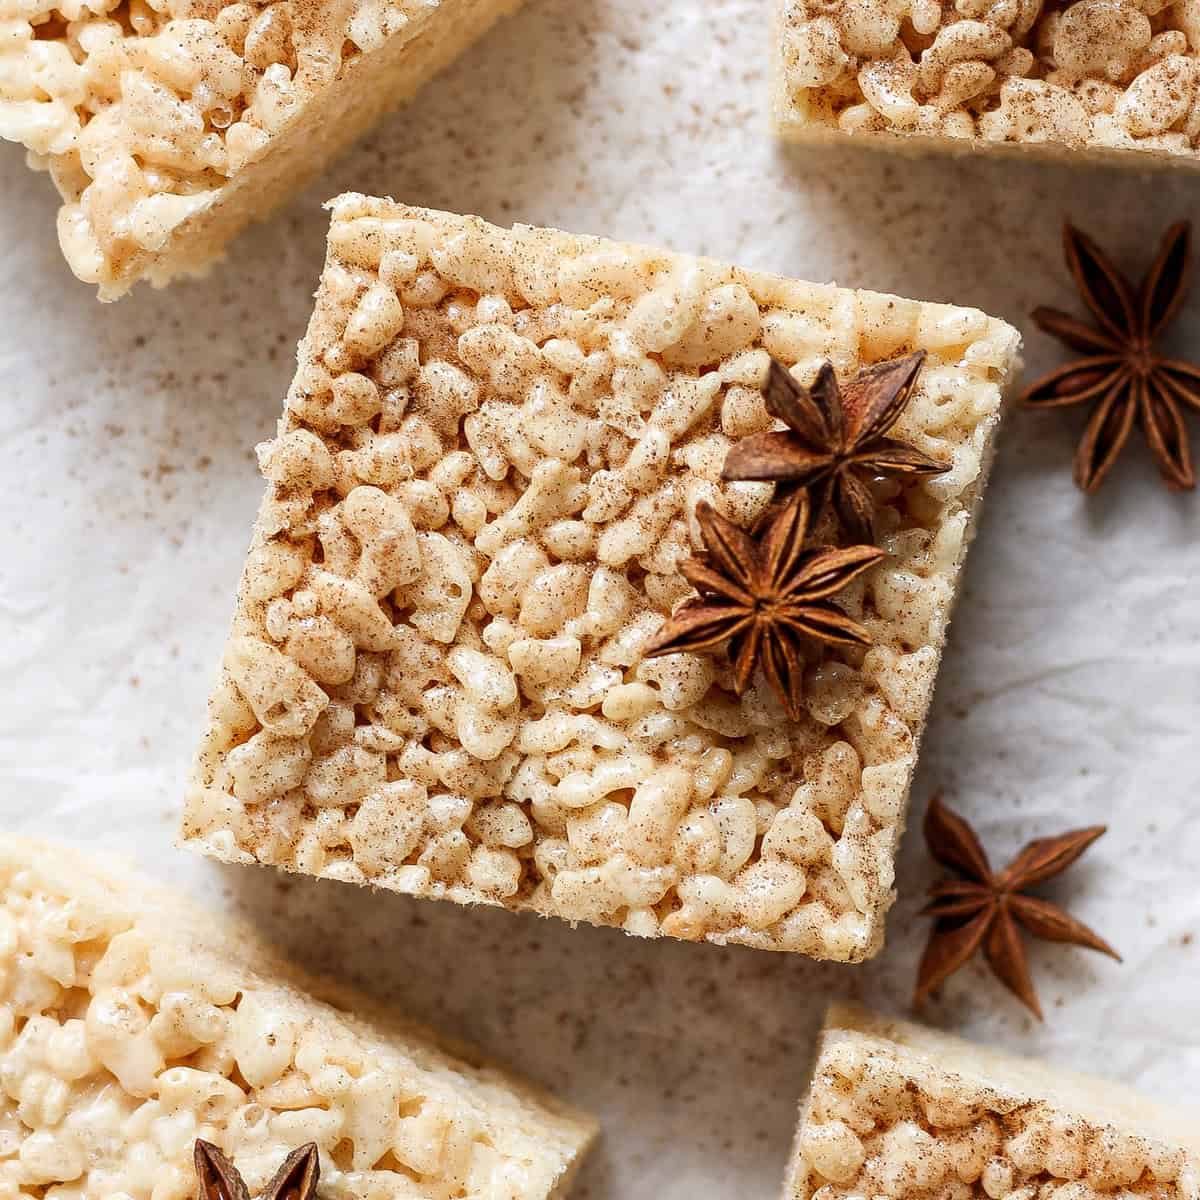
Brown Butter Chai Rice Krispie Treats
Ingredients
Method
- Line a 9x9-inch pan with parchment paper.
- Heat the butter in a large pot over medium/high heat. Melt the butter until little brown bits form in the butter. Remove the pot from the heat so it doesn’t burn.
- Whisk the chai spice into the brown butter.
- Add the marshmallows to the pot and stir until they are coated in butter and begin to melt. If they continue to melt, keep stirring. If they stop melting, return the pot to the burner and heat over low heat. Stir the marshmallows consistently until melted.
- Remove them from the heat and add the rice crispies. Stir until combined.
- Transfer the mixture to the lined pan and lightly press the rice crispies into the pan. Option to dust the top with more chai spice.
- Let the mixture set for at least 30 minutes, Slice and enjoy!