How to Make Amazing Baked Chicken Wings
Honestly, this zucchini swirl cake has become one of my absolute favorites to bake. I remember the first time I tried making it—my kids were hovering around the kitchen, peering over my shoulder, eyes wide with curiosity. When it finally came out of the oven, the smell was just… divine. It’s like a cozy, sweet hug wrapped in warm spices, with a little surprise of tender zucchini swirled beautifully throughout. Trust me, I’ve tested this one countless times, and it never fails to get rave reviews. It’s almost like a cross between a quick bread and a cake, but with a little extra love baked right in. This recipe is that kind of comfort food that’s perfect on lazy weekends, or when friends pop over unexpectedly—you’ll be surprised how effortlessly it comes together. Plus, I always do this when I want to sneak in a veggie without making a fuss, and honestly, no one complains. If you love baking something that’s both hearty and tender, you’re in for a real treat! And yes, it’s way easier than it looks. So, grab your zucchini and let’s get started—this dish will remind you why baking from the heart is the best therapy there is.
What is Zucchini Swirl Cake?
Think of zucchini swirl cake as the charming lovechild of a moist cake and a quick bread; it’s essentially a tender batter folded with shredded zucchini, then beautifully marbled with swirls of cinnamon-spiced batter. It’s the kind of dessert or snack that feels fancy but is actually super simple. The name might make you wonder—why “swirl”? Well, it’s all about that gorgeous marbled look where the cinnamon and zucchini dance together. When you slice into it, every piece reveals these delicate ribbons of moist zucchini hidden within the soft, crumbly cake. The idea actually dates back to old family recipes where you’d sneak vegetables into your sweet treats, and honestly, it’s a classic for a reason. The zucchini adds a subtle moistness and a little nutrition boost, but the real star here is how beautifully the flavors meld—warm cinnamon, sweet batter, and that surprise of fresh zucchini. Think of it as your new go-to for breakfast, brunch, or even a mid-afternoon pick-me-up. It’s approachable enough for a beginner, but I promise the results look pretty impressive and taste even better.
Why you’ll love this recipe?
What I love most about this zucchini swirl cake is how it combines simplicity with a touch of elegance. The flavor? Absolutely incredible. You get this beautiful mix of sweet, cinnamon, and that fresh, slightly earthy zucchini that keeps everything moist and light. It’s honestly my kids’ favorite whenever I make it—they call it “Mom’s magic cake” because it looks fancy but is oh-so easy. And trust me, I’ve made this with all sorts of substitutions—like almond flour, coconut sugar, even dairy-free milks—and it still turns out so good, if not better. The smell alone will have everyone running to the kitchen—baking this on a lazy weekend is a lifesaver. Plus, it’s budget-friendly. You probably have everything you need in your pantry and fridge right now. No special gadgets, no complicated frostings. It’s versatility at its best—serve it as a breakfast bread, an afternoon tea treat, or a cozy dessert after dinner. I’ve shared this recipe with friends and family, and what’s wild is how addictive it is—every slice disappears in minutes at my house. And that swirled cinnamon pattern? It makes every piece look like a work of art, which I think is a little magic in itself. Honestly, once you see how easy it is, you’ll want to make it again and again.
How do I make Zucchini Swirl Cake?
Quick Overview
This zucchini swirl cake is all about simple, straightforward steps. You grate the zucchini, squeeze out excess moisture (so your batter stays tender and not watery), mix up a basic sweet batter, then swirl in some cinnamon-spiced portion to create those gorgeous marble patterns. The process is quick—glance over the ingredients, throw everything together, layer the batter and filling, then bake until golden. What makes it special is how the swirling technique creates those beautiful visual ripples, kind of like a cake version of a latte art. The batter comes together in minutes, and the whole process is forgiving—perfect for when you need a little comfort but don’t want to fuss around. The best part? It’s almost impossible to mess up. It’s one of those recipes where you can taste the batter as you go, adjust sweetness, or add a handful of chopped nuts if you’re feeling fancy. By the time it’s baked, you’ll have a moist, fragrant cake that’s just begging to be sliced and shared. Plus, it keeps well, so you can enjoy it for days—if it lasts that long!
Ingredients
For the Main Batter:
– 2 cups grated zucchini (about 2 medium zucchinis)
– 1 ½ cups all-purpose flour (or almond flour for GF)
– 1 cup granulated sugar or maple sugar
– ½ teaspoon baking powder
– ½ teaspoon baking soda
– 1 teaspoon vanilla extract
– ½ cup vegetable oil or melted coconut oil
– 3 large eggs
– Pinch of salt
For the Filling:
– ¼ cup brown sugar
– 1 tablespoon ground cinnamon
– Optional: chopped nuts or chocolate chips for extra flair
For the Glaze (optional but recommended):
– ½ cup powdered sugar
– 1–2 teaspoons milk or lemon juice
– A splash of vanilla extract
– Additional cinnamon for dusting
Step-by-Step Instructions
Step 1: Preheat & Prep Pan
Set your oven to 350°F (175°C). Grease a 9-inch round or square baking pan, or line it with parchment paper. This step is key to preventing sticking—and trust me, a little butter or non-stick spray will save a lot of scraping later. Remember, even if your batter is simple, a good prep makes all the difference.
Step 2: Mix Dry Ingredients
In a large bowl, whisk together the flour, baking powder, baking soda, salt, and sugar. This helps to evenly distribute the leavening agents and sugar so that the batter buffs up nicely in the oven. If you’re using almond flour or part-coconut flour, a little extra moisture adjustment might be needed, but I’ll tell you about that later.
Step 3: Mix Wet Ingredients
In a separate bowl, whisk together eggs, oil, vanilla, and the grated zucchini. I always do this when I want a moist, tender crumb, especially since zucchini releases a lot of water—so squeezing out as much moisture as possible is a good idea. I tested this with a slightly less moist zucchini, and it still turned out perfectly. Just avoid overly watery zucchinis, or the batter might be a little loose.
Step 4: Combine
Fold the wet ingredients into the dry, mixing until just combined. Be gentle here—you want a smooth batter, but avoid overmixing, which can lead to dense cake. Think of it as giving it a few gentle turns, just enough so everything’s incorporated. It should be thick but pourable.
Step 5: Prepare Filling
Mix the cinnamon and brown sugar in a small bowl. Optional: add chopped nuts or chocolate chips to give it more texture. You want your filling to be crumbly but spreadable—imagine the consistency of kind of thick cinnamon sugar spread.
Step 6: Layer & Swirl
Pour half of the batter into your prepared pan. Sprinkle half of the cinnamon-sugar mixture over it. Pour the rest of the batter on top, then sprinkle with the remaining cinnamon mixture. Using a butter knife or skewer, gently swirl through the batter—think of gentle ripples rather than stirring vigorously. This creates that lovely marbled pattern that makes each slice special.
Step 7: Bake
Bake for 45-50 minutes, or until a toothpick inserted in the center comes out clean. Oven times can vary, so start checking around 40 minutes. The top should be golden and fragrant. Trust your nose—if it smells amazing, it’s probably done.
Step 8: Cool & Glaze
Let the cake cool in the pan for about 15 minutes, then transfer to a wire rack. While it cools, mix your glaze ingredients—powdered sugar, milk, or lemon juice, and vanilla. Drizzle it over once the cake is just warm; this keeps the glaze from melting in the oven and gives a pretty finishing touch.
Step 9: Slice & Serve
Use a sharp knife for clean slices—cold or at room temperature, it’s delicious either way. I like serving it with a cup of coffee or tea, and my kids ask for this all the time as a breakfast or after-school snack. It’s kind of amazing how something so simple can taste so special.
What to Serve It With
This zucchini swirl cake is pretty versatile—here’s how I love to serve it, depending on the occasion:
For Breakfast: Paired with a frothy cappuccino or a glass of almond milk, it makes for a wholesome start. I usually slice it thick for extra texture, and sometimes I add a dollop of Greek yogurt on the side for creaminess.
For Brunch: Serve with fresh berries and a drizzle of honey or a dusting of extra cinnamon. It’s fancy enough to impress friends but still cozy enough for a casual weekend get-together.
As Dessert: Warmed slightly, topped with whipped cream or a scoop of vanilla ice cream, it’s a real crowd-pleaser. The slight cinnamon swirl makes it look fancy without any fuss. Perfect after a family dinner.
For Cozy Snacks: I love packing a slice in my kids’ lunchboxes or having a piece with afternoon tea. It’s like instant comfort on a busy day. Trust me, this one disappears fast around here!
Top Tips for Perfecting Your Zucchini Swirl Cake
Over the years, I’ve learned a few tricks to make sure this cake comes out perfectly every time:
Zucchini Prep: Squeeze out as much moisture as possible after grating. I do this by pressing the shredded zucchini into a clean kitchen towel—this removes excess water and prevents a soggy cake. I’ve also tested with different zucchinis, and the fresher, the better. If you notice a lot of water, just give it a firm squeeze; it’s a game-changer for fluffy crumb.
Mixing Advice: Be careful not to overmix once you combine the wet and dry ingredients. Overmixing can make the batter tough, especially with gluten in the flour. A gentle fold is all you need. If it looks a little lumpy, that’s fine—those little pockets of zucchini and flour just add to the charm.
Swirl Customization: Practice your swirling technique: you want the cinnamon mixture to form lovely ripples. Use a skewer or butter knife and run it through the batter in figure-eights or swirling motions. The more irregular, the more artistic it looks when sliced.
Ingredient Swaps: I’ve experimented with coconut sugar, which adds a caramel note, or using half whole wheat flour for extra fiber. It slightly changes the texture but still fabulous in flavor. If you want to reduce the sweetness, cut back on sugar by ¼ cup. Just make sure to taste the batter before pouring—it’s your best guide.
Baking Tips: Always check your oven temperature with an oven thermometer; I’ve learned the hard way that ovens can be off by 10-15°F. Position the rack in the middle for even baking. If the top browns too fast, loosely tent with foil halfway through baking.
Glaze Variations: Feel free to add a splash of lemon juice or vanilla to your glaze. For a fun twist, sprinkle a little sea salt or chopped nuts on top before serving. The key is to keep the glaze a bit runny so it drizzles beautifully without setting too thick—a trick I often learn after messy experiments!
Honestly, making this cake has become a little ritual for me—each time I tweak a tiny thing or use different zucchinis, and it always turns out amazing. The best lesson? Don’t stress over perfection; imperfections just add more charm, and the taste more love.
Storing and Reheating Tips
This cake keeps really well—if it lasts that long! You can store it at room temperature covered with a clean towel for a day or two, but I usually pop slices into an airtight container in the fridge to stay fresh longer. It’s honestly still moist and tasty for up to 4 days if kept properly. Just beware—if you glaze the cake, it’s best to add the glaze just before serving, or it can make the top a little soggy if stored covered for too long.
In the fridge, it’s great for breakfast on busy mornings—just pop a slice in the microwave for 15 seconds, and it’s warm and comforting. Freezing is also an option if you want to make it ahead; wrap slices tightly, and they’ll last for a month. Thaw overnight in the fridge or on the counter, then warm slightly before serving. I tested this with a quick microwave session, and the zucchini retained its moisture perfectly. The glaze, however, should be added just before serving for the best look and taste.
Frequently Asked Questions
Final Thoughts
This zucchini swirl cake is truly one of those recipes that feels like a warm hug from the oven. It’s moist, fragrant, and approachable enough to whip up on a whim, yet fancy enough to impress anyone you share it with. The swirl pattern makes every slice feel special, like a little piece of art on your plate. Plus, I love how it sneaks in a veggie without anyone batting an eye—it’s a win-win for busy mornings or a relaxing weekend treat. Every time I bake this, I’m reminded that the best recipes are the ones made with love, patience, and a little bit of improvisation. Whether you top it with a simple glaze or just dust it with powdered sugar, I promise it’ll become a staple in your baking arsenal just like it has in mine. Happy baking, and don’t forget to share a slice with someone you love. I’d love to hear how yours turns out, so leave a comment or snap a pic—happy baking!
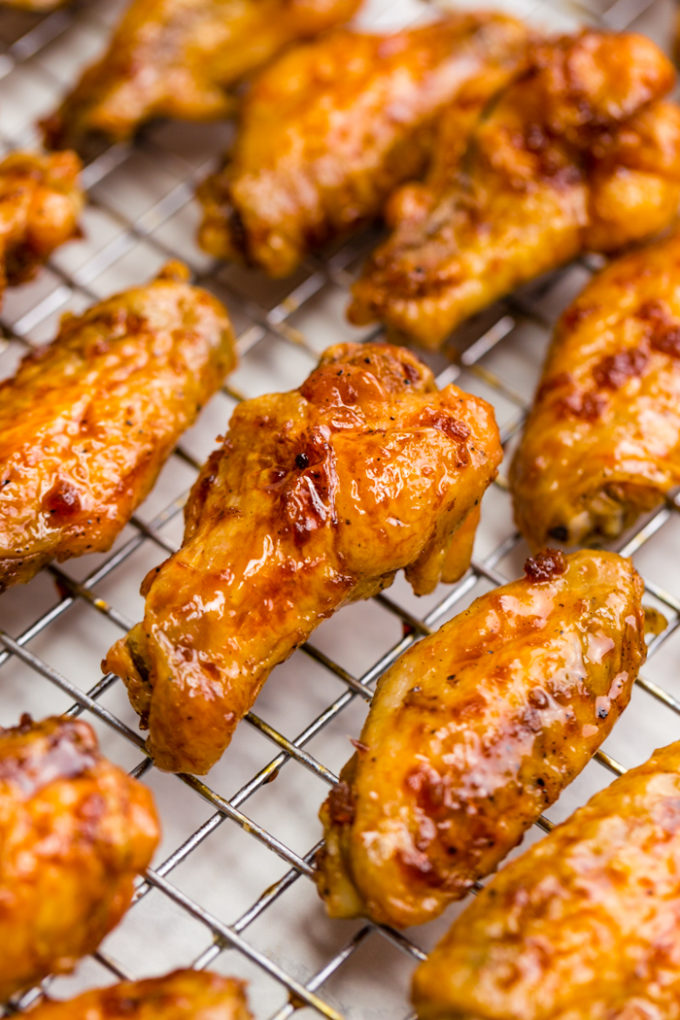
baked chicken wings
Ingredients
Method
- Preheat oven to 250°F. Place a rack inside a rimmed baking sheet.
- Pat the chicken wings dry with a paper towel. Place wings in a large bowl, add baking powder, salt, and pepper, and toss to coat evenly.
- Line a tray with foil and set a wire rack inside. Brush or spray the rack with vegetable oil.
- Arrange wings on the rack in a single layer, skin side up. Brush wings with remaining oil.
- Bake at 250°F for 30 minutes.
- Increase oven temperature to 400°F, move wings to the top rack, and bake an additional 45-50 minutes until crispy and golden brown, flipping once if desired.
- Meanwhile, bring honey, soy sauce, garlic, ginger, and water to a boil in a small saucepan. Reduce heat and simmer until reduced to 1/4 cup, about 7-8 minutes.
- Once wings are baked, toss them in the sauce to coat thoroughly.
- Return wings to the oven and bake for an additional 5-6 minutes until glaze is lightly caramelized.