Tropical Chia Pudding How to Make It
There’s something about waking up on a lazy Sunday morning and smelling the warm, cinnamon-laced air wafting through the house that gets me every time. This Zucchini Swirl Coffee Cake is my secret weapon for those cozy weekends when I want something sweet, comforting, but still kinda wholesome. It’s the kind of treat my kids ask for all the time—especially when they know I’ve snuck zucchini into their favorite breakfast. Honestly, I make this at least once a month because it’s just so easy and totally addictive. Plus, it’s got that perfect blend of tender crumb, sweet filling, and a hint of spice that makes it feel like a hug in cake form. The best part? It’s a great way to use up any zucchini hiding in the fridge. Trust me, this “human” (as in, real, imperfect, loving home cooking) recipe never fails to bring smiles around my table!
What is Zucchini Swirl Coffee Cake?
Think of this as a cross between your classic breakfast coffee cake and a zucchini bread miracle. It’s essentially a tender, moist cake made with grated zucchini, swirled with a sweet cinnamon filling, and topped with a buttery crumb topping that’s crunchy and delicious. The name “swirl” comes from the beautiful marbled effect you create when you swirl the cinnamon-spiced filling into the batter—kind of like a cinnamon roll but in cake form. I love that it’s versatile enough for breakfast, brunch, or an afternoon treat. It’s not overly sweet, making it a perfect pick-me-up, and the zucchini keeps it moist and sneaky—no one will guess there’s veggie in there! It’s a crowd-pleaser at family gatherings, and I always do this when I want a dessert that feels special but is actually super straightforward to make. Honestly, once I got the hang of swirling and baking it just right, it became my go-to recipe for impressing friends while still feeling like I’m just baking with my kids’ favorite vegetables.
Why you’ll love this recipe?
There are so many reasons why I keep coming back to this zucchini swirl coffee cake—it’s practically my culinary comfort blanket. First off, the flavor combo of sweet cinnamon, tender cake, and that slightly nutty zucchini is just divine. It’s like a breakfast and dessert all in one—what’s not to love? What I love most about this is how insanely easy it is to throw together when I’m short on time but craving something warm and homemade. No fancy equipment needed, just a simple mixing bowl and a spoon. Budget-wise, it’s fantastic because zucchini and pantry staples like flour, sugar, and cinnamon come together for a wallet-friendly treat. Plus, the versatility is what seals the deal—bake it in a big pan for a crowd or just make a smaller batch for a cozy night in. My kids ask for this all the time, especially when they know I’ve added extra cinnamon or maybe a sprinkle of streusel on top. Honestly, it’s one of those recipes that smells so good while baking, it practically calls everyone into the kitchen. It’s moist, flavorful, and (most importantly) just a little bit special. It’s become a tradition for me—baking this while the kids do their homework or while I sip coffee and daydream about spring. If you’re into quick, comforting, veggie-packed baked goods, this one’s a lifesaver on busy nights!
How do I make Zucchini Swirl Coffee Cake?
Quick Overview
This cake comes together quickly with basic mixing and swirling. Start by grating your zucchini—squeeze out excess moisture so the cake isn’t soggy. Mix together your batter with flour, sugar, eggs, and a bit of oil, then spread half of the batter in your prepared pan. Top with a cinnamon-sugar filling, swirl it through the batter, dollop the remaining batter on top, and swirl again for that gorgeous marbled look. Finish with a crumbly streusel and bake until golden. The magic here is how effortlessly the flavors come together into a tender, flavorful cake that tastes like a warm hug. The whole process from start to finish takes under an hour—perfect for those afternoons when you want something sweet but don’t want to fuss too long.
Ingredients
For the Main Batter:
– 2 cups grated zucchini (about 2 small zucchinis, peeled or unpeeled depending on preference)
– 1 ½ cups all-purpose flour (or your favorite gluten-free blend)
– 1 cup granulated sugar
– 2 large eggs
– ½ cup vegetable oil (or melted butter for richer flavor)
– 1 teaspoon vanilla extract
– 1 teaspoon baking powder
– ½ teaspoon baking soda
– ½ teaspoon salt
For the Filling:
– ½ cup light brown sugar
– 1 tablespoon ground cinnamon
– 2 tablespoons unsalted butter (melted) — I’ve tested with coconut oil too, and it’s equally delicious
– Optional: a handful of chopped nuts or a sprinkle of chopped chocolate for extra flair
For the Glaze:
– ½ cup powdered sugar
– 1-2 tablespoons milk (or almond milk)
– ½ teaspoon vanilla extract
– A pinch of cinnamon (for that extra cozy feel)
Step-by-Step Instructions
Step 1: Preheat & Prep Pan
Set your oven to 350°F (175°C). Grease a 9-inch baking pan—I’ve found that lining it with parchment paper makes cleanup a breeze. Once your pan is ready, you can start grating the zucchini. I always do this last thing before mixing because I want to get rid of excess moisture, which I do by tossing the grated zucchini in a clean towel and squeezing out as much liquid as I can. That step keeps the cake moist but not soggy, which is super important!
Step 2: Mix Dry Ingredients
In a large bowl, whisk together the flour, baking powder, baking soda, salt, and cinnamon. This step helps ensure everything is evenly distributed, giving you a nice, lift-y crumb. The smell of cinnamon and baking powder mixing together is honestly the best wake-up call ever in the kitchen.
Step 3: Mix Wet Ingredients
In another bowl, beat the eggs with sugar, vanilla, and oil until well combined. Then, fold in the grated zucchini. I’ve tested with both peeled and unpeeled zucchini, and both work fine—peeling is really personal preference. The key is to squeeze out all the moisture, so it doesn’t turn your batter into a zucchini soup.
Step 4: Combine
Pour the wet mixture into the dry ingredients and fold gently—don’t overmix. The batter should be thick but pourable. Overmixing can make the cake dense, so just fold until everything looks combined with no streaks of flour.
Step 5: Prepare Filling
In a small bowl, mix the brown sugar, cinnamon, and melted butter until crumbly. I love adding chopped nuts or a few chocolate chips here when I want a little extra texture or decadence.
Step 6: Layer & Swirl
Spread half of the batter into your prepared pan. Sprinkle the cinnamon-sugar mixture evenly over, then dollop the remaining batter on top in spoonfuls. Use a butter knife or skewer to swirl through the batter to create a marbled effect—be gentle, but don’t worry if it’s not perfect. That marbling makes each slice look as pretty as it tastes!
Step 7: Bake
Bake for 35-40 minutes, or until a toothpick inserted in the center comes out clean. I always start checking at 35 minutes because ovens can vary, and I want to avoid overbaking. If the top is turning too dark but the inside isn’t quite done, just tent it with foil and continue baking—it’s a trick I learned after a couple of burnt edges!
Step 8: Cool & Glaze
Let the cake cool in the pan for about 15 minutes before transferring it to a wire rack. This lets the structure set so it doesn’t fall apart when sliced. Mix together your glaze ingredients—add milk slowly until it’s thick but pourable. Drizzle it over the cooled cake and let it set for a few minutes. The glaze really adds a lovely sweetness and makes the cake extra inviting.
Step 9: Slice & Serve
Use a sharp serrated knife and a gentle sawing motion to cut neat slices. I love serving this warm with a dollop of whipped cream or a scoop of vanilla ice cream—trust me, the combo is heavenly. It’s also perfect just plain, especially with a cup of strong coffee or tea. Letting the cake sit a little after glazing helps the topping set, making your presentation look as pretty as it tastes. This one disappears in minutes at my house!
What to Serve It With
Honestly, this cake pairs beautifully with just about everything. For breakfast, I love pairing it with a strong espresso or a latte—there’s something about the sweet cinnamon and zucchini that wakes up your senses. If you’re serving it at brunch, serve slices alongside fresh fruit and a glass of bubbly or sparkling cider. My family likes to sprinkle a little extra cinnamon on top when I serve it warm, which makes it feel extra special. This cake also makes a lovely after-dinner dessert—just add a scoop of vanilla ice cream or a dollop of mascarpone. On cozy afternoons, I’ll cut thick slices, pop them in the microwave for a few seconds, and enjoy with a tea or coffee. It’s a versatile, crowd-pleasing treat that’s perfect for any occasion, especially when you want to sneak some veggie goodness into something sweet. It’s become a household staple, and I love that my kids feel like they’re having a treat, even if it’s secretly healthy!
Top Tips for Perfecting Your Zucchini Swirl Coffee Cake
Over the years, I’ve learned a few tricks to make this cake turn out even better every single time. First, when grating the zucchini, I always use a box grater on the medium side—finer grates blend more smoothly into the batter, but a coarser grate adds more texture if you prefer a chunkier bite. Squeeze out all the excess moisture—this is the golden rule—they say, but I’ve tested with just a quick squeeze and it makes the batter too loose, so, trust me, take that extra minute. The swirl pattern is your chance to get fancy—try zig-zags or circular swirls for visual interest. When I want to change things up, I fold in chopped nuts or semi-sweet chocolate chips into the filling or batter for extra flavor. If your oven tends to run hot or cool, adjust your baking time accordingly—mine likes a little less time, so I always keep a close eye. The glaze should be thick enough to stay put but thin enough to drizzle easily. I sometimes add a pinch of cinnamon or even a splash of bourbon vanilla to deepen the flavor. Finally, let the cake cool properly before glazing and slicing—rushing this step can cause the filling to ooze out or the slices to be uneven. Practice makes perfect, and I’ve definitely learned from a few burnt edges or underbaked centers. Trust your nose and toothpick tests—it’s the only real way to know it’s done!
Storing and Reheating Tips
This cake keeps well for several days if stored properly. If you’re planning to enjoy it within a day or two, just cover it tightly with plastic wrap or keep it in an airtight container at room temperature. It stays nicely moist, and the cinnamon flavor actually gets better with a little time. For longer storage, I recommend refrigerating—just make sure to cover it well. It will last up to a week in the fridge, and I always reheat slices in the microwave for about 15-20 seconds—a trick that keeps it soft and cozy. If you’re freezing leftovers, wrap individual slices tightly in plastic wrap and then foil; they can be frozen for up to three months. Thaw at room temperature or in the fridge before reheating. A quick zap in the microwave or warm oven will bring back that fresh-baked feeling. I usually wait to add the glaze if the cake is stored—best to do that right before serving so it stays glossy and fresh. Just a heads-up: if you’re adding fresh fruit or whipped topping, do that after reheating for the best presentation. I’ve experimented with different storage methods, and honestly, it’s so good leftover that I often sneak a slice as a late-night snack—shh, don’t tell anyone!
Frequently Asked Questions
Final Thoughts
Honestly, if you’re anything like me, this zucchini swirl coffee cake will quickly become a fixture in your baking lineup. It’s one of those recipes that’s deceptively simple but tastes like you’ve put a lot more effort into it. The combination of zucchini’s subtle earthiness, warm cinnamon, and that crunchy streusel topping is pure comfort. Plus, it’s an excellent way to sneak some veggies into a dessert—my kids never suspect, and it’s become a family favorite for brunches, lazy mornings, or even a quick sweet fix after dinner. Don’t stress if your batter looks a little uneven or if your swirl isn’t picture-perfect—mine rarely does, and no one notices because they’re too busy licking their fingers! I love experimenting with the filling and toppings—sometimes I add chopped nuts for crunch or coconut flakes for tropical flair. The best part? It’s forgiving and adaptable—once you get the hang of swirling and baking, you can tweak it endlessly. Give it a try, and I promise, your kitchen will smell like a cinnamon dream. Happy baking, and I can’t wait to hear how yours turns out!
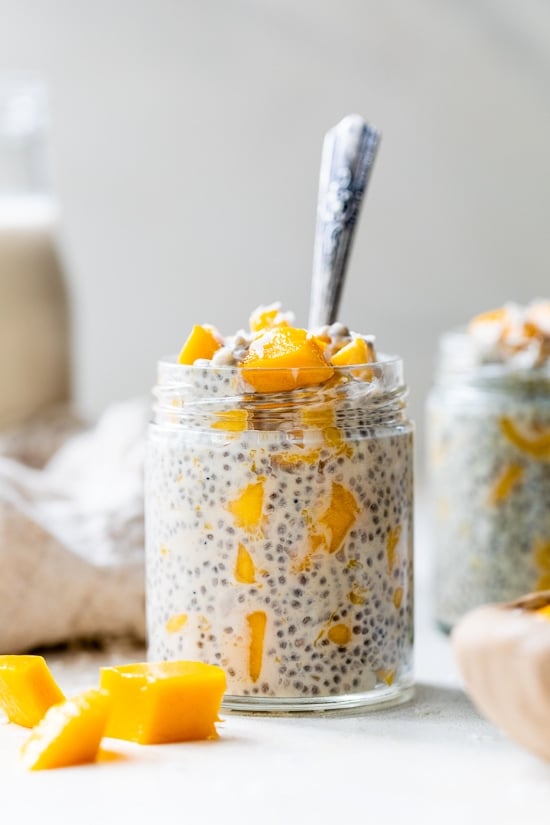
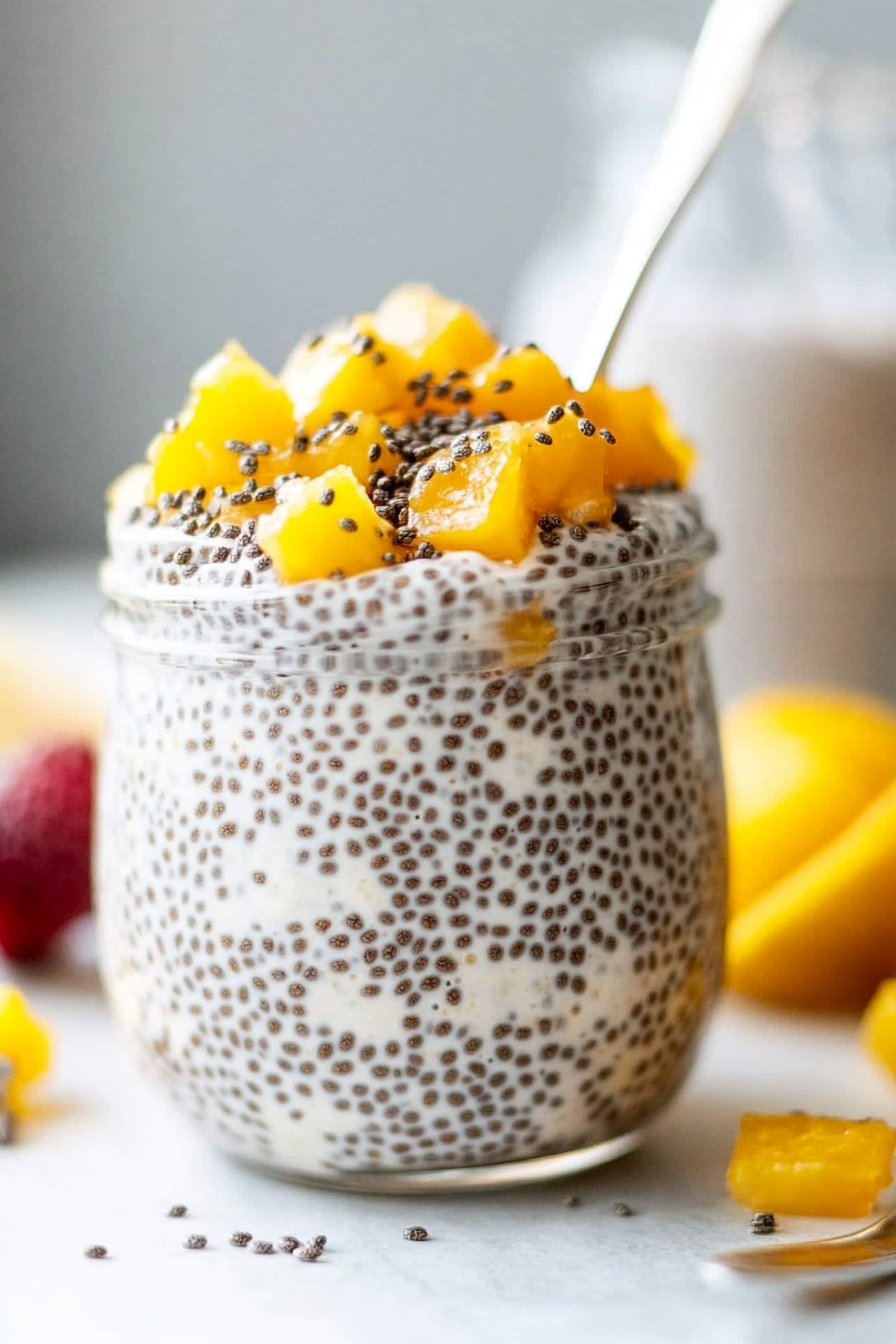
chia pudding
Ingredients
Method
- Combine coconut milk, almond milk, diced mango, chia seeds, shredded coconut, and stevia in a large container. Mix well and let sit for 30 minutes, then stir again. Refrigerate overnight or at least 5-6 hours until the seeds expand and thicken.
- Divide into serving dishes and enjoy your nutritious mango coconut chia pudding!